Pioneer AVIC-7200NEX Owner s Manual
Pioneer AVIC-7200NEX Manual
 |
View all Pioneer AVIC-7200NEX manuals
Add to My Manuals
Save this manual to your list of manuals |
Pioneer AVIC-7200NEX manual content summary:
- Pioneer AVIC-7200NEX | Owner s Manual - Page 1
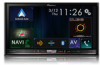
6200NEX AVIC-5200NEX MULTIMEDIA NAVIGATION RECEIVER Notice to all users: This software requires that the product is properly connected to your vehicle' s parking brake and depending on your vehicle, additional installation may be required. For more information, please contact your Authorized Pioneer - Pioneer AVIC-7200NEX | Owner s Manual - Page 2
the "Radio settings" screen............39 ■Apple CarPlay 50 Using Apple CarPlay 50 Starting procedure 50 Setting the driving position 50 Adjusting the volume 50 ■Android Auto 51 Using Android Auto 51 Starting procedure 51 Setting the auto-launch function 51 Setting the driving position - Pioneer AVIC-7200NEX | Owner s Manual - Page 3
information bar 63 Setting navigation screen interruption 63 Setting Bluetooth audio source activation.......63 Setting the ever scroll 64 Setting the beep tone 64 Setting the rear view camera 64 Setting the second camera 65 Setting the camera for Camera View mode.....65 Setting the demo mode - Pioneer AVIC-7200NEX | Owner s Manual - Page 4
first time after installation. If this product fails to operate properly. If there appears to be problems with the operation of the system. If your vehicle position is shown on the map with a signifi- cant positioning error. 1 Turn the ignition switch OFF. 2 Press the RESET button with a pen - Pioneer AVIC-7200NEX | Owner s Manual - Page 5
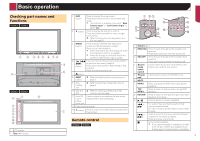
6 78 9 a b 6200NEX 5200NEX 7 9 8 2 3 4 1 5 6 c d 1 LCD screen 2 VOL (+/-) button 3 MAP button Press to display the map screen. Press and hold to switch to the camera view mode. p This function is available only when " Back Camera Input" or "2nd Camera Input" is set to "On". 4 button - Pioneer AVIC-7200NEX | Owner s Manual - Page 6
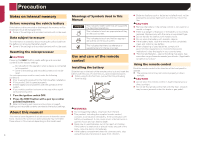
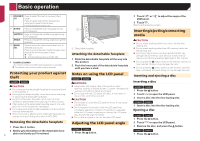
5200NEX The remote control CD-R33 (sold separately) is available. For details, refer to the remote control manual. Protecting your product against theft 6200NEX 5200NEX so after turning off the operate this product until the LCD panel has completely opened or closed. If this product is operated - Pioneer AVIC-7200NEX | Owner s Manual - Page 7
operation password for the anti- theft function if the password services right away. Refer to "Connected Services" settings on page 28 10 Touch the connected services you want to use, then touch [Next]. The initial setup is now complete. The map screen appears and you can start using the navigation - Pioneer AVIC-7200NEX | Owner s Manual - Page 8
Basic operation How to use the screens Application menu screen Time and date setting screen Setting menu screen Application operation screen Top menu screen AV operation screen Map screen Navigation menu screen Favorite source icons AV source selection screen Phone menu screen 8 - Pioneer AVIC-7200NEX | Owner s Manual - Page 9
" is replaced with "Android Auto" when Android Auto is running. p If you select "Power OFF" on the AV source selection screen, you can turn off almost all functions. The "Power OFF" mode is released in the following cases: - An incoming call is received. - The rear view camera image is input when - Pioneer AVIC-7200NEX | Owner s Manual - Page 10
the operation panel 1 Touch or . The hidden function keys appears. p This key does not appear for some AV sources. 10 How to use the Navigation menu the route currently set. Main Menu 1 (without a planned route) Displays the traffic screen. Displays useful information to support your driving. - Pioneer AVIC-7200NEX | Owner s Manual - Page 11
, or licenses can be displayed, for example. p 5200NEX The traffic features of [Traffic] can be used when the online traffic feature is available. Operating the Navigation menu screen 345 6 1 Returns to the map screen. 2 Displays notifications that contain important information. 3 Displays - Pioneer AVIC-7200NEX | Owner s Manual - Page 12
touch [Settings]. 3 Touch [Navigation Map], and then [Map Display]. 4 Touch [Viewpoint]. 5 Drag the pop-up window and touch [Manual]. 6 Press the MAP button. 7 Touch or . Smart Zoom Your navigation system features "Smart Zoom" that works in two ways: When the route is set: When approaching a turn - Pioneer AVIC-7200NEX | Owner s Manual - Page 13
Once the route guidance begins, the system provides various guides by voice, text indications and signs. Frequently shown route events The following are some examples of the maneuvers that are displayed. Icon Meaning Turn left, turn right, turn back. Go left on the traffic circle, 3rd exit - Pioneer AVIC-7200NEX | Owner s Manual - Page 14
icon to open the details of the next few exits or service stations. In addition, touch an item to show its location on the map. You can set it as a waypoint easily. Browsing the data field The data fields are different when you are navigating a route and when you have no specified destination. For - Pioneer AVIC-7200NEX | Owner s Manual - Page 15
on the search results, some steps may be skipped. 1 Press the MAP button and touch . 2 Touch [New Route]. 3 Touch [Address]. 4 Touch the following text box and set the destination you are looking for. Country: By default, your navigation system proposes the country where you are. If you want to - Pioneer AVIC-7200NEX | Owner s Manual - Page 16
services preset categories: Home and Work. p This function is available navigation system starts the route guidance. Selecting a location you searched for recently The places that were previously set as destinations or waypoints have been automatically stored in "History". History 1 Press the MAP - Pioneer AVIC-7200NEX | Owner s Manual - Page 17
as Destination], and then touch [Start Navigation]. Your navigation system starts the route guidance. Searching for a location by scrolling the map Specifying a location after scrolling the map enables you to set the position as a destination or waypoint. 1 Press the MAP button. 2 Touch and drag the - Pioneer AVIC-7200NEX | Owner s Manual - Page 18
for route calculation returns to the current position. Adding waypoints 1 Press the MAP button and touch . 2 Touch [Add Waypoint]. 3 Search for a location already set, the "My Route" screen appears. Touch [Show Route] and proceed to the next step.) 5 Touch [Start Navigation]. Your navigation system - Pioneer AVIC-7200NEX | Owner s Manual - Page 19
Places Along Route: Searches for POIs along the displayed route. Touch the POI to show the "Map Location" screen, and also set the POI as a waypoint. Simulation: You can run a simulation of the navigation for the current route, as a demonstration. Refer to Watching the simulation of the route on - Pioneer AVIC-7200NEX | Owner s Manual - Page 20
navigation menu is displayed. 3 Touch [Home] or [Work] and then touch [OK]. p When you have already stored your home or workplace, touch [Home] or [Work] to show the location on the "Map touch [Delete]. p "Home" and "Work" cannot be deleted. The location can be set again. p If you touch and then - Pioneer AVIC-7200NEX | Owner s Manual - Page 21
reports and information received. p The online function in "Traffic" can be used if you connect an iPhone or a smartphone that has the AVICSYNC App installed. Be sure read Expanding the use of the navigation functions (page 29) before using the AVICSYNC function. p 5200NEX The traffic information - Pioneer AVIC-7200NEX | Owner s Manual - Page 22
" menu The "Useful Information" menu contains various information to support your driving. p To use the online functions ("Parking", "Weather" and "Fuel Prices"), the appropriate content installation must be installed in the navigation system and a connection with an iPhone or a smartphone that - Pioneer AVIC-7200NEX | Owner s Manual - Page 23
navigation review your trip log later. p The trip logger is set so that it can be started manually by default. You can change the settings , turn on "Enable Auto-Saving". Refer to Setting the received from the GPS receiver and your vehicle is displayed like a meter for a vehicle. 1 Press the MAP - Pioneer AVIC-7200NEX | Owner s Manual - Page 24
function. Refer to "Warnings" settings on page 26 Navigation Map: Fine-tunes the appearance of the map screen and adjusts how the software helps you navigate with different kinds of route-related information on the map screen. Refer to "Navigation Map" settings on page 27 Regional: Changes - Pioneer AVIC-7200NEX | Owner s Manual - Page 25
possible to update your maps. Refer to Getting the map update on page 29 Restoring the default settings You can restore settings or recorded content to the default settings. 1 Press the MAP button and touch . 2 Touch , and then touch [Settings]. 3 Touch . 4 Touch [Reset All Settings]. 5 Touch [OK - Pioneer AVIC-7200NEX | Owner s Manual - Page 26
railroad crossings. Refer to Setting the alert point warnings on page 28 Warning Road Signs Maps may contain driver alert information. Touch this key to turn on or off these warnings and to set the distance from the hazard to receive the warning at. These can be set individually for the different - Pioneer AVIC-7200NEX | Owner s Manual - Page 27
. p 6200NEX/5200NEX This function becomes effective only when the additional map data is installed. 3D Terrain This setting shows or hides the 3D elevation of the surrounding terrain. Track Logs You can turn on or off track log saving which saves the sequence of the locations you go through on - Pioneer AVIC-7200NEX | Owner s Manual - Page 28
disable the online parking service. Online Fuel Prices You can enable or disable the online gas price service. Online Search You can enable or disable the online search service. Setting the alert point warnings Important The warning for road safety cameras (like speed cameras) is disabled when you - Pioneer AVIC-7200NEX | Owner s Manual - Page 29
and refer to "HOW TO UPDATE?" GUIDE. http://pioneer.naviextras.com Expanding the use of the navigation functions You can expand the use of the navigation functions to iPhone or smartphones if you connect an iPhone or a smartphone (Android) that has the AVICSYNC App installed. Be sure to read before - Pioneer AVIC-7200NEX | Owner s Manual - Page 30
of the USB connections, refer to the Installation Manual. 4 Press the MAP button and touch . 5 Touch on the navigation menu. 6 Touch [Associate New Phone]. 7 Touch the iPhone or smartphone (Android) that you want to associate with the navigation system and then touch [Associate]. 8 Accept the - Pioneer AVIC-7200NEX | Owner s Manual - Page 31
Displaying the "Bluetooth" screen on page 30 3 Touch [BT Software Update]. 4 Touch [Start]. Follow the on-screen instructions to finish updating the Bluetooth software. Displaying the Bluetooth software version If this product fails to operate properly, you may need to consult your dealer for repair - Pioneer AVIC-7200NEX | Owner s Manual - Page 32
lists on page 32 *2 Switches to the phone book list. Refer to Calling a number in the phone book on page 32 *3 Switches to the missed, received and dialed call lists. Refer to Dialing from the history on page 32 *4 Switches the mode to enter the phone number directly. Refer to Direct - Pioneer AVIC-7200NEX | Owner s Manual - Page 33
be disabled. Registration and connection Cellular phone operations vary depending on the type of cel- lular phone. Refer to the instruction manual that came with your cellular phone for detailed instructions. When phone book transfer does not work, disconnect your phone and then perform pairing - Pioneer AVIC-7200NEX | Owner s Manual - Page 34
setting may not be operable right after it is changed. iPod / iPhone compatibility This product supports only the following iPod / iPhone models and iPod / iPhone software versions. Others may not work refer to the information on our website. This manual applies to the following iPod / iPhone models - Pioneer AVIC-7200NEX | Owner s Manual - Page 35
and functions for each device The settings and cables required for connecting each - Connect to USB port 1 for using Apple CarPlay, Pandora or AVICSYNC App. 8200NEX/7200NEX/6200NEX When adapter - Bluetooth connection is required. - 5200NEX When connecting via the following cables: CD-IV202AV - Pioneer AVIC-7200NEX | Owner s Manual - Page 36
this product for the first time. From the next time a compatible device is connected, Android Auto cannot be used while the AVICSYNC App function is on. (*4) Turn on the AVICSYNC App function for using AVICSYNC App. (*5) Not available when the AVICSYNC App function is turned on. (*6) 5200NEX 36 - Pioneer AVIC-7200NEX | Owner s Manual - Page 37
page 37 2 Touch [Local]. 3 Touch the item. Off: Turns the seek tuning setting off. Level1 to Level4: Sets the level of sensitivity for FM to Level1 to Level4 (for AM Level1 or Level2). p The FM "Level4" (AM "Level2") setting allows you to receive the only stations with the strongest signals. 37 - Pioneer AVIC-7200NEX | Owner s Manual - Page 38
sounds like a CD. Program Service Data: Contributes to the superior user experience of HD Radio Technology. Presents song name, artist, station IDs, HD2/HD3 Channel Guide, and other relevant data streams. and the means to "tag" that content for later review and purchase from the iTunes® Store. - Pioneer AVIC-7200NEX | Owner s Manual - Page 39
the strongest broadcast frequencies The BSM (best stations memory) function automatically stores the Turns the seek tuning setting off. Level1 to Level4: Sets the level of sensitivity for FM to Level1 to Level4 (for AM Level1 or Level2). p The FM "Level4" (AM "Level2") setting allows you to receive - Pioneer AVIC-7200NEX | Owner s Manual - Page 40
order. This function is available for music CD. : Does not play tracks in random order. : Plays all tracks in random order. Audio source screen 2 Sets a repeat play range. : Repeats the current disc. : Repeats the current track. Hides the touch panel keys. To display again the keys, touch anywhere - Pioneer AVIC-7200NEX | Owner s Manual - Page 41
a Video-CD with PBC On is being played, appears. p You can set the screen size for the video image. Refer to Changing the wide screen you registered. Operating the DVD menu You can operate the DVD menu by touching the menu item on the screen directly. p This function may not work properly with - Pioneer AVIC-7200NEX | Owner s Manual - Page 42
Disc Operating the DVD menu using touch panel keys If items on the DVD menu *4 Skips files forward or backward. Switches between playback and pause. Switches the current music information display. Sets a repeat play range. or : Repeats all files. : Repeats the current folder. or : Repeats - Pioneer AVIC-7200NEX | Owner s Manual - Page 43
source screen (Example: Disc) Video source screen (Example: Disc) *3 *5 Sets a repeat play range. or : Repeats all files. : Repeats the current 90° clockwise. Selects the previous or next folder. Still image screen *3 Sets a repeat play range. : Repeats all files. : Repeats the current folder - Pioneer AVIC-7200NEX | Owner s Manual - Page 44
SD source is not available. Refer to Supported AV source on page 9 p By pressing the a disc on page 6 p If the disc is already set, select [Disc] as the playing source. Starting procedure ( are skipped if they contain no playable files. Operations common to all file types Selecting files from - Pioneer AVIC-7200NEX | Owner s Manual - Page 45
. : Changes the audio language. p You can specify the desired language as the default subtitle/ audio languages. Refer to Setting the top-priority languages on page 72 Still image file operations Setting the slideshow interval JPEG files can be viewed as a slideshow on this product. In this - Pioneer AVIC-7200NEX | Owner s Manual - Page 46
fast reverse or fast forward. - This function is not available while playing Apple Music Radio. p You can set the screen size for the video image. Refer to Changing the wide screen mode on page 74 p is produced in the video image of the iPod, turn off the output setting of the rear display. - Pioneer AVIC-7200NEX | Owner s Manual - Page 47
even if the ignition key is turned off. Operate the iPod to turn off the power. 1 Touch . 2 Operate the connected iPod to select a video or song and play. p Some functions are still accessible from this product even if the control mode is set to "App Mode". However, the operation will depend on your - Pioneer AVIC-7200NEX | Owner s Manual - Page 48
Compatibility p 5200NEX AppRadio Mode PIONEER IS NOT RESPONSIBLE AND DISCLAIMS LIABILITY FOR THIRD PARTY (NON-PIONEER operate the application. Starting procedure When connecting an iPhone or a smartphone to this product, select the method for connecting your device. Settings the Installation Manual. 2 - Pioneer AVIC-7200NEX | Owner s Manual - Page 49
Android) users) 8200NEX 7200NEX 6200NEX Black dots may appear on the screen when using AppRadio Mode with an Android device connected to this product. p This setting is set to on, the voice guidance of the navigation system is not output. To output the voice guidance of the navigation system, set the - Pioneer AVIC-7200NEX | Owner s Manual - Page 50
. p The route guidance by the internal navigation system will stop automatically if the route guidance function in Apple CarPlay is launched. Setting the driving position To achieve optimum usability of Apple CarPlay, set the driving position setting correctly according to the vehicle. The default - Pioneer AVIC-7200NEX | Owner s Manual - Page 51
established. Refer to Setting the auto-launch function on page 51 1 Connect an Android Auto-compatible device to this product via USB. Refer to the Installation Manual. 2 Press the button. 3 Touch [Android Auto]. A Bluetooth connection with the Android Auto-compatible device will automatically - Pioneer AVIC-7200NEX | Owner s Manual - Page 52
Android Auto™ Pandora® p You cannot adjust the volume of the main sound on the screen. a key. Preset stations can be stored for each user (up to 10 users). If the preset stations for 10 users are already stored, the preset stations for the user who has not accessed their preset stations for the - Pioneer AVIC-7200NEX | Owner s Manual - Page 53
an iPhone or a smartphone that has the Pandora application installed. Important Requirements to access Pandora using Pioneer car audio/ video Refer to Setup for iPod / iPhone or smartphone on page 34 Please update the firmware of the Pandora application to the latest version before use - Pioneer AVIC-7200NEX | Owner s Manual - Page 54
2 - A2DP and AVRCP (Audio/Video Remote Control Profile): Playing back, pausing, selecting audio player connected to this product, the available operations with this product may be limited to the Touch [AV Source Settings]. 4 Confirm that "Bluetooth Audio" is turned on. 5 Display the AV - Pioneer AVIC-7200NEX | Owner s Manual - Page 55
Performs manual tuning. to Checking the update traffic and weather Channel 0 is selected. SiriusXM tuner operations Only SiriusXM® brings you more of including commercial-free music plus the best sports, news, talk, comedy install the SiriusXM Connect Vehicle Tuner, consult the installation guide - Pioneer AVIC-7200NEX | Owner s Manual - Page 56
will send an activation message to your tuner. When the tuner has received the message, "Subscription Updated" is displayed. p The activation process usually takes 10 to 15 minutes but may take longer. Do not turn off this product while the activation message is displayed. Selecting a channel from - Pioneer AVIC-7200NEX | Owner s Manual - Page 57
. If you want to remove all the teams you have set, touch the [Clear All]. Setting of priorities If you set numerous favorite teams, you can receive alerts for up to five favorite teams in the order in which data are received. You can set the order of priority for up to five teams, if more - Pioneer AVIC-7200NEX | Owner s Manual - Page 58
turn off the engine while restoring the settings. 1 Display the "SiriusXM Settings" screen. Refer to Displaying the "SiriusXM Settings" screen on page 56 2 Touch [SiriusXM Reset]. 3 Touch [Restore]. p The source is turned . Refer to the Installation Manual. p You can set the screen size for the - Pioneer AVIC-7200NEX | Owner s Manual - Page 59
input. Refer to the Installation Manual. 1 Display the "System" setting screen. 2 Touch [Input/Output Settings]. 3 Touch [AV Input]. 4 Touch [Source]. p If "Source" is selected, "2nd Camera Input" is automatically set to "Off". Refer to Setting the second camera activation on page 65 5 Display - Pioneer AVIC-7200NEX | Owner s Manual - Page 60
6 Touch [AV]. Starting procedure (for camera) You can display the image output by the camera connected to video input. Refer to the Installation Manual. 1 Display the "System" setting screen. 3 Touch [AV]. 4 Touch the item. The following items are available: Auto, PAL, NTSC, PAL-M, PAL-N, SECAM - Pioneer AVIC-7200NEX | Owner s Manual - Page 61
left of the item or song that you do not want to play. Displaying the "MIXTRAX Settings" screen 1 Display the "System" setting screen. 2 Touch [AV Source Settings]. 3 Touch [MIXTRAX Settings]. Setting the flash pattern The flashing color changes with the changes in the sound and bass levels. The - Pioneer AVIC-7200NEX | Owner s Manual - Page 62
installing the iDatalink adapter, refer to the install guide of the iDatalink adapter. After installing the iDatalink adapter, be sure to check the operations . For troubleshooting information about iDatalink functions, visit the following website. http://maestro.idatalink.com/support Limitations: - Pioneer AVIC-7200NEX | Owner s Manual - Page 63
information of the navigation on the AV operation screen. 1 Display the "System" setting screen. Refer to Displaying the "System" setting screen on page 63 2 Touch [Navigation Related Settings]. 3 Touch [Navigation info window] to switch "On" or "Off". Setting navigation screen interruption You - Pioneer AVIC-7200NEX | Owner s Manual - Page 64
[Camera settings]. 3 Touch [Parking Assist Guide] to switch "On" or "Off". Adjusting the parking assist guidelines CAUTION When adjusting the guidelines, be sure to park the vehicle in a safe place and apply the parking brake. Before getting out of the car to place the markings, be sure to turn - Pioneer AVIC-7200NEX | Owner s Manual - Page 65
Touch [Camera settings]. 5 Touch [Parking Assist Guide Adjust]. 6 Set the guidelines by dragging the four points. Adjust the guidelines so that the guidelines can be overlaid to the markings p Touch / / / / / to adjust the guidelines if necessary. Touch [Default] to reset the settings. Setting the - Pioneer AVIC-7200NEX | Owner s Manual - Page 66
screen. Refer to Displaying the "System" setting screen on page 63 2 Touch [Dimmer Settings]. 3 Touch [Dimmer Trigger]. 4 Touch the item. Auto: Switches the dimmer to on or off automatically according to your vehicle's headlight turning on or off. Manual: Switches the dimmer to on or off - Pioneer AVIC-7200NEX | Owner s Manual - Page 67
screen. Refer to Displaying the "System" setting screen on page 63 6 Touch [System Information]. 7 Touch [Firmware Update]. 8 Touch [Continue] to display the data transfer mode. Follow the on-screen instructions to finish updating the firmware. p If an error message appears on the screen, touch - Pioneer AVIC-7200NEX | Owner s Manual - Page 68
navigation outputs the guidance voice. The default setting is "ATT". 1 Display the "Audio" setting screen. Refer to Displaying the "Audio" setting can be turned on or off. The default setting is "On". 1 Display the "Audio" setting screen. Refer to Displaying the "Audio" setting screen on page - Pioneer AVIC-7200NEX | Owner s Manual - Page 69
manually only when the listen- ing position setting is set to "Front-L" or "Front-R". p If the Auto EQ measurement has been done, the result of the Auto EQ measurement will be applied by touching [Apply Auto microphone in the specified location. Before operating the Auto EQ function Perform Auto - Pioneer AVIC-7200NEX | Owner s Manual - Page 70
. 8200NEX 7200NEX Plug the microphone into the auto EQ microphone input jack on this product. Refer to Checking part names and functions on page 5 6200NEX 5200NEX Plug the microphone into the AUX input jack on the back panel of this product. Refer to the Installation Manual. p Use an extension - Pioneer AVIC-7200NEX | Owner s Manual - Page 71
on the external storage device CAUTION Do not turn off the engine while importing an image from the operation screen by touching [Home] or [AV] respectively. Selecting the style of the clock 1 Display the "Theme" screen. Refer to Displaying the "Theme" setting screen on page 71 2 Touch [Clock - Pioneer AVIC-7200NEX | Owner s Manual - Page 72
external storage device. CAUTION Do not turn off the engine while exporting or importing the settings. p If multiple external storage devices device (USB port 2) 6200NEX 5200NEX 1 USB storage device (USB port 1) 2 USB storage device (USB port 2) p This setting is available only when you stop - Pioneer AVIC-7200NEX | Owner s Manual - Page 73
function is not fully operable, turn this function off and start playback. 1 Display the "DVD/DivX Setup" screen Refer to Displaying the "DVD/DivX Setup" screen on page 72 2 Touch [DVD Auto Play] to switch "On" or "Off". Setting the video signal for the rear view camera When you connect a rear - Pioneer AVIC-7200NEX | Owner s Manual - Page 74
registered in the favorite menu. Creating a shortcut 1 Display the setting menu screen. 2 Touch the star icon of the menu item song information to the iPod when this product receives song information. The songs will appear in synchronize your iPod. You can directly buy the songs via iTunes. p The - Pioneer AVIC-7200NEX | Owner s Manual - Page 75
anti-theft function You can set a password for this product. If the back-up lead is cut after the password is set, this product prompts for the password at the time of next boot up. Important If you forgot your password, contact the nearest authorized Pioneer Service Station. 1 Display the "System - Pioneer AVIC-7200NEX | Owner s Manual - Page 76
to initialize. All Settings Almost all settings or recorded content returns to the default. Audio Settings p This setting is available when the source is turned off. Theme Settings Bluetooth Settings 5 Touch [Restore]. 76 Troubleshooting If you have problems operating this product, refer to - Pioneer AVIC-7200NEX | Owner s Manual - Page 77
any unneces- sary services on the smartphone. The status of the vehicle for the forward and backward directions are reversed. Since part of the vehicle status is sent to the connected device when you use the Android Auto function, this problem occurs when the reverse gear polarity setting of this - Pioneer AVIC-7200NEX | Owner s Manual - Page 78
your device and update the application and use it. Turn the ignition switch Pioneer service center for assistance. No Signal The SiriusXM Connect Vehicle Tuner is having difficulty receiving Perform the operation with another preset mechanical error. - Press the RESET button. Different Region Disc - Pioneer AVIC-7200NEX | Owner s Manual - Page 79
device (USB, SD) instructions to disable security. damaged. Audio Format not supported This type of file is not supported on this product. - reset it. Error-02-67 The iPod firmware version is old. - Update the iPod version. iTunes tagging Error-8D Built-in FLASH ROM encountered an error. - Turn - Pioneer AVIC-7200NEX | Owner s Manual - Page 80
above action, please contact your dealer or an authorized Pioneer Service Station. Bluetooth pairing failed. Please pair your Android phone manually. The Bluetooth pairing failed for some reasons. - Pair this product with the device manually. Android Auto cannot connect right now. When it is safe - Pioneer AVIC-7200NEX | Owner s Manual - Page 81
dead reckoning work together? For maximum accuracy, your navigation system continually map matching. However, in some situations, these functions may not work properly, and the error may become bigger. When positioning by GPS is impossible GPS positioning is disabled if signals cannot be received - Pioneer AVIC-7200NEX | Owner s Manual - Page 82
hairpin bends. If you are driving on a long, straight road or a gently curving road. If you take a recently opened road that is not on the map. If there is a loop or similar road configuration. 82 If you are on a steep mountain road with many height changes. - Pioneer AVIC-7200NEX | Owner s Manual - Page 83
or change your tires for ones with a different size. If you join the road after driving around a large parking lot. If your vehicle is turned on a turntable or similar structure. If trees or other obstacles block the GPS signals for a considerable period. When you drive around a traffic - Pioneer AVIC-7200NEX | Owner s Manual - Page 84
. In such cases, you are instructed to turn around, so please turn around safely by following the actual Auto reroute function If you deviate from the set route, the system will re-calculate the route from that point so that you remain on track to the destination. This function may not work - Pioneer AVIC-7200NEX | Owner s Manual - Page 85
the disc. Serious scratches can lead to playback problems on this product. In some cases, a DualDisc recording device, writing software, their settings, and other environmental factors. (USB, SD) with complex folder hierarchies. Operations may vary depending on the kind of an external storage - Pioneer AVIC-7200NEX | Owner s Manual - Page 86
the application used to encode the files. This product may not operate correctly, depending on the application used to encode WMA files. Depending SD): 7.5 h (450 minutes) This product assigns folder numbers. The user cannot assign folder numbers. CD-R/-RW File system: ISO9660 level 1.ISO9660 level - Pioneer AVIC-7200NEX | Owner s Manual - Page 87
If a file contains more than 4 GB, playback stops before the end. Some special operations may be prohibited because of the composition of DivX files. Files with high transfer rates of such marks by PIONEER CORPORATION is under license. Other trademarks and trade names are those of their respective - Pioneer AVIC-7200NEX | Owner s Manual - Page 88
OF SUBSTITUTE GOODS OR SERVICES; LOSS OF USE, DATA Android™ Google, Google Play and Android are trademarks of Google Inc. Android Auto Android Auto is a trademark of Google Inc. MIXTRAX MIXTRAX is a trademark of PIONEER For details, refer to the iPod manuals. iPhone and iPod "Made for iPod" - Pioneer AVIC-7200NEX | Owner s Manual - Page 89
or service by its provider. Pioneer is not liable for any issues that may arise from incorrect or flawed app-based content. The content and functionality of the supported applications are the responsibility of the App providers. In AppRadio Mode, Apple CarPlay and Android Auto, functionality - Pioneer AVIC-7200NEX | Owner s Manual - Page 90
pioneer.com/car/multimedia/ Map coverage For details about the map anything besides your finger when operating the touch panel functions. the LCD screen, first turn this product off and 5200NEX NAND flash memory 8 GB Navigation GPS receiver: System L1, C/Acode GPS SPS (Standard Positioning Service - Pioneer AVIC-7200NEX | Owner s Manual - Page 91
display area: 156.6 mm × 81.6 mm) (6-1/8 in. × 3-1/4 in.) 6200NEX/5200NEX Screen size/aspect ratio... 6.2 inch wide/16:9 (effective display area: 136.2 mm , mpeg MPEG-4 Part2 (Visual), MS MPEG-4 Ver.3: avi USB USB standard spec USB 1.1, USB 2.0 High speed Max current supply 1.6 A USB Class MSC - Pioneer AVIC-7200NEX | Owner s Manual - Page 92
To keep up to date with the latest navigational data, you can periodically update your navigation system. For further details, please visit: http://pioneer.naviextras.com © 2016 PIONEER CORPORATION. All rights reserved. < KOKZ15L > PIONEER CORPORATION 1-1, Shin-ogura, Saiwai-ku, Kawasaki-shi,
-
 1
1 -
 2
2 -
 3
3 -
 4
4 -
 5
5 -
 6
6 -
 7
7 -
8
-
9
-
10
-
11
-
12
-
13
-
14
-
15
-
16
-
17
-
18
-
19
-
20
-
21
-
22
-
23
-
24
-
25
-
26
-
27
-
28
-
29
-
30
-
31
-
32
-
33
-
34
-
35
-
36
-
37
-
38
-
39
-
40
-
41
-
42
-
43
-
44
-
45
-
46
-
47
-
48
-
49
-
50
-
51
-
52
-
53
-
54
-
55
-
56
-
57
-
58
-
59
-
60
-
61
-
62
-
63
-
64
-
65
-
66
-
67
-
68
-
69
-
70
-
71
-
72
-
73
-
74
-
75
-
76
-
77
-
78
-
79
-
80
-
81
-
82
-
83
-
84
-
85
-
86
-
87
-
88
-
89
-
90
-
91
-
92
 |
 |
Operation Manual
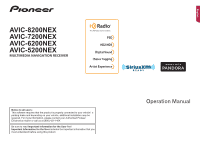
AVIC-8200NEX
AVIC-7200NEX
AVIC-6200NEX
AVIC-5200NEX
MULTIMEDIA NAVIGATION RECEIVER
Notice to all users:
This software requires that the product is properly connected to your vehicle’
s
parking brake and depending on your vehicle, additional installation may be
required. For more information, please contact your Authorized Pioneer
Electronics retailer or call us at (800) 421-1404.
Be sure to read
Important Information for the User
first!
Important Information for the User
includes the important information that you
must understand before using this product.
English