Pioneer AVIC-7200NEX Owner s Manual - Page 32
Hands-free phoning
 |
View all Pioneer AVIC-7200NEX manuals
Add to My Manuals
Save this manual to your list of manuals |
Page 32 highlights
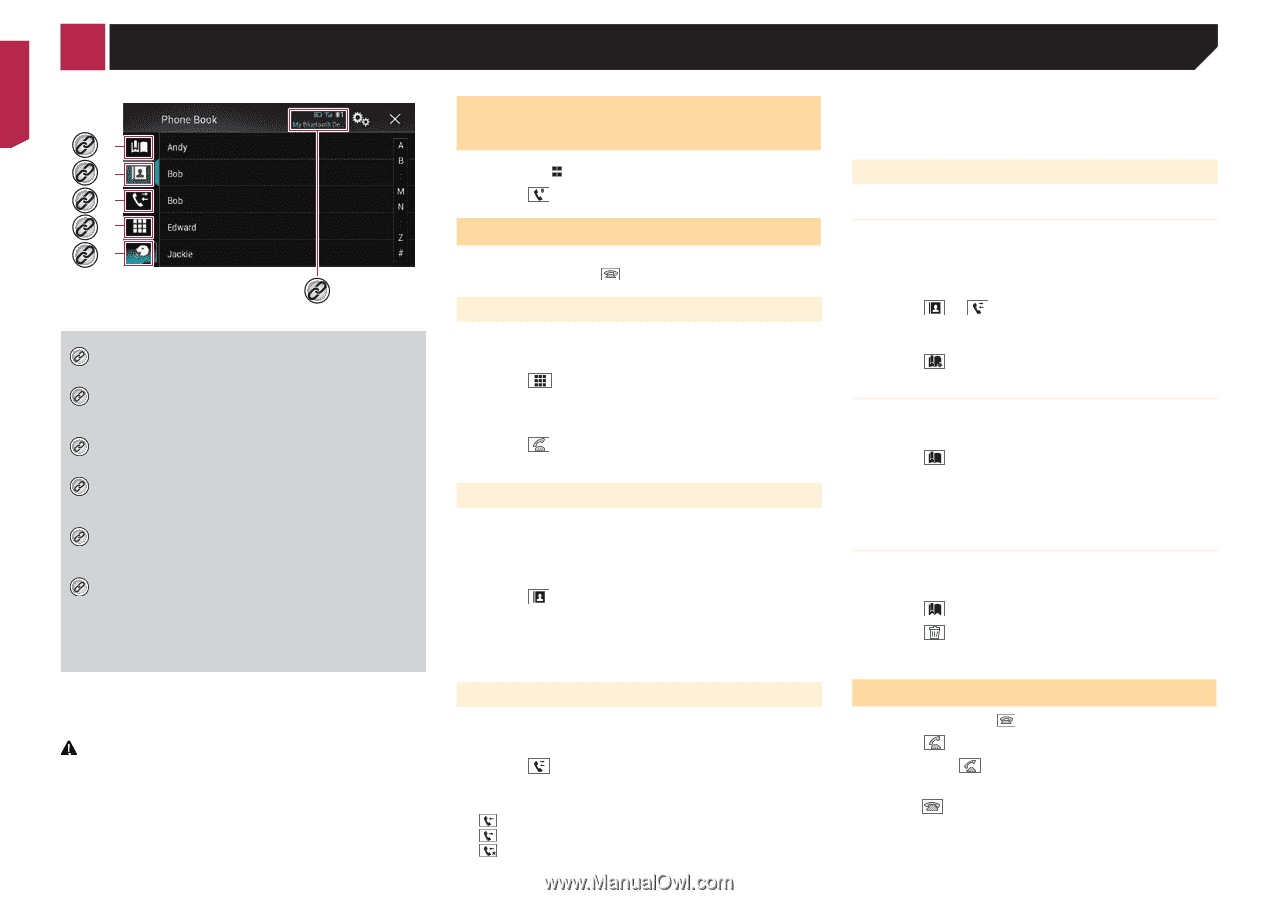
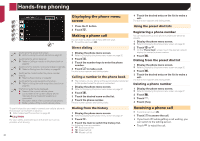
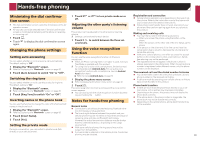
Hands-free phoning *1 *2 *3 *4 *5 *6 *1 Switches to the preset dial screen. Refer to Using the preset dial lists on page 32 *2 Switches to the phone book list. Refer to Calling a number in the phone book on page 32 *3 Switches to the missed, received and dialed call lists. Refer to Dialing from the history on page 32 *4 Switches the mode to enter the phone number directly. Refer to Direct dialing on page 32 *5 Switches to the voice recognition function. Refer to Using the voice recognition function on page 33 *6 The following items are displayed. Name of the current cellular phone List number of the current cellular phone Indicates that a Bluetooth telephone is connected. Reception status of the current cellular phone Battery status of the current cellular phone To use this function you need to connect your cellular phone to this product via Bluetooth in advance. Refer to Bluetooth® connection on page 30 CAUTION For your safety, avoid talking on the phone as much as possible while driving. 32 Displaying the phone menu screen 1 Press the button. 2 Touch . Making a phone call You can make a phone call in many different ways. p To end the call, touch . Direct dialing 1 Display the phone menu screen. Refer to Displaying the phone menu screen on page 32 2 Touch . 3 Touch the number keys to enter the phone number. 4 Touch to make a call. The dial screen appears and dialing starts. Calling a number in the phone book p The contacts on your phone will be automatically transferred to this product when the phone is connected. 1 Display the phone menu screen. Refer to Displaying the phone menu screen on page 32 2 Touch . 3 Touch the desired name on the list. 4 Touch the phone number. The dial screen appears and dialing starts. Dialing from the history 1 Display the phone menu screen. Refer to Displaying the phone menu screen on page 32 2 Touch . 3 Touch the item to switch the history list. The following items are available: : Received call list : Dialed call list : Missed call list 4 Touch the desired entry on the list to make a call. The dial screen appears and dialing starts. Using the preset dial lists Registering a phone number You can easily store up to six phone numbers per device as presets. 1 Display the phone menu screen. Refer to Displaying the phone menu screen on page 32 2 Touch or . p On the "Phone Book" screen, touch the desired name to display the contact's phone number. 3 Touch . Dialing from the preset dial list 1 Display the phone menu screen. Refer to Displaying the phone menu screen on page 32 2 Touch . 3 Touch the desired entry on the list to make a call. The dial screen appears and dialing starts. Deleting a phone number 1 Display the phone menu screen. Refer to Displaying the phone menu screen on page 32 2 Touch . 3 Touch . 4 Touch [Yes]. Receiving a phone call p To end the call, touch . 1 Touch to answer the call. If you touch while getting a call waiting, you can switch to the talking person. Touch to reject the call.
-
 1
1 -
2
-
3
-
4
-
5
-
6
-
7
-
8
-
9
-
10
-
11
-
12
-
13
-
14
-
15
-
16
-
17
-
18
-
19
-
20
-
21
-
22
-
23
-
24
-
25
-
26
-
 27
27 -
 28
28 -
 29
29 -
 30
30 -
 31
31 -
 32
32 -
 33
33 -
 34
34 -
 35
35 -
 36
36 -
 37
37 -
38
-
39
-
40
-
41
-
42
-
43
-
44
-
45
-
46
-
47
-
48
-
49
-
50
-
51
-
52
-
53
-
54
-
55
-
56
-
57
-
58
-
59
-
60
-
61
-
62
-
63
-
64
-
65
-
66
-
67
-
68
-
69
-
70
-
71
-
72
-
73
-
74
-
75
-
76
-
77
-
78
-
79
-
80
-
81
-
82
-
83
-
84
-
85
-
86
-
87
-
88
-
89
-
90
-
91
-
92
 |
 |