Pioneer AVIC-7200NEX Owner s Manual - Page 16
Selecting a destination from, stored locations, stored routes, Selecting a location you, searched
 |
View all Pioneer AVIC-7200NEX manuals
Add to My Manuals
Save this manual to your list of manuals |
Page 16 highlights
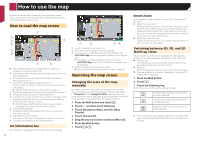
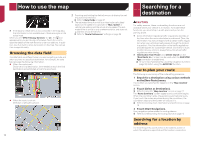
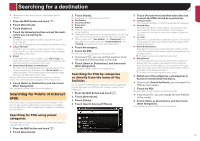
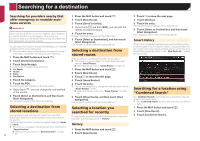
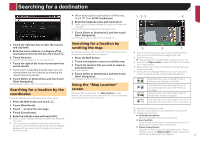
Searching for a destination Searching for providers nearby that offer emergency or roadside assistance services Important Never use this product to route to hospitals, police stations or similar facilities in an emergency. Stop using any functions relating to the hands-free phoning and please call the appropriate emergency number. You can search for locations that provide emergency or roadside assistance in the surrounding areas. p This information does not necessarily correspond to actual information. Utilize the information for your reference. 1 Press the MAP button and touch . 2 Touch [Useful Information]. 3 Touch [Help Nearby]. The preset search categories are as follows. Car Repair Health Police Gas Station 4 Touch the category. 5 Touch the POI. The searched location appears on the map screen. If you touch , you can change the sort method of the results. 6 Touch [Select as Destination], and then touch [Start Navigation]. Your navigation system starts the route guidance. Selecting a destination from stored locations Storing locations you visit frequently saves time and effort. Selecting an item from the list provides an easy way to specify the position. The list of saved locations contains two preset categories: Home and Work. p This function is available if locations have been registered in "Saved Location". Refer to Storing a location in "Saved Location" on page 16 20 1 Press the MAP button and touch . 2 Touch [New Route]. 3 Touch [Saved Location]. If you touch and then [Edit], you can edit the details of saved locations. 4 Touch the entry. The searched location appears on the map screen. 5 Touch [Select as Destination], and then touch [Start Navigation]. Your navigation system starts the route guidance. Selecting a destination from stored routes Storing routes you use frequently saves time and effort. p This function is not available if no routes have been regis- tered in "Saved Routes". Refer to Storing a route in "Saved Routes" on page 20 1 Press the MAP button and touch . 2 Touch [New Route]. 3 Touch to show the next page. 4 Touch [Saved Routes]. 5 Touch the entry. p You can add waypoints or change the final destination on the "Route Planner" screen. Refer to Building a route using "Route Planner" on page 18 6 Touch [Show Route], and then touch [Start Navigation]. Your navigation system starts the route guidance. Selecting a location you searched for recently The places that were previously set as destinations or waypoints have been automatically stored in "History". History 1 Press the MAP button and touch . 2 Touch [New Route]. 3 Touch to show the next page. 4 Touch [History]. 5 Touch the entry. The searched location appears on the map screen. 6 Touch [Select as Destination], and then touch [Start Navigation]. Your navigation system starts the route guidance. Smart History Smart History suggests these previously used locations as destinations based on your navigation habits, using parameters like the current time of day, the day of week, and the current location. Smart History items are shown in the "New Route to..." screen for easy access. Searching for a location using "Combined Search" The "Combined Search" feature lets you quickly find a place by its name and search area. p The "Combined Search" function also searches your stored data. 1 Press the MAP button and touch . 2 Touch [New Route]. 3 Touch [Combined Search].
-
 1
1 -
2
-
3
-
4
-
5
-
6
-
7
-
8
-
9
-
10
-
 11
11 -
 12
12 -
 13
13 -
 14
14 -
 15
15 -
 16
16 -
 17
17 -
 18
18 -
 19
19 -
 20
20 -
 21
21 -
22
-
23
-
24
-
25
-
26
-
27
-
28
-
29
-
30
-
31
-
32
-
33
-
34
-
35
-
36
-
37
-
38
-
39
-
40
-
41
-
42
-
43
-
44
-
45
-
46
-
47
-
48
-
49
-
50
-
51
-
52
-
53
-
54
-
55
-
56
-
57
-
58
-
59
-
60
-
61
-
62
-
63
-
64
-
65
-
66
-
67
-
68
-
69
-
70
-
71
-
72
-
73
-
74
-
75
-
76
-
77
-
78
-
79
-
80
-
81
-
82
-
83
-
84
-
85
-
86
-
87
-
88
-
89
-
90
-
91
-
92
 |
 |