Pioneer AVIC-7200NEX Owner s Manual - Page 75
Other functions
 |
View all Pioneer AVIC-7200NEX manuals
Add to My Manuals
Save this manual to your list of manuals |
Page 75 highlights
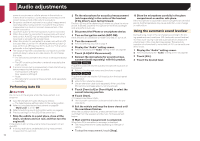
Other functions p (*1) 5200NEX p (*2) 8200NEX/7200NEX/6200NEX Setting the password 1 Display the "System" setting screen. Refer to Displaying the "System" setting screen on page 63 2 Touch [AV Source Settings]. 3 Touch [Tag Forwarding] to select the USB port you use. 4 Tune into the broadcast station. Radio (*1) Refer to Radio on page 37 HD Radio(*2) Refer to HD Radio™ on page 38 SiriusXM Refer to SiriusXM® Satellite Radio on page 55 5 Touch the song information. HD Radio(*2) The song title or artist name SiriusXM The artist name, song title, category name or content text The information on the song on air is stored in this product. When the information is acquired, turns off and is displayed. p The song information for up to 50 songs can be stored in this product. 6 Connect your iPod. The song information is transferred to your iPod. p When your iPod is already connected, the song information will be transferred directly to your iPod every time you touch the song information. Selecting the video for the rear display You can choose either to show the same image as the front screen or to show the selected source on the rear display. p Video files on the external storage device are not available as a source for the rear display when [Apple CarPlay] is activated in [Smartphone Setup]. 8200NEX/7200NEX p Video files on the external storage device are not available as a source for the rear display when [Android Auto] is activated in [Smartphone Setup]. 1 Display the AV source selection screen. 2 Touch [Rear]. 3 Touch the source you want to show on the rear display. Mirror The video on the front screen of this product is output to the rear display. - Not all videos or sounds can be output to the rear display. DVD/CD The video and sound of a disc are output to the rear display. - Compatible video types are DVD-V, Video-CD, DivX, MPEG1, MPEG-2, and MPEG-4 only. USB/iPod1 The video and sound of the USB storage device or iPod are output to the rear display. - The port that supports the rear display will only be USB port 1. - Compatible file types are MPEG-4, H.264, WMV, MKV, and FLV only. SD (*1) The video and sound of the SD memory cards are output to the rear display. - Compatible file types are MPEG-4, H.264, WMV, MKV, and FLV only. AV The video and/or sound of the AV input source are output to the rear display. - The video image and sound are output only when "AV Input" is set to "Source". Refer to Starting procedure (for AV source) on page 59. Source OFF Nothing is output to the rear display. p (*1) 8200NEX/7200NEX Setting the anti-theft function You can set a password for this product. If the back-up lead is cut after the password is set, this product prompts for the password at the time of next boot up. Important If you forgot your password, contact the nearest authorized Pioneer Service Station. 1 Display the "System" setting screen. Refer to Displaying the "System" setting screen on page 63 2 Touch 1 , followed by 2 , and then touch and hold 3 . 123 3 Touch [Set Password]. 4 Enter the password. p 5 to 16 characters can be entered for a password. 5 Touch [Go]. 6 Enter a password hint. p Up to 40 characters can be entered for a hint. 7 Touch [Go]. p If you want to change the password currently set, enter the current password and then enter the new one. 8 Check the password, and then touch [OK]. Deleting the password The current password and password hint can be deleted. 1 Display the "System" setting screen. Refer to Displaying the "System" setting screen on page 63 2 Touch 1 , followed by 2 , and then touch and hold 3 . Refer to Setting the password on page 75. 3 Touch [Clear Password]. 75
-
 1
1 -
2
-
3
-
4
-
5
-
6
-
7
-
8
-
9
-
10
-
11
-
12
-
13
-
14
-
15
-
16
-
17
-
18
-
19
-
20
-
21
-
22
-
23
-
24
-
25
-
26
-
27
-
28
-
29
-
30
-
31
-
32
-
33
-
34
-
35
-
36
-
37
-
38
-
39
-
40
-
41
-
42
-
43
-
44
-
45
-
46
-
47
-
48
-
49
-
50
-
51
-
52
-
53
-
54
-
55
-
56
-
57
-
58
-
59
-
60
-
61
-
62
-
63
-
64
-
65
-
66
-
67
-
68
-
69
-
 70
70 -
 71
71 -
 72
72 -
 73
73 -
 74
74 -
 75
75 -
 76
76 -
 77
77 -
 78
78 -
 79
79 -
 80
80 -
81
-
82
-
83
-
84
-
85
-
86
-
87
-
88
-
89
-
90
-
91
-
92
 |
 |