Pioneer AVIC-7200NEX Owner s Manual - Page 5
Basic operation - remote
 |
View all Pioneer AVIC-7200NEX manuals
Add to My Manuals
Save this manual to your list of manuals |
Page 5 highlights
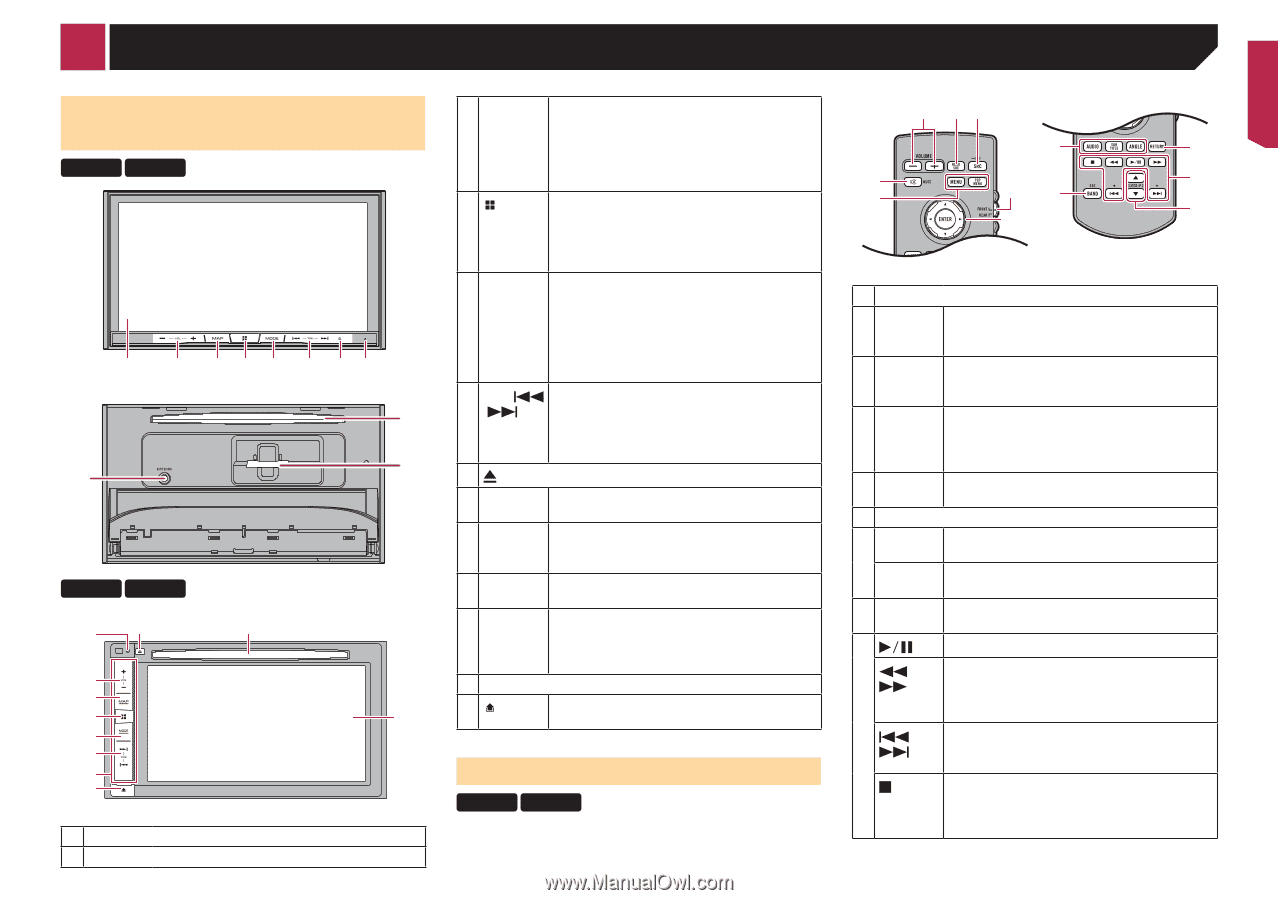
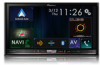
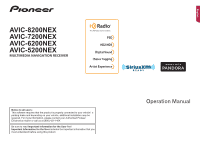
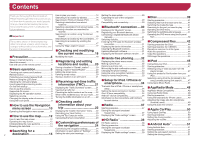
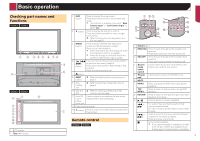
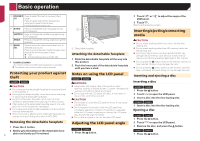
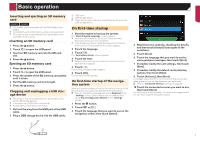
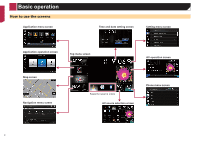
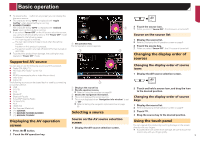
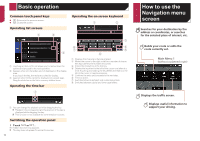
Basic operation Checking part names and functions 8200NEX 7200NEX 1 2 3 4 5 6 78 9 a b 6200NEX 5200NEX 7 9 8 2 3 4 1 5 6 c d 1 LCD screen 2 VOL (+/-) button 3 MAP button Press to display the map screen. Press and hold to switch to the camera view mode. p This function is available only when " Back Camera Input" or "2nd Camera Input" is set to "On". 4 button Press to display the top menu screen. Press and hold to activate the voice recogni- tion function. Refer to Using the voice recognition func- tion on page 33 5 MODE button Press to switch between the Application screen and the AV operation screen. Press to turn the display off. p Press and hold to turn the display off when the Application screen is available. p When the display is turned off, touch the screen to revert to the original screen. 6 TRK ( /) button Press to return to the previous track (chapter) or go to the next track (chapter). Press and hold to perform fast reverse or fast forward. Press to answer or end a call. 7 button 8 RESET button Refer to Resetting the microprocessor on page 4 9 Discloading slot Refer to Inserting and ejecting a disc on page 6 10 SD card Refer to Inserting and ejecting an SD slot memory card on page 7 11 Auto EQ microphone input jack Use to connect a microphone for acoustical measurement (sold separately). 12 Detachable faceplate 13 button Press to remove the detachable faceplate from this product. Remote control 8200NEX 6200NEX 1 23 b 8 6 7 4c 9 a 5 1 Volume (+/-) 2 REAR SRC Press to cycle through all the available rear sources. Press and hold to turn the rear source off. 3 SRC/OFF Press to cycle through all the available front sources. Press and hold to turn the front source off. 4 Source mode select switch Use to switch the source mode between the front source and the rear source. 5 Thumb Use to select a menu on the DVD menu. pad 6 MUTE 7 MENU Press to display the DVD menu during DVD playback. TOP MENU Press to return to the top menu during DVD playback. 8 RETURN Press to return to the specified point and start playback from there. 9 Press to pause or resume playback. or For audio: Press and hold to perform fast reverse or fast forward. For video: Press to perform fast reverse or fast forward. or Press to return to the previous track (chapter) or go to the next track (chapter). Press to answer or end a call. Press to stop playback. p If you resume playback, playback will start from the point where you stopped. Touch the key again to stop playback completely. 5
-
 1
1 -
 2
2 -
 3
3 -
 4
4 -
 5
5 -
 6
6 -
 7
7 -
 8
8 -
 9
9 -
 10
10 -
 11
11 -
12
-
13
-
14
-
15
-
16
-
17
-
18
-
19
-
20
-
21
-
22
-
23
-
24
-
25
-
26
-
27
-
28
-
29
-
30
-
31
-
32
-
33
-
34
-
35
-
36
-
37
-
38
-
39
-
40
-
41
-
42
-
43
-
44
-
45
-
46
-
47
-
48
-
49
-
50
-
51
-
52
-
53
-
54
-
55
-
56
-
57
-
58
-
59
-
60
-
61
-
62
-
63
-
64
-
65
-
66
-
67
-
68
-
69
-
70
-
71
-
72
-
73
-
74
-
75
-
76
-
77
-
78
-
79
-
80
-
81
-
82
-
83
-
84
-
85
-
86
-
87
-
88
-
89
-
90
-
91
-
92
 |
 |