Samsung SCH-A890 User Manual (user Manual) (ver.d8) (English) - Page 46
Assign a picture to a phonebook entry
 |
View all Samsung SCH-A890 manuals
Add to My Manuals
Save this manual to your list of manuals |
Page 46 highlights
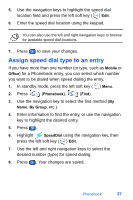
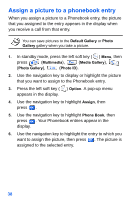
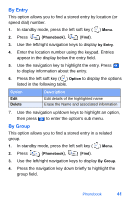
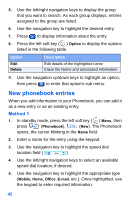
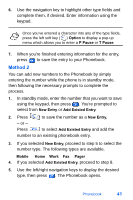
Assign a picture to a phonebook entry When you assign a picture to a Phonebook entry, the picture that you assigned to the entry appears in the display when you receive a call from that entry. You can save pictures to the Default Gallery or Photo Gallery gallery when you take a picture. 1. In standby mode, press the left soft key ( ) Menu, then press (Multimedia), (Media Gallery), (Photo Gallery), (Photo ID). 2. Use the navigation key to display or highlight the picture that you want to assign to the Phonebook entry. 3. Press the left soft key ( ) Option. A pop-up menu appears in the display. 4. Use the navigation key to highlight Assign, then press . 5. Use the navigation key to highlight Phone Book, then press . Your Phonebook entries appear in the display. 6. Use the navigation key to highlight the entry to which you want to assign the picture, then press . The picture is assigned to the selected entry. 38
-
 1
1 -
2
-
3
-
4
-
5
-
6
-
7
-
8
-
9
-
10
-
11
-
12
-
13
-
14
-
15
-
16
-
17
-
18
-
19
-
20
-
21
-
22
-
23
-
24
-
25
-
26
-
27
-
28
-
29
-
30
-
31
-
32
-
33
-
34
-
35
-
36
-
37
-
38
-
39
-
40
-
 41
41 -
 42
42 -
 43
43 -
 44
44 -
 45
45 -
 46
46 -
 47
47 -
 48
48 -
 49
49 -
 50
50 -
 51
51 -
52
-
53
-
54
-
55
-
56
-
57
-
58
-
59
-
60
-
61
-
62
-
63
-
64
-
65
-
66
-
67
-
68
-
69
-
70
-
71
-
72
-
73
-
74
-
75
-
76
-
77
-
78
-
79
-
80
-
81
-
82
-
83
-
84
-
85
-
86
-
87
-
88
-
89
-
90
-
91
-
92
-
93
-
94
-
95
-
96
-
97
-
98
-
99
-
100
-
101
-
102
-
103
-
104
-
105
-
106
-
107
-
108
-
109
-
110
-
111
-
112
-
113
-
114
-
115
-
116
-
117
-
118
-
119
-
120
-
121
-
122
-
123
-
124
-
125
-
126
-
127
-
128
-
129
-
130
-
131
-
132
-
133
-
134
-
135
-
136
-
137
-
138
-
139
-
140
-
141
-
142
-
143
-
144
-
145
-
146
-
147
-
148
-
149
-
150
-
151
-
152
-
153
-
154
-
155
-
156
-
157
-
158
-
159
-
160
-
161
-
162
-
163
-
164
-
165
-
166
-
167
-
168
-
169
-
170
-
171
-
172
-
173
-
174
-
175
-
176
-
177
-
178
-
179
-
180
-
181
-
182
-
183
-
184
-
185
-
186
-
187
-
188
-
189
-
190
-
191
-
192
-
193
-
194
-
195
-
196
 |
 |