Sharp AR-BC260 AR-BC260 Operation Manual Suite
Sharp AR-BC260 Manual
 |
View all Sharp AR-BC260 manuals
Add to My Manuals
Save this manual to your list of manuals |
Sharp AR-BC260 manual content summary:
- Sharp AR-BC260 | AR-BC260 Operation Manual Suite - Page 1
MODEL AR-BC260 (Option) Duplex bypass / inverter unit and Stand / 3 x 500 sheet paper drawer DIGITAL FULL COLOR MULTIFUNCTIONAL SYSTEM OPERATION MANUAL (for general information and copier operation) Page • BEFORE USING THE PRODUCT 1-1 • MANAGING THE MACHINE 2-1 • PERIPHERAL DEVICES 3-1 • - Sharp AR-BC260 | AR-BC260 Operation Manual Suite - Page 2
back of the unit. Model Number AR-BC260 Serial Number Date of Purchase Place of Purchase Authorized Sharp Copier/Printer Service Department Number Warranty While every effort has been made to make this document as accurate and helpful as possible, SHARP Corporation makes no warranty of any - Sharp AR-BC260 | AR-BC260 Operation Manual Suite - Page 3
Part 1: General Information - Sharp AR-BC260 | AR-BC260 Operation Manual Suite - Page 4
- Sharp AR-BC260 | AR-BC260 Operation Manual Suite - Page 5
machine to your computer, install the printer driver for Windows, and configure the printer driver settings. G Operation manual (for printer)*: This manual explains the procedures for using the machine as a printer. G Operation manual (for network scanner)*: This manual explains the procedures for - Sharp AR-BC260 | AR-BC260 Operation Manual Suite - Page 6
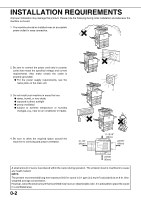
requirements, see the name plate on the main unit. 3. Do not install your machine in areas that are: G damp, humid, or very dusty servicing and proper ventilation. 31-1/2" (80cm) 11-13/16" (30cm) 23-5/8" (60cm) 23-5/8" (60cm) A small amount of ozone is produced within the copier during operation - Sharp AR-BC260 | AR-BC260 Operation Manual Suite - Page 7
INSTALLATION REQUIREMENTS Moving this machine Pull out the four handles as shown below, grasp them firmly, and keep the machine horizontal while moving it. Left side - Sharp AR-BC260 | AR-BC260 Operation Manual Suite - Page 8
G Checks G Passports G Driver's licenses Fusing unit Adjuster Caster Lock Release Lock Release "BATTERY DISPOSAL" THIS PRODUCT CONTAINS A LITHIUM PRIMARY MEMORY BACK-UP BATTERY THAT MUST BE DISPOSED OF PROPERLY. PLEASE CONTACT YOUR LOCAL SHARP DEALER OR AUTHORIZED SERVICE REPRESENTATIVE FOR - Sharp AR-BC260 | AR-BC260 Operation Manual Suite - Page 9
stitch finisher 3-6 G Staple cartridge replacement and staple jam removal 3-7 G Misfeed in the saddle stitch finisher 3-10 G Troubleshooting saddle stitch finisher problems..... 3-12 G Stapling position quick reference guide for duplex output 3-13 G Relation between print image and saddle stitch - Sharp AR-BC260 | AR-BC260 Operation Manual Suite - Page 10
-sided copying from the document glass 5-9 EXPOSURE ADJUSTMENTS 5-10 REDUCTION/ENLARGEMENT/ZOOM 5-12 G Automatic selection (auto image 5-12 G Manual selection 5-13 G XY ZOOM 5-15 SPECIAL PAPERS 5-17 CHAPTER 6 CONVENIENT COPY FUNCTIONS SPECIAL MODES 6-2 G Common operation procedure for using - Sharp AR-BC260 | AR-BC260 Operation Manual Suite - Page 11
that should be read before using the product. Page INTRODUCTION 1-2 MAIN FEATURES 1-2 PART NAMES AND FUNCTIONS 1-4 G Exterior 1-4 G Interior ...1-5 G Part names and functions of peripheral devices 1-6 G Operation panel 1-8 G Touch panel 1-9 AUDITING MODE 1-11 G Using the machine when the - Sharp AR-BC260 | AR-BC260 Operation Manual Suite - Page 12
product is a high speed Digital full color copier/printer that can be expanded to become multifunctional through the installation of optional peripheral devices. The product can be extended to include printer, network scanning or network printing capabilities. This manual describes the basic use of - Sharp AR-BC260 | AR-BC260 Operation Manual Suite - Page 13
will be lit). Auto power shut-off mode can be configured in the key operator programs. The mode is initially set (factory default setting) to activate after 60 seconds elapses. (See page 9 of the key operator's guide.) If a print job or fax is received while auto power shut-off mode or preheat mode - Sharp AR-BC260 | AR-BC260 Operation Manual Suite - Page 14
for support of two-sided originals. Power switch Press to turn power on and off. Front cover Open to replace toner cartridge. Operation panel approximately 500 sheets of the recommended paper for color (21 lbs. or 80 g/m2), or approximately 500 sheets of SHARP standard paper (21 lbs. or 80 g/m2 - Sharp AR-BC260 | AR-BC260 Operation Manual Suite - Page 15
Interior PART NAMES AND FUNCTIONS 1 Fusing unit Toner images are fused here. CAUTION The fusing unit is hot. Take care in removing misfed paper. Toner cartridge The toner cartridge must be replaced when indicated on the operation panel. (See page 2-15) Right side cover Open when a misfeed has - Sharp AR-BC260 | AR-BC260 Operation Manual Suite - Page 16
color (21 lbs. or 80 g/m2), or approximately 500 sheets of SHARP standard paper (21 lbs. or 80 g/m2). To perform two-sided printing, a duplex bypass/inverter unit (AR-RB1) is required. Stand/3 x 500 sheet paper drawer (AR must be installed. Exit tray (AR-TE3) The exit tray is installed on the - Sharp AR-BC260 | AR-BC260 Operation Manual Suite - Page 17
must be installed to use the fax function. GFax memory (8 MB) (AR-MM9) This adds memory for use by the fax function. 1 G256 MB optional memory (AR-SM5) This adds memory that is used for the copy function, printer function, and scanner function. I Face-up and face-down output After printing, the - Sharp AR-BC260 | AR-BC260 Operation Manual Suite - Page 18
is being received. Also lights up or blinks when printing is being performed. [IMAGE SEND] key/LINE indicator/DATA indicator Press this key to switch the display between network scanner mode and fax mode*. (See the operation manuals for network scanner and fax.) [COPY] key Press to select the copy - Sharp AR-BC260 | AR-BC260 Operation Manual Suite - Page 19
by a key operator program. (See page 10 of the key operator's guide.) The touch panel screens shown in this manual are printed images, and may touches of the function keys on the panel. Copier feature G Dual page copy G Centering G Transparency inserts G Mirror image G 11"x17" (A3) Full-bleed G - Sharp AR-BC260 | AR-BC260 Operation Manual Suite - Page 20
the jobs in the queue show the job mode. Copy mode Printer mode Network scanner mode Fax send job Fax reception job The displayed jobs in the job list are themselves operation keys. To cancel printing or to give a job the highest print priority, touch the relevant job key to select the job and - Sharp AR-BC260 | AR-BC260 Operation Manual Suite - Page 21
for copy mode, fax mode, network scanner mode, and printer mode. (Page 6 of key operator's guide) Using the machine when the auditing mode is enabled 1 The procedure for using the machine for copying functions when the Auditing Mode has been enabled for the copier functions is explained below. NOTES - Sharp AR-BC260 | AR-BC260 Operation Manual Suite - Page 22
-enter the correct digit. When a correct account number is entered, the following message will appear. ACCOUNT STATUS:COPIES MADE/REMAINING B/W S.COLOR F.COLOR This does not appear if the account counter has only been set for color copy mode. If a limit has been set by key operator program for - Sharp AR-BC260 | AR-BC260 Operation Manual Suite - Page 23
CHAPTER 2 MANAGING THE MACHINE This chapter explains how to load paper, replace the toner cartridge, and remove paper misfeeds. 2-13 G Operation procedure common to all custom settings 2-13 G About the settings 2-14 REPLACING THE TONER CARTRIDGES 2-15 STORAGE drawer 2-22 TROUBLESHOOTING 2-24 2-1 - Sharp AR-BC260 | AR-BC260 Operation Manual Suite - Page 24
operation. Follow the procedure below to load paper. NOTES G Do not use curled or folded paper. Doing so may cause a misfeed. G For best results use paper supplied by SHARP stops color (21 lbs. or 80 g/m2), or approximately 500 sheets of SHARP part or all of the image may not print.) 3 Adjust the guide - Sharp AR-BC260 | AR-BC260 Operation Manual Suite - Page 25
LOADING PAPER 4 Load paper into the tray. 6 Set the paper type of the paper that was loaded in the 1st tray. If you loaded a different type of paper from the previous paper, be sure to set the new paper type as explained in "Setting the paper type" (page 211). 7 Changing paper size in paper tray 1 - Sharp AR-BC260 | AR-BC260 Operation Manual Suite - Page 26
(page 2-9). Up to 250 sheets of SHARP standard paper or up to 100 postcards can support papers that extend past the tray extension, pull out the wire extension. 2 Set the bypass tray guides you do not set a size, part or all of the image may not print.) 5 This completes the procedure for - Sharp AR-BC260 | AR-BC260 Operation Manual Suite - Page 27
paper fax machine or a laser printer. This may cause printed images to become dirty. G When printing on transparency film, be sure to remove each sheet as it exits the machine. Allowing sheets to stack in the output tray may cause curling. G Use only SHARP-recommended transparency film. Insert the - Sharp AR-BC260 | AR-BC260 Operation Manual Suite - Page 28
, color deviations, misfeeds, and poor quality images. Printing onto envelopes GAttempting to print on envelopes that have metal clasps, plastic snaps, string closures, windows, linings, self- adhesive patches or synthetic materials may cause misfeeds, inadequate toner adherence or other trouble - Sharp AR-BC260 | AR-BC260 Operation Manual Suite - Page 29
500 sheet paper drawer (AR-D18N) 11" x 17", 8-1/2" x 14", 8-1/2" x 13", 8-1/2" x 11", 8-1/2" x 11"R, 7-1/4" x 10-1/2"R, 5-1/2" x 8-1/2", Extra. (A3, B4, A4, A4R, B5, B5R, A5) / 17 to 28 lbs. or 64 to 105 g/m2 Paper recommended for color (21 lbs. or 80 g/m2): 500 sheets; SHARP standard paper (21 - Sharp AR-BC260 | AR-BC260 Operation Manual Suite - Page 30
The upper tray contains a duplex module that automatically turns print paper over for automatic two-sided printing. Middle and lower paper trays: The middle and lower trays are paper trays. Up to 500 sheets of paper recommended for color or SHARP recommended plain paper can be loaded in these trays - Sharp AR-BC260 | AR-BC260 Operation Manual Suite - Page 31
tray name) Applicable paper types Applicable paper sizes Remarks A Paper tray 1 Paper recommended for color Tray 1 11"x17", 8-1/2"x14", 8-1/2"x13", 8-1/2"x11", 8-1/2"x11"R, 5-1/2"x8-1/2", 7-1/4"x10 module/2 x 500 sheet paper drawer is installed. *2 When the Stand/3 x 500 sheet paper drawer is - Sharp AR-BC260 | AR-BC260 Operation Manual Suite - Page 32
for automatic two-sided printing. Heavy paper up to 54 lbs. (200 g/m2) can be used. G The image quality and toner fusibility of special papers may change due to ambient conditions, operating conditions, and paper characteristics, resulting in image quality inferior to that of SHARP standard paper - Sharp AR-BC260 | AR-BC260 Operation Manual Suite - Page 33
. 4 Select the type of paper that was loaded in the tray. PLAIN PRE-PRINTED RECYCLED LETTER HEAD PRE-PUNCHED COLOR The currently selected paper type will be highlighted. To change the setting, touch the desired 297 mm). When both have been entered, touch the [OK] to complete the operation. 2-11 - Sharp AR-BC260 | AR-BC260 Operation Manual Suite - Page 34
SELECT highlighted. TRANSPARENCY ENVELOPE 100% COPY RATIO (When printer mode is selected) PLAIN HEAVY PAPER TRANSPARENCY ENVELOPE step 7. SPEED MODE QUALITY MODE G SPEED MODE is for fast printing. G QUALITY MODE is for a high quality image. 5 Touch the type of envelope, and go to step 7. - Sharp AR-BC260 | AR-BC260 Operation Manual Suite - Page 35
Operation manuals for fax* and network scanner. 2 G Address control Use this to store fax destinations (fax numbers). This is also used to store groups, memory boxes, and user indexes. E-mail addresses, user indexes, and scanner tray 1 can be used in print, copy, and fax modes. Tray 2 can - Sharp AR-BC260 | AR-BC260 Operation Manual Suite - Page 36
500 sheet paper drawer and a duplex bypass/inverter unit are installed.) I Display contrast Screen contrast adjustment is used to make the make the screen darker. I List print Used to print a list of the settings configured in the fax, printer and network scanner function. I Clock adjust Use this - Sharp AR-BC260 | AR-BC260 Operation Manual Suite - Page 37
it horizontally to even out the toner in the cartridge, and re-insert the toner cartridge. If copy images do not improve even after following this procedure, replace the toner cartridge with a new cartridge. G If one of the toners is out, including black toner, color copying will not be possible. If - Sharp AR-BC260 | AR-BC260 Operation Manual Suite - Page 38
resolution adjustment mode. (In some cases, this may take about 5 minutes.) NOTE A toner cartridge of a different color cannot be installed. For instance, a yellow cartridge cannot be installed in the cyan position. 7 Push the cartridge in until it locks securely in place. NOTE Do not push the - Sharp AR-BC260 | AR-BC260 Operation Manual Suite - Page 39
the user include paper, toner cartridges, and staple cartridges for the finisher. For best copying results, be sure to use only Sharp Genuine . Spare parts are those parts of the apparatus which may break down within the scope of the ordinary use of the product - whereas those parts which normally - Sharp AR-BC260 | AR-BC260 Operation Manual Suite - Page 40
appear in the touch panel display of the operation panel and printing output will stop. The approximate locations of possible misfeeds are care in removing paper. Upper fusing unit Fusing unit paper guide Transfer belt Misfeed removal guidance Misfeed removal guidance can be displayed by - Sharp AR-BC260 | AR-BC260 Operation Manual Suite - Page 41
the unit. After closing, confirm that the misfeed message has been cleared and the normal display appears. If the duplex bypass/ inverter unit is not installed, close the side cover in the same way. 2-19 - Sharp AR-BC260 | AR-BC260 Operation Manual Suite - Page 42
. Take care in removing paper. (Do not touch any metal parts.) 3 Misfeed in the transfer unit If paper is misfed on the transfer belt, remove it gently without touching the transfer belt. Do not pull out the transfer unit. CAUTION The transfer unit is hot. Take care in removing paper. (Do not touch - Sharp AR-BC260 | AR-BC260 Operation Manual Suite - Page 43
MISFEED REMOVAL Misfeed in the stand/1 x 500 sheet paper drawer NOTE Paper misfed from a paper tray may be extending out of the tray into the right side cover area. In this case if the tray is drawn out of the machine, the paper may become torn and difficult to remove. To prevent this from - Sharp AR-BC260 | AR-BC260 Operation Manual Suite - Page 44
cover of the duplex bypass/inverter unit. 3 Remove the misfeed from the upper part of the duplex bypass/inverter unit. Hold the upper cover of the unit open the duplex bypass/inverter unit. 5 Lift the exit tray if one is installed and open the cover of the duplex bypass/inverter unit. 6 Remove the - Sharp AR-BC260 | AR-BC260 Operation Manual Suite - Page 45
MISFEED REMOVAL 10Remove the misfed paper from the duplex module. Be careful not to tear the misfed paper during removal. I Misfeed in the upper or lower tray To remove misfed paper from the upper tray or lower tray, follow steps 1 through 5 of "Misfeed in the stand/1 x 500 sheet paper drawer" on - Sharp AR-BC260 | AR-BC260 Operation Manual Suite - Page 46
related to the copy function, see page 7-4. For fax, printer, and network scanner problems, see the manuals for those functions. For peripheral device problems, see the explanation of the device. If the message "CALL FOR SERVICE. CODE:**-**" appears in the touch panel, turn off the power switch - Sharp AR-BC260 | AR-BC260 Operation Manual Suite - Page 47
in step 6 on page 2-12. If the paper size setting is not correct, part or all of the image may not print (this depends on the options installed). Is paper other than SHARPrecommended paper being used? Use SHARP-recommended paper. Paper curled or damp? Do not use curled or crimped paper. If - Sharp AR-BC260 | AR-BC260 Operation Manual Suite - Page 48
- Sharp AR-BC260 | AR-BC260 Operation Manual Suite - Page 49
stitch finisher 3-6 G Staple cartridge replacement and staple jam removal 3-7 G Misfeed in the saddle stitch finisher 3-10 G Troubleshooting saddle stitch finisher problems 3-12 G Stapling position quick reference guide for duplex output 3-13 G Relation between print image and saddle stitch - Sharp AR-BC260 | AR-BC260 Operation Manual Suite - Page 50
for installation into the finisher. Part names and functions Stapler compiler Paper to be stapled is stacked temporarily. When printing on out this section to replace the staple cartridge or to remove jammed staples. Front cover Open to replace the staple cartridge, to remove the misfed paper, - Sharp AR-BC260 | AR-BC260 Operation Manual Suite - Page 51
(W) x 676 mm (D) (56-25/64" (W) x 26-5/8" (D)) (when tray is extended) Remarks Paper output Upper tray: Supports both face-up and face-down output canceled. Supplies AR-SC2 staple cartridges must be used for this finisher. The cartridge package contains three cartridges of approximately 5000 - Sharp AR-BC260 | AR-BC260 Operation Manual Suite - Page 52
will be offset from the previous set or group for easy separation. (The offset function only operates in the offset tray.) Stapled sets will not be offset. I Staple sort mode Collated sets of prints or copies will be stapled and delivered to the offset tray. When saddle stitching is selected, the - Sharp AR-BC260 | AR-BC260 Operation Manual Suite - Page 53
if a punch module is installed) If the saddle stitch finisher is equipped with a hole punch module, printed paper can be hole punched and delivered to the offset tray. Saddle stitching and hole punching cannot be selected at the same time. The automatic image - Sharp AR-BC260 | AR-BC260 Operation Manual Suite - Page 54
a checkmark appears in the checkbox of the [AUTOMATIC SADDLE STITCH] key operator program (see page 12 of the Key operator's guide.)) [PUNCH] key (See page 3-5.) If the saddle stitch finisher is equipped with a hole punch module, printed paper can be hole punched and delivered to the offset tray - Sharp AR-BC260 | AR-BC260 Operation Manual Suite - Page 55
jammed, a message will appear in the message display of the operation panel. Follow the procedure below to replace the staple cartridge or remove jammed staples. I Staple cartridge replacement 1 Open the front cover. 6 Insert a new staple cartridge into the staple box. After inserting the staple - Sharp AR-BC260 | AR-BC260 Operation Manual Suite - Page 56
SADDLE STITCH FINISHER I Staple jam removal 1 Unlatch the saddle stitch finisher and slide it away from the main unit. 6 Remove the misfed paper. Be careful not to tear the misfed paper during removal. 2 Open the front cover. 7 Close the saddle stitch section cover. 3 Turn roller rotating knob - Sharp AR-BC260 | AR-BC260 Operation Manual Suite - Page 57
the saddle stitch finisher back against the main unit. NOTE Make a test print or copy in the staple sort mode to ensure that stapling is performed properly. I Disposal of hole punch scrap (when the punch unit is installed) 1 Unlatch the saddle stitch finisher and slide it away from the main - Sharp AR-BC260 | AR-BC260 Operation Manual Suite - Page 58
paper in step 2, pull roller rotating knob B on the punch unit towards you and rotate it. (Only when an optional punch unit is installed.) Roller rotating knob B Rotating roller rotating knob B releases the caught paper. 6 Close the top cover. 7 Remove the misfed paper from the stapler compiler - Sharp AR-BC260 | AR-BC260 Operation Manual Suite - Page 59
10Open the front cover. SADDLE STITCH FINISHER 13Close the saddle stitch section cover. 11Turn roller rotating knob in the direction of the arrow. 14Close the front cover. 12Remove any misfed paper from the saddle stitch tray. Be careful not to tear the misfed paper during removal. 3 15Push the - Sharp AR-BC260 | AR-BC260 Operation Manual Suite - Page 60
Troubleshooting saddle stitch finisher problems Check the list below before calling for service. Problem paper Remove all remaining paper from the stapler operate. from the stapler compiler displayed? compiler staple cartridge. (See page 3-7.) Check that a staple cartridge has been installed. ( - Sharp AR-BC260 | AR-BC260 Operation Manual Suite - Page 61
SADDLE STITCH FINISHER Stapling position quick reference guide for duplex output The orientation of the copy paper with two-position stapling is not possible. 3 Top binding Portrait orientation printing Right binding Left binding One-position stapling Two-position stapling Two-position - Sharp AR-BC260 | AR-BC260 Operation Manual Suite - Page 62
SADDLE STITCH FINISHER Relation between print image and saddle stitch The orientation of the Page 2 Duplexed Output result Page 3 Page 4 Page 3 & Page 4 Duplexed Left binding Portrait orientation printing Right binding Same as above Page 1 Page 2 Page 1 & Page 2 Duplexed Page 3 Page - Sharp AR-BC260 | AR-BC260 Operation Manual Suite - Page 63
Capacity tray" in the tray specifications (page 2-9).) Part name Top cover Open for misfeed removal. Release lever hard on the tray. G To install the large capacity tray, the optional duplex module/2 x to machine LARGE CAPACITY TRAY (AR-LC8) 8-1/2" x 11" (A4) 17 to 28 lbs. (64 to 105 g/m2) 1 tray - Sharp AR-BC260 | AR-BC260 Operation Manual Suite - Page 64
in the large capacity tray 1 Pull the tray out until it stops. When the tray is in operation, do not use excessive force to pull the tray out. paper stack must not be higher than the indicator line (up to 3,500 sheets of SHARP standard paper (21 lbs. (80 g/m2)) If the paper type was changed, be - Sharp AR-BC260 | AR-BC260 Operation Manual Suite - Page 65
misfed paper, following the procedure below. 1 While holding the tray release lever, carefully slide the large capacity tray away from the main unit until it stops. 5 Push the large capacity tray towards the main unit and latch it into place. Gently push the large capacity tray back in until it - Sharp AR-BC260 | AR-BC260 Operation Manual Suite - Page 66
- Sharp AR-BC260 | AR-BC260 Operation Manual Suite - Page 67
Part 2: Copier Operation - Sharp AR-BC260 | AR-BC260 Operation Manual Suite - Page 68
- Sharp AR-BC260 | AR-BC260 Operation Manual Suite - Page 69
This chapter provides basic information necessary for using the copier functions of the machine. Please read this chapter before making copies. Page PART NAMES AND FUNCTIONS (The Reversing Single Pass Feeder) ......4-2 G Exterior 4-2 G Operation Panel 4-3 G Touch Panel (main screen of copy mode - Sharp AR-BC260 | AR-BC260 Operation Manual Suite - Page 70
PART NAMES AND FUNCTIONS (The Reversing Single Pass Feeder) Exterior *RSPF exit area Finished originals are output here. Document feeder tray (page 4-6) Set the originals here for automatic feeding. Original guides (page 4-6) Adjust to the size of the originals. Document feeding area cover (page - Sharp AR-BC260 | AR-BC260 Operation Manual Suite - Page 71
PART NAMES AND FUNCTIONS (The Reversing Single Pass Feeder) Operation ) 4 This returns all copy mode settings to the default settings. However, the touch panel display mode will not G [COLOR COPY START ( )] key Press this key to start a single or multiple color copy job. G [BLACK COPY START - Sharp AR-BC260 | AR-BC260 Operation Manual Suite - Page 72
installed. The image will vary depending on the equipment installed. original. (See page 12 of the key operator's guide.) 4-4 Paper size display The display shows the operating, and the original size appears when the original size has been entered manually. [ORIGINAL] key Use this key to manually - Sharp AR-BC260 | AR-BC260 Operation Manual Suite - Page 73
having to manually turn the in the feeder (maximum stack thickness of 11/64" (4 mm), or 30 originals of weight 24 guide for feeding originals. Transparency film, tracing paper, carbon paper, thermal paper or originals printed with thermal transfer ink ribbon should not be fed through the document - Sharp AR-BC260 | AR-BC260 Operation Manual Suite - Page 74
default setting is "INCH-1 (AB-1)". The setting can be changed using "ORIGINAL SIZE DETECTOR SETTING" in the key operator programs. (Page 11 of the key operator's guide.) Group Detectable original sizes Document pass feeder is used, these sizes are only supported for one-sided originals. 4-6 - Sharp AR-BC260 | AR-BC260 Operation Manual Suite - Page 75
as shown below. Document feeder tray Document glass Top Bottom Bottom Top I Automatic copy image rotation - rotation copying operates in both the auto paper select or auto image mode. (Rotation copying can be disabled with a key operator program. See page 15 of the key operator's guide - Sharp AR-BC260 | AR-BC260 Operation Manual Suite - Page 76
correct original size is not detected or the original size is not displayed, you can manually specify the original size. By causing the machine to recognize the original size, you " (143 to 432 mm) 5-1/8" to 11-3/4" (130 to 297 mm) Using the document glass 2-1/2" to 17" (64 to 432 mm) 2-1/2" to 11 - Sharp AR-BC260 | AR-BC260 Operation Manual Suite - Page 77
if the power is turned off. Storing a frequently used original size saves you the trouble of manually setting the size each time you copy that size of document. G To cancel an original size storing, using, or deleting operation, press the [CA] key or touch the [ORIGINAL] key on the screen. Storing - Sharp AR-BC260 | AR-BC260 Operation Manual Suite - Page 78
- Sharp AR-BC260 | AR-BC260 Operation Manual Suite - Page 79
from the reversing single pass feeder .....5-6 G Copying from the document glass 5-7 G Automatic two-sided copying from the document glass 5-9 EXPOSURE ADJUSTMENTS 5-10 REDUCTION/ENLARGEMENT/ZOOM 5-12 G Automatic selection (auto image 5-12 G Manual selection 5-13 G XY ZOOM 5-15 SPECIAL PAPERS - Sharp AR-BC260 | AR-BC260 Operation Manual Suite - Page 80
on the amount of memory installed and the copy settings. (See of 1-sided originals Original Copy 1 Place the originals in the document feeder tray. (pages 4-6 to 4-9) 5 Touch the [OK] PLAIN than the sizes above are to be copied, manually 8½x14 RECYCLED select the desired paper size by - Sharp AR-BC260 | AR-BC260 Operation Manual Suite - Page 81
an entry if a mistake has been made. 9 Press the [COLOR COPY START ( or [BLACK COPY START ( )] key. )] If the [C] key is pressed while originals are being scanned, scanning will stop. If copying had already started, copying and scanning will stop after the original in progress is output to the - Sharp AR-BC260 | AR-BC260 Operation Manual Suite - Page 82
added memory Memory added (128 MB or 256 MB) Two-sided copying Output mode mode original/paper size Sort Group Sort Group One-sided copying Color copying Black and white copying Up to 11" x 17" (A3) 12" x 18" (A3W)* Up to 11" x 17" (A3) 12" x 18" (A3W)* Up to 8-1/2" x 11" (A4) Automatic - Sharp AR-BC260 | AR-BC260 Operation Manual Suite - Page 83
document feeder tray of the reversing single pass feeder. Press the [COLOR COPY START] key G Grouping copies by page Original Press the [BLACK use for copy output. Turning on the offset function The offset function operates when a checkmark appears in the [OFFSET] checkbox, which is displayed by - Sharp AR-BC260 | AR-BC260 Operation Manual Suite - Page 84
/ inverter unit are not installed. 1 Place the originals in the document feeder tray. (pages 4-6 installed. If a copy key is touched for a mode that cannot be selected, a double beep will be sounded. 5-6 Example of a portrait-oriented original Example of a landscape-oriented original The image - Sharp AR-BC260 | AR-BC260 Operation Manual Suite - Page 85
the document cover and copy the originals from the document glass. NOTE Certain restrictions exist depending on the amount of memory installed and size other 8½x11 PLAIN than the sizes above are to be copied, manually 8½x14 RECYCLED select the desired paper size by touching the 11x17 PLAIN - Sharp AR-BC260 | AR-BC260 Operation Manual Suite - Page 86
output mode. (See page 5-5.) When a document is 2-SIDED COPY detected on the document glass, the group mode will be OUTPUT Press the [COLOR COPY START ( or [BLACK COPY START ( )] key. )] Replace the original with the next original and press the [START] key. Repeat this operation until all - Sharp AR-BC260 | AR-BC260 Operation Manual Suite - Page 87
NORMAL COPYING Automatic two-sided copying from the document glass When a duplex module/2 x 500 sheet paper drawer and a duplex bypass/inverter unit are installed, the following automatic two-sided copy function is possible. The copy paper is turned over automatically, allowing easy two-sided - Sharp AR-BC260 | AR-BC260 Operation Manual Suite - Page 88
. PHOTO, TEXT/PHOTO, TEXT, PHOTO, PRINTED PHOTO and MAP. [AUTO] This is the standard initial setting for this copier. When a black and white copy is made, the exposure is automatically adjusted to obtain the best image quality. When a full-color copy is made, the image is adjusted in the same way as - Sharp AR-BC260 | AR-BC260 Operation Manual Suite - Page 89
to 5: Originals written with pencils or light color characters G Color adjustment menu As special functions for color copying, the following color image adjustments can be made. (Page 6-11) G RGB ADJUST G SHARPNESS G SUPPRESS BACKGROUND G COLOR BALANCE G BRIGHTNESS G INTENSITY 4 Use the - Sharp AR-BC260 | AR-BC260 Operation Manual Suite - Page 90
display showing "0". Use the [C] (clear) key to cancel an entry if a mistake has been made. 5 Press the [COLOR COPY START ( or [BLACK COPY START ( )] key. )] If you placed the original on the document glass, set the output to "Sort", you must touch the [READ-END] key after all pages of the - Sharp AR-BC260 | AR-BC260 Operation Manual Suite - Page 91
operator's guide can be used to set two additional enlargement ratios and two additional reduction ratios.> 1 Place the original in the document feeder tray or on the document IMAGE 0 AUTO ORIGINAL AUTO EXPOSURE AUTO 8½x11 PAPER SELECT COPY RATIO G A. Preset reduction copy ratios are: 77% and 64% - Sharp AR-BC260 | AR-BC260 Operation Manual Suite - Page 92
display showing "0". Use the [C] (clear) key to cancel an entry if a mistake has been made. 8 Press the [COLOR COPY START ( or [BLACK COPY START ( )] key. )] If you placed the original on the document glass, set the output to "Sort", you must touch the [READ-END] key after all pages of the - Sharp AR-BC260 | AR-BC260 Operation Manual Suite - Page 93
the width Original Copy 1 Place the original in the document feeder tray or on the document glass. (pages 4-6 to 4-9) 2 Touch the [COPY 8½x11 11x17 8½x11 64% 8½x11 5½x8½ XY ZOOM 100 % ZOOM 8½x14 11x17 121% 8½x11 11x17 129% 5½x8½ 8½x11 MENU 12 OK 100% AUTO IMAGE 0 AUTO ORIGINAL AUTO - Sharp AR-BC260 | AR-BC260 Operation Manual Suite - Page 94
% % 200% EX 100% AUTO 400% PAPE 10Make all other desired settings such as exposure, paper size and number of copies and then press the [COLOR COPY START ( )] or [BLACK COPY START ( )] key. To cancel this function, touch the [CANCEL] key or the [XY ZOOM] key again as in step 3 or 5 on page - Sharp AR-BC260 | AR-BC260 Operation Manual Suite - Page 95
copying, the following color image adjustments are available. (Page 611) G RGB ADJUST G SHARPNESS G SUPPRESS BACKGROUND G COLOR BALANCE G BRIGHTNESS G INTENSITY 5 4 Make all other desired settings such as exposure or the number of copies, and press the [COLOR COPY START ( )] or [BLACK COPY START - Sharp AR-BC260 | AR-BC260 Operation Manual Suite - Page 96
- Sharp AR-BC260 | AR-BC260 Operation Manual Suite - Page 97
. Page SPECIAL MODES 6-2 G Common operation procedure for using the special functions COLOR ADJUSTMENTS MENU 6-11 G RGB adjust 6-12 G Sharpness 6-13 G Suppress background 6-13 G Color balance 6-14 G Brightness 6-15 G Intensity 6-15 IMAGE EDIT MENU 6-16 G Single color 6-17 G Mirror image - Sharp AR-BC260 | AR-BC260 Operation Manual Suite - Page 98
SINGLE COLOR MIRROR IMAGE PHOTO REPEAT MULTI SHOT [COLOR ADJUSTMENTS] key (page 6-11) Touch this key to display the color adjustments menu screen. This allows you to select the special functions shown below for color adjustment when making color copies. COLOR ADJUSTMENTS RGB ADJUST SHARPNESS - Sharp AR-BC260 | AR-BC260 Operation Manual Suite - Page 99
Common operation procedure for using the special functions 1 Touch the [SPECIAL MODES] key. SPECIAL MODES 2-SIDED COPY 2 Touch the key for the desired special mode. Example: MARGIN SHIFT To set the margin shift function CENTERING If you touch the menu keys for color adjustment or image editing - Sharp AR-BC260 | AR-BC260 Operation Manual Suite - Page 100
-sided copying Original Image shifted to the right Margin Image shifted to the left sheet paper drawer and duplex bypass/inverter unit are not installed, the margin shift setting for back-side copies will not used, see pages 5-2 through 5-6. If the document glass is being used, see pages 5-7 through - Sharp AR-BC260 | AR-BC260 Operation Manual Suite - Page 101
of copies caused when heavy paper or a book is used as an original. CENTER ERASE Eliminates shadow lines produced by the bindings of bound documents. EDGE + CENTER ERASE Eliminates shadow lines around the edges of copies and eliminates the shadow at the center of copies. 1 Touch the [ERASE] key - Sharp AR-BC260 | AR-BC260 Operation Manual Suite - Page 102
8½x11 PAPER SELECT paper is not selected, touch the [PAPER SELECT] key to select 8-1/2" x 11" (A4) size 100% paper. 3 Place the originals on the document glass. This page is copied first. Center line of original Index 8½x11 A4 About the steps that follow For two-sided copying, follow steps - Sharp AR-BC260 | AR-BC260 Operation Manual Suite - Page 103
Example] Original Copy G This function can be used to reduce a larger sized original image and center it on a copy of smaller paper size, as well as center pass feeder is being used, see pages 5-2 through 5-6. If the document glass is being used, see pages 5-7 through 5-9. To cancel the - Sharp AR-BC260 | AR-BC260 Operation Manual Suite - Page 104
best results, use SHARP recommended transparency film the optional saddle stitch finisher is installed, touch the [FINISHER TRAY] key printing. QUALITY MODE is for a high quality image 11x17 4. 8½x11R PLAIN RECYCLED COLOR PLAIN INTERRUPT 0 8½x11 AUTO and 5-3. If the document glass is being used, - Sharp AR-BC260 | AR-BC260 Operation Manual Suite - Page 105
document glass cannot be used.) I Copying onto a cover I Not copying onto a cover One-sided copies from one-sided or two-sided originals One-sided originals One-sided copies (copying onto a cover) 4 3 2 1 4 3 2 1 SHARP Cover original SHARP PRINT ON FRONT COVER? YES NO Select [FRONT], [BACK] - Sharp AR-BC260 | AR-BC260 Operation Manual Suite - Page 106
operator's guide. G During cover image. (This function can only be used for black and white copying.) Original B/W reverse copy NOTE Originals with large black areas (which use a large amount of toner) can be printed with black/white reverse to reduce toner 5-6. If the document glass is being - Sharp AR-BC260 | AR-BC260 Operation Manual Suite - Page 107
), G (green), or B (blue). SHARPNESS (page 6-13) Sharpens or softens image outlines. SUPPRESS BACKGROUND (page 6-13) Suppresses copying of lighter background areas. COLOR BALANCE (page 6-14) Adjusts the color, tone, and density of color copies. BRIGHTNESS (page 6-15) This copier allows the level of - Sharp AR-BC260 | AR-BC260 Operation Manual Suite - Page 108
steps that follow If the reversing single pass feeder is being used, see pages 5-2 through 5-6. If the document glass is being used, see pages 5-7 through 5-9. In either case, press the [COLOR COPY START] key to begin copying. To cancel the RGB ADJUST function, select the RGB ADJUST function again - Sharp AR-BC260 | AR-BC260 Operation Manual Suite - Page 109
COLOR COPY START] key to begin copying. To cancel the SHARPNESS function, select the SHARPNESS function again and touch the [CANCEL] key (step 2). Suppress background This copier can suppress unwanted background areas on the original images steps. The default setting is level 3. 3 Touch the - Sharp AR-BC260 | AR-BC260 Operation Manual Suite - Page 110
color balance settings are the values set with key operator program "Initial color balance setting" (See page 15 of the key operator's guide [Bk] = black). If only the area around the letter inside a key is highlighted, the settings have been changed from the factory default settings. (B) Use - Sharp AR-BC260 | AR-BC260 Operation Manual Suite - Page 111
ADJUSTMENTS MENU Brightness This copier allows the level of brightness of images to be adjusted. 1 Touch the [BRIGHTNESS] key on the COLOR ADJUSTMENTS menu screen. The BRIGHTNESS SU T SHARPNESS BAC setting screen will appear. BRIGHTNESS IN 3 Touch the [OK] key (inside [OK] key) on the - Sharp AR-BC260 | AR-BC260 Operation Manual Suite - Page 112
-PAGE ENLARGEMENT PHOTO REPEAT PAMPHLET COPY OK MULTI SHOT SINGLE COLOR (page 6-17) Produces copies with a selected single color. MIRROR IMAGE (page 6-17) A mirror image of the original is printed. PHOTO REPEAT (page 6-18) Produces repeated images of a photo on a single sheet of copy paper. MULTI - Sharp AR-BC260 | AR-BC260 Operation Manual Suite - Page 113
document glass is being used, see pages 5-7 through 5-9. In either case, press the [COLOR COPY START] key to begin copying. To cancel the SINGLE COLOR function, select the SINGLE COLOR function again and touch the [CANCEL] key (step 2). Mirror image 6 This function is used to print a mirror image - Sharp AR-BC260 | AR-BC260 Operation Manual Suite - Page 114
MENU Photo Repeat PHOTO REPEAT is used to produce repeated images of a photo on a single sheet of copy paper. G Up to 24 repeats can be made on a single copy sheet. The number of copies on a single - Sharp AR-BC260 | AR-BC260 Operation Manual Suite - Page 115
the [OK] key on the IMAGE EDIT menu screen. Return to of original type and paper size. IMAGE EDIT PHOTO REPEAT ORIGINAL SIZE E/L IMAGE EDIT menu screen. About the steps that follow See pages 5-7 through 5-8. NOTES G Be sure to place the original on the document images onto one sheet may be smaller than - Sharp AR-BC260 | AR-BC260 Operation Manual Suite - Page 116
] key on the IMAGE EDIT menu screen. Return to the SPECIAL MODES screen. 7 Touch the [OK] key on the SPECIAL MODES screen. Return to the main screen of copy mode. About the steps that follow If a reversing single pass feeder is being used, see pages 5-2 through 5-6. If the document glass is being - Sharp AR-BC260 | AR-BC260 Operation Manual Suite - Page 117
the document glass. the IMAGE EDIT menu screen. SINGLE COLOR 11x17 IMAGE EDIT menu screen. Return to the SPECIAL MODES screen. 3 Touch the [OK] key on the SPECIAL MODES screen. Return to the main screen of copy mode. 4 Load 12" x 18" (A3W) copy paper into the bypass tray. Adjust the bypass guide - Sharp AR-BC260 | AR-BC260 Operation Manual Suite - Page 118
Multi-page enlargement This function is used to enlarge an original image to a size larger than 11" x 17" (A3) and print divided images onto multiple sheets of copy paper. [Example] Original (8-1/2" x 11" (A4) size) Copy (enlarged image on 8 sheets of 11" x 17" (A3) paper) Overlap of sections of - Sharp AR-BC260 | AR-BC260 Operation Manual Suite - Page 119
image, and the ratio are automatically selected based on the selected original size and enlargement size. (The paper size and ratio cannot be selected by the operator document glass in accordance with the indicated orientation. (page 4-6) Multi-page enlargement is only possible using the document - Sharp AR-BC260 | AR-BC260 Operation Manual Suite - Page 120
function. G If a saddle stitch finisher is installed, copies can be stapled in two positions along Touch the [PAMPHLET COPY] key on the IMAGE EDIT menu screen. The PAMPHLET COPY R PHOTO document glass:] Replace the original with the next original and press the [START] key. Repeat this operation - Sharp AR-BC260 | AR-BC260 Operation Manual Suite - Page 121
registers. This is convenient for quick job recall without losing time manually reprogramming each aspect of a job. Job programs can be recalled the key operator programs, you will not be able to storing a job program. (See page 16 of the key operator's guide.) 4 Make all copier selections to - Sharp AR-BC260 | AR-BC260 Operation Manual Suite - Page 122
number of copies as needed and press the [COLOR COPY START ( )] or [BLACK COPY START ( )] key. Copying will start contents of a job program were changed in the key operator programs after the job program was stored, the changed key operator programs, you will not be able to clear a job program - Sharp AR-BC260 | AR-BC260 Operation Manual Suite - Page 123
can be used to temporarily stop a long copy run so COLOR COPY START ( )] or [BLACK COPY START ( )]key. When making black and white copying using the document glass in the sort mode, replace the original with the next original and press the [BLACK COPY START] key. Repeat this operation - Sharp AR-BC260 | AR-BC260 Operation Manual Suite - Page 124
- Sharp AR-BC260 | AR-BC260 Operation Manual Suite - Page 125
procedures for removing misfeeds in a reversing single pass feeder, cleaning the machine, and troubleshooting. Page REMOVING AN ORIGINAL MISFEED 7-2 G Removing a misfed original from the reversing single pass feeder .......7-2 USER MAINTENANCE (For copying 7-3 CLEANING THE ORIGINAL SCANNING AREA - Sharp AR-BC260 | AR-BC260 Operation Manual Suite - Page 126
be easily removed from the exit area, open the moveable part of the document feeder tray and remove the reversing tray and then remove the returned to the document feeder tray. Return the originals to the document feeder tray and press the [START] key for color or black and white copying - Sharp AR-BC260 | AR-BC260 Operation Manual Suite - Page 127
USER MAINTENANCE (For copying) To ensure good service at left). CLEANING THE ORIGINAL SCANNING AREA If you find that black (or white) lines appear when you make copies using the and remove the glass cleaning tool. Example of dirty print image 7 2 Clean the original scanning area with the glass - Sharp AR-BC260 | AR-BC260 Operation Manual Suite - Page 128
describes problems concerning copier features. For troubleshooting specific problems related to the printer, network scanner, and fax features, see the separate manuals provided for these features. For problems related to other peripheral devices, see page 2-24. Problem Machine does not operate - Sharp AR-BC260 | AR-BC260 Operation Manual Suite - Page 129
TROUBLESHOOTING Problem Job cancelation needed Scanning of originals is incomplete. The selected number of sets of copies is not printed copying will not be performed. If you install an additional memory, the storage capacity will increase. When color copying is performed in sort mode for - Sharp AR-BC260 | AR-BC260 Operation Manual Suite - Page 130
- Sharp AR-BC260 | AR-BC260 Operation Manual Suite - Page 131
CHAPTER 8 SPECIFICATIONS This chapter contains useful information about the machine. Page SPECIFICATIONS 8-2 G Copier and Main unit 8-2 G Reversing single pass feeder 8-4 G Duplex bypass/inverter unit (optional 8-4 INDEX ...8-5 8-1 - Sharp AR-BC260 | AR-BC260 Operation Manual Suite - Page 132
in the key operator programs, scan: 600 x 300 dpi) Gradation Scan: Color; 256 levels, Black and white; 2 levels Printing: Color: Equivalent of 256 levels / Black and white: 2 levels (in copy mode) / Equivalent of 256 levels (in printer mode) Originals Sheets, bound documents Maximum size: 11 - Sharp AR-BC260 | AR-BC260 Operation Manual Suite - Page 133
* (measurement according to ISO7779) Sound power level LwA Printing mode Black/White Color Standby mode 8 6.3 B or less 6.3 B or less 5.5 B or less * Measurement conditions: The duplex module/2 x 500 sheet paper drawer option is installed and paper is fed from paper tray 1. Emission - Sharp AR-BC260 | AR-BC260 Operation Manual Suite - Page 134
) Face-down output: 17 to 54 lbs. (64 to 200 g/m2) Center reference point 6-5/32" (W) x 17-29/64" (D) x 17-1/64" (H) (156 mm (W) x 443 mm (D) x 432 mm (H)) Approx. 14.3 lbs. (Approx. 6.5 kg) As a part of our policy of continuous improvement, SHARP reserves the right to make design and specification - Sharp AR-BC260 | AR-BC260 Operation Manual Suite - Page 135
Document glass 5-9 - Reversing single pass feeder 5-6 Automatic two-sided printing 2-8, 2-10 IB Binding change 5-9 [BLACK COPY START] key 1-8, 4-3 Black toner 2-15 Book original 6-6 Brightness 6-11, 6-15 Bypass tray 1-4, 2-24 B/W reverse 6-10 IC [C] key 4-3 [CA] key 4-3 Call for service - Sharp AR-BC260 | AR-BC260 Operation Manual Suite - Page 136
for color 2-9 Paper select display 4-4 [PAPER SELECT] key 4-4, 5-2, 5-7 Paper size slide 2-2 Paper tray 1 2-2, 2-19 Paper tray 1-4 Part names and functions - Exterior 1-4 - Interior 1-5 - Large capacity tray 3-15 - Operation panel (Copier Operation 4-3 - Operation panel (General - Sharp AR-BC260 | AR-BC260 Operation Manual Suite - Page 137
5-11 Toner cartridge 1-5, 2-15 Total count 2-14 Total number of originals 4-5 Touch panel 1-8 to 1-9, 4-3 to 4-4 Transfer belt 2-20 Transparency film 2-9, 5-17, 6-8 Transparency inserts 6-2, 6-8 Tray extension 2-4 Tray settings 2-11, 2-14 Troubleshooting - Copier operation 7-4 - General - Sharp AR-BC260 | AR-BC260 Operation Manual Suite - Page 138
- Sharp AR-BC260 | AR-BC260 Operation Manual Suite - Page 139
from which you purchased the Product. AR-BC260 Digital Full Color Multifunctional System In the event that this authorized dealer does not honor its warranty commitments, please contact the General Manager, Business Products Group, Sharp Electronics Corporation, Sharp Plaza, Mahwah, NJ 07430-1163 - Sharp AR-BC260 | AR-BC260 Operation Manual Suite - Page 140
AR-BC260 (for general information and copier operation) SHARP ELECTRONICS CORPORATION Sharp Plaza, Mahwah, New Jersey 07430-1163. www.sharpusa.com SHARP ELECTRONICS OF CANADA LTD. 335 Britannia Road East, Mississauga, Ontario, L4Z 1W9 This manual has been printed using a vegetable-based soy oil - Sharp AR-BC260 | AR-BC260 Operation Manual Suite - Page 141
INSTALLATION GUIDE (for printer) MODEL AR-BC260 DIGITAL FULL COLOR MULTIFUNCTIONAL SYSTEM Page • INTRODUCTION 1 • ABOUT THE CD-ROM 2 • INSTALLING THE PRINTER DRIVER AND UTILITIES (SOFTWARE INSTALLATION) 3 • UNINSTALLING PRINTER DRIVERS AND PRINTER UTILITIES 15 • INSTALLING PRINTER - Sharp AR-BC260 | AR-BC260 Operation Manual Suite - Page 142
user's authority to operate this equipment. Note: This equipment has been tested and found to comply with the limits for a Class A digital device, pursuant to Part of Sharp Corporation. Microsoft®, Windows®, Windows® 95, Windows® 98, Windows® Me, Windows NT® 4.0, Windows® 2000, Windows® XP, Windows® - Sharp AR-BC260 | AR-BC260 Operation Manual Suite - Page 143
, and key operator programs for the printer function. Help files installed with the software in the "Software CD-ROM" G Printer Status Monitor Help file G Printer Administration Utility Help file Print Server Card Online Manual G Print Server Card Online Manual This manual is on the "Software CD-ROM - Sharp AR-BC260 | AR-BC260 Operation Manual Suite - Page 144
installs software for direct printing from Windows 95, Windows 98 and Windows Me to the machine. LPR (only for this machine) or IPP can be selected. G Online Manual: This manual in PDF format explains the settings and procedures required for using the machine as a network printer. R:\Tool\Manual - Sharp AR-BC260 | AR-BC260 Operation Manual Suite - Page 145
the currently installed printer driver first and then install the new printer driver. To uninstall the printer driver, see page 15. 3. About network environments There are several types of network environments. The explanations in this manual assume that your operating system is Windows and that - Sharp AR-BC260 | AR-BC260 Operation Manual Suite - Page 146
network, see the operating system manual or Help. Computer running Windows Computer running Windows Computer running Windows Computer running Windows To install the printer driver, see "Installing the printer driver (standard installation)" and "Installing the printer driver (custom installation - Sharp AR-BC260 | AR-BC260 Operation Manual Suite - Page 147
the machine Before installing the printer driver, set the IP address of the machine using the appropriate key operator program. For this procedure, see Key Operator Programs (page 6-6) in the "Operation manual (for printer)" (in PDF format) in the "Software CD-ROM". The factory default setting for - Sharp AR-BC260 | AR-BC260 Operation Manual Suite - Page 148
click the [Next] button. 11Select the printer driver being installed as the default printer and click the [Next] button. 12Check the contents of the window and click the [Next] button. Installation of the printer driver begins. NOTE When you are using Windows 2000/XP/Server 2003 If a warning message - Sharp AR-BC260 | AR-BC260 Operation Manual Suite - Page 149
[LPR Direct Print] and click the [Next] button. 10The printers that are connected to the network are found. Select the machine and click the [Next] button. G If you wish to install the Printer Status Monitor, click the [Printer Status Monitor] button and follow the on-screen instructions. G If you - Sharp AR-BC260 | AR-BC260 Operation Manual Suite - Page 150
INSTALLING THE PRINTER DRIVER AND UTILITIES (SOFTWARE INSTALLATION) 12Select the printer driver being installed as the default printer and click the [Next] button. 13When the printer name window appears, click the [Next] button. If you wish to change the printer name, enter the desired name. 14When - Sharp AR-BC260 | AR-BC260 Operation Manual Suite - Page 151
), follow the steps below to install the printer driver in each client computer. Ask your network administrator for the server name and printer name of the machine on the network. NOTE For the procedure for configuring settings in the printer server, see the operating system manual or Help. The - Sharp AR-BC260 | AR-BC260 Operation Manual Suite - Page 152
INSTALLING THE PRINTER DRIVER AND UTILITIES (SOFTWARE INSTALLATION) Installation method 2 Use this procedure to install the software in the following environments: 1. The printer is connected by USB cable or parallel cable. 2. Windows version: Windows XP/Server 2003 NOTE To install this software, - Sharp AR-BC260 | AR-BC260 Operation Manual Suite - Page 153
INSTALLING THE PRINTER DRIVER AND UTILITIES (SOFTWARE INSTALLATION) 11Follow the on-screen instructions to install the printer driver. If a warning message regarding the Windows logo test appears while the printer driver files are being copied (the warning message may appear several times), be sure - Sharp AR-BC260 | AR-BC260 Operation Manual Suite - Page 154
INSTALLING THE PRINTER DRIVER AND UTILITIES (SOFTWARE INSTALLATION) Installation method 3 Use this procedure to install the software in the following environments: 1. The printer is connected by USB cable. 2. Windows version: Windows 98/Me/2000*1 NOTE *1 To install the software using the installer, - Sharp AR-BC260 | AR-BC260 Operation Manual Suite - Page 155
INSTALLING THE PRINTER DRIVER AND UTILITIES (SOFTWARE INSTALLATION) 12When you are asked if you wish to install the display font, select an answer and click the [Next] button. 13Follow the on-screen instructions to install the printer driver. If you are using Windows 2000 and a warning message - Sharp AR-BC260 | AR-BC260 Operation Manual Suite - Page 156
INSTALLING THE PRINTER DRIVER AND UTILITIES (SOFTWARE INSTALLATION) Installation method 4 Use this procedure to install the software in the following environments: 1. The printer is connected by parallel cable. 2. Windows version: Windows 95/98/Me/NT 4.0*1/2000*1 NOTE *1 To install the software - Sharp AR-BC260 | AR-BC260 Operation Manual Suite - Page 157
deleted from "Printers" of "Control Panel" and select [Delete]. When uninstalling a printer driver that has been installed using the installer, the Printer Administration Utility or the Printer Status Monitor, use "Add/Remove Programs" of "Control Panel". Use the Windows standard operation for each - Sharp AR-BC260 | AR-BC260 Operation Manual Suite - Page 158
Windows NT 4.0 (Service Pack 3 or later) Microsoft Windows XP Professional/Home Edition Microsoft Windows Server 2003 When using the "Add Printer Wizard" to install printer drivers, enter the directory name indicated below as a source directory. Path for using PCL5c driver in Windows 2000/XP - Sharp AR-BC260 | AR-BC260 Operation Manual Suite - Page 159
4 Click [Add a printer] in [Printer Tasks]. 5 Follow the on-screen instructions. To specify the printer driver path, enter the following path: R:\Drivers\Printer\English\PCL5c\2kxp I Installing PCL Display Fonts The PCL display fonts are fonts displayed on your computer screen. The "Software CD-ROM - Sharp AR-BC260 | AR-BC260 Operation Manual Suite - Page 160
CONNECTING THE YOUR COMPUTER I Connection with a network connector If you will be using the machine as a network printer, see the online manual ("Print Server Card Users Manual") on the "Software CD-ROM". Use a network cable that is shielded. MACHINE TO I Connection with a USB cable Please - Sharp AR-BC260 | AR-BC260 Operation Manual Suite - Page 161
- Sharp AR-BC260 | AR-BC260 Operation Manual Suite - Page 162
- Sharp AR-BC260 | AR-BC260 Operation Manual Suite - Page 163
- Sharp AR-BC260 | AR-BC260 Operation Manual Suite - Page 164
INSTALLATION GUIDE (for printer) SHARP ELECTRONICS CORPORATION Sharp Plaza, Mahwah, New Jersey 07430-1163. www.sharpusa.com SHARP ELECTRONICS OF CANADA LTD. 335 Britannia Road East, Mississauga, Ontario, L4Z 1W9 This manual has been printed using a vegetable-based soy oil ink to help protect the - Sharp AR-BC260 | AR-BC260 Operation Manual Suite - Page 165
KEY OPERATOR'S GUIDE MODEL AR-BC260 DIGITAL FULL COLOR MULTIFUNCTIONAL SYSTEM This manual describes programs for use by the key operator. The key operator should read this manual thoroughly to gain the maximum value that these programs provide. Page • PURPOSE OF THE KEY OPERATOR PROGRAMS 1 • - Sharp AR-BC260 | AR-BC260 Operation Manual Suite - Page 166
- Sharp AR-BC260 | AR-BC260 Operation Manual Suite - Page 167
or network scanner function, see the following manuals: GFax Operation manual (for facsimile), chapter 8 GPrinter Operation manual (for printer), chapter 6 GNetwork scanner Operation manual (for network scanner), page 39 Key operator programs can only be accessed after a key operator code number - Sharp AR-BC260 | AR-BC260 Operation Manual Suite - Page 168
fax, printer, and network scanner functions) and programs that are specifically for the copy function. Key operator programs can only be accessed after a key operator code number has been entered. NOTE The key operator programs that can be accessed depend on the optional equipment that is installed - Sharp AR-BC260 | AR-BC260 Operation Manual Suite - Page 169
to enter the five-digit key operator code. Each time a number is entered, the dashes (-) KEY OPERATOR CODE in the display will change to asterisks ( ). The factory default setting for the key operator code number is 00000. 4 Touch the [KEY CHANGE] key . TINGS PRINTER SETTINGS N/W SC SETTI - Sharp AR-BC260 | AR-BC260 Operation Manual Suite - Page 170
explanation of key operation for key operator programs KEY OPERATOR PROGRAMS DEVICE CONTROL These keys and indicator are available on setting screens that require the entry of numerical values. OK 20 (1-999) SEC. (A) ORIGINAL SIZE DETECTOR SETTING DISABLING OF DOCUMENT 1/3 FEEDER DISABLING - Sharp AR-BC260 | AR-BC260 Operation Manual Suite - Page 171
SETTINGS For the following settings, see the indicated manuals. Printer settings Operation manual (for printer) Fax settings Operation manual (for facsimile) Network scanner settings Operation manual (for network scanner) INITIAL STATUS SETTINGS EXPOSURE ADJUSTMENT ROTATION COPY SETTING - Sharp AR-BC260 | AR-BC260 Operation Manual Suite - Page 172
5-digit account numbers must be entered to use the copy function, fax function, or network scanner function. (The functions can only be used if a valid account number is entered.) When auditing mode is enabled for the printer function, an account number must be entered at the computer when the print - Sharp AR-BC260 | AR-BC260 Operation Manual Suite - Page 173
When using the fax function or network scanner function, this program is used to reset the original transmission count to "0". Touch the [RESETTING ACCOUNT] key to display the following screen. KEY OPERATOR PROGRAMS RESETTING ACCOUNT ACCOUNT NUMBER COPIES S.COLOR PRINTS SCAN OK FAX SEND 100 - Sharp AR-BC260 | AR-BC260 Operation Manual Suite - Page 174
. Account number security This program is used to prevent users from gaining access to accounts by entering code numbers through trial and error. If this program is selected and an operator enters three successive invalid account numbers, the copier will not accept another number for one minute and - Sharp AR-BC260 | AR-BC260 Operation Manual Suite - Page 175
Toner save in B/W printer mode Printing in the toner save mode will reduce black toner consumption. If toner save is set, black solid areas will be printed as halftone. (This setting is effective only for printing without use of the printer driver. If the printer driver is used, the printer driver - Sharp AR-BC260 | AR-BC260 Operation Manual Suite - Page 176
screen of fax, and network scanner modes Auto clear setting After a programmed length has elapsed without any operation after a copy job is up to 240 seconds. The auto clear function can be disabled for copier functions. Display language setting This program is used to select the display - Sharp AR-BC260 | AR-BC260 Operation Manual Suite - Page 177
supported for one-sided originals. If "CANCEL DETECTION AT DOCUMENT GLASS" is set, originals will be regarded as EXTRA for all copier functions and no original size will be displayed. Disabling of document feature that offsets sets of copies or printed pages in the center tray will not function - Sharp AR-BC260 | AR-BC260 Operation Manual Suite - Page 178
paper tray in the paper tray settings of the user settings (page 2-11 of the "Operation manual (for general information and copier operation)"). Registration adjustment Use this program when the color of characters and lines in color printing is off. Registration adjustment can be performed in two - Sharp AR-BC260 | AR-BC260 Operation Manual Suite - Page 179
the [Registration adjustment] key operator program explained on page 12. Touch the [MANUAL ADJUSTMENT] key and then the [EXECUTE] key to print the adjustment pattern for manual registration adjustment. This pattern consists of scales that show how much each of the colors C (cyan), M (magenta), and - Sharp AR-BC260 | AR-BC260 Operation Manual Suite - Page 180
is used to print lists of key operator programs. Lists of key operator programs for copier, fax, printer and network scanner features are available. Key operator code change This program is used to change the key operator code. The key operator must register a key operator code number and use - Sharp AR-BC260 | AR-BC260 Operation Manual Suite - Page 181
manual (for general information and copier operation)"). Use this feature when you want to repeatedly use settings for a favorite color or for correction when a change occurs in the color balance. * Preset values displayed when you select the special "Color Balance" function. The factory default - Sharp AR-BC260 | AR-BC260 Operation Manual Suite - Page 182
printed, a message appears asking you to begin automatic adjustment. Place the test patch on the document glass as shown below and touch the [EXECUTE] key. Black neither "COPY OF COPY" nor "COLOR TONE ENHANCEMENT" are selected. • When MIRROR IMAGE, sheet paper drawer is installed) This program is used - Sharp AR-BC260 | AR-BC260 Operation Manual Suite - Page 183
- Sharp AR-BC260 | AR-BC260 Operation Manual Suite - Page 184
AR-BC260 KEY OPERATOR'S GUIDE SHARP ELECTRONICS CORPORATION Sharp Plaza, Mahwah, New Jersey 07430-1163. www.sharpusa.com SHARP ELECTRONICS OF CANADA LTD. 335 Britannia Road East, Mississauga, Ontario, L4Z 1W9 This manual has been printed using a vegetable-based soy oil ink to help protect the
-
 1
1 -
 2
2 -
 3
3 -
 4
4 -
 5
5 -
 6
6 -
 7
7 -
8
-
9
-
10
-
11
-
12
-
13
-
14
-
15
-
16
-
17
-
18
-
19
-
20
-
21
-
22
-
23
-
24
-
25
-
26
-
27
-
28
-
29
-
30
-
31
-
32
-
33
-
34
-
35
-
36
-
37
-
38
-
39
-
40
-
41
-
42
-
43
-
44
-
45
-
46
-
47
-
48
-
49
-
50
-
51
-
52
-
53
-
54
-
55
-
56
-
57
-
58
-
59
-
60
-
61
-
62
-
63
-
64
-
65
-
66
-
67
-
68
-
69
-
70
-
71
-
72
-
73
-
74
-
75
-
76
-
77
-
78
-
79
-
80
-
81
-
82
-
83
-
84
-
85
-
86
-
87
-
88
-
89
-
90
-
91
-
92
-
93
-
94
-
95
-
96
-
97
-
98
-
99
-
100
-
101
-
102
-
103
-
104
-
105
-
106
-
107
-
108
-
109
-
110
-
111
-
112
-
113
-
114
-
115
-
116
-
117
-
118
-
119
-
120
-
121
-
122
-
123
-
124
-
125
-
126
-
127
-
128
-
129
-
130
-
131
-
132
-
133
-
134
-
135
-
136
-
137
-
138
-
139
-
140
-
141
-
142
-
143
-
144
-
145
-
146
-
147
-
148
-
149
-
150
-
151
-
152
-
153
-
154
-
155
-
156
-
157
-
158
-
159
-
160
-
161
-
162
-
163
-
164
-
165
-
166
-
167
-
168
-
169
-
170
-
171
-
172
-
173
-
174
-
175
-
176
-
177
-
178
-
179
-
180
-
181
-
182
-
183
-
184
 |
 |
•
BEFORE USING
THE PRODUCT
•
MANAGING THE MACHINE
•
PERIPHERAL DEVICES
•
BEFORE MAKING
COPIES
•
BASIC PROCEDURE
FOR MAKING COPIES
•
CONVENIENT COPY
FUNCTIONS
•
MACHINE MAINTENANCE
(FOR COPYING)
•
SPECIFICATIONS
1-1
2-1
3-1
4-1
5-1
6-1
7-1
8-1
Page
DIGITAL FULL COLOR MULTIFUNCTIONAL
SYSTEM
OPERATION MANUAL
(for general information and copier operation)
MODEL
AR-BC260
(Option) Duplex bypass / inverter unit and
Stand / 3 x 500 sheet paper drawer
Be sure to become thoroughly familiar with this manual to
gain the maximum benefit from the product.
Before installing this product, be sure to read the
installation requirements and cautions sections.
Be sure to keep all operation manuals handy for reference
including this manual, the "Operation manual (for general
information and copier operation)" and operation manuals
for any optional equipment which has been installed.