Sharp AR-BC260 AR-BC260 Operation Manual Suite - Page 151
Using the machine as a shared printer viaserver
 |
View all Sharp AR-BC260 manuals
Add to My Manuals
Save this manual to your list of manuals |
Page 151 highlights
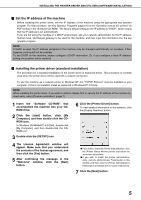
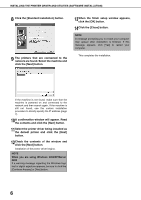
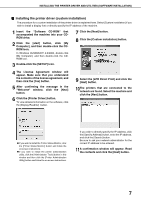
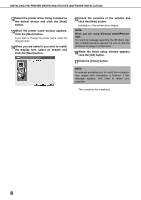
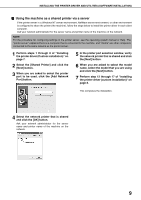
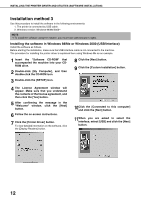
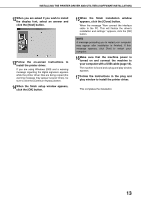
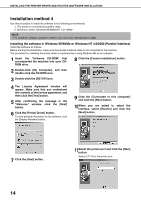
INSTALLING THE PRINTER DRIVER AND UTILITIES (SOFTWARE INSTALLATION) I Using the machine as a shared printer via a server If the printer server in a Windows NT server environment, NetWare server environment, or other environment is configured to share the printer (the machine), follow the steps below to install the printer driver in each client computer. Ask your network administrator for the server name and printer name of the machine on the network. NOTE For the procedure for configuring settings in the printer server, see the operating system manual or Help. The "printer server" explained here is a computer that is connected to the machine, and "clients" are other computers connected to the same network as the printer server. 1 Perform steps 1 through 8 of "Installing the printer driver (Custom installation)" on page 7. 2 Select the [Shared Printer] and click the [Next] button. 3 When you are asked to select the printer port to be used, click the [Add Network Port] button. 5 In the printer port selection window, verify the network printer that is shared and click the [Next] button. 6 When you are asked to select the model name, select the model that you are using and click the [Next] button. 7 Perform step 12 through 17 of "Installing the printer driver (custom installation)" on page 8. This completes the installation. 4 Select the network printer that is shared and click the [OK] button. Ask your network administrator for the server name and printer name of the machine on the network. 9
-
 1
1 -
2
-
3
-
4
-
5
-
6
-
7
-
8
-
9
-
10
-
11
-
12
-
13
-
14
-
15
-
16
-
17
-
18
-
19
-
20
-
21
-
22
-
23
-
24
-
25
-
26
-
27
-
28
-
29
-
30
-
31
-
32
-
33
-
34
-
35
-
36
-
37
-
38
-
39
-
40
-
41
-
42
-
43
-
44
-
45
-
46
-
47
-
48
-
49
-
50
-
51
-
52
-
53
-
54
-
55
-
56
-
57
-
58
-
59
-
60
-
61
-
62
-
63
-
64
-
65
-
66
-
67
-
68
-
69
-
70
-
71
-
72
-
73
-
74
-
75
-
76
-
77
-
78
-
79
-
80
-
81
-
82
-
83
-
84
-
85
-
86
-
87
-
88
-
89
-
90
-
91
-
92
-
93
-
94
-
95
-
96
-
97
-
98
-
99
-
100
-
101
-
102
-
103
-
104
-
105
-
106
-
107
-
108
-
109
-
110
-
111
-
112
-
113
-
114
-
115
-
116
-
117
-
118
-
119
-
120
-
121
-
122
-
123
-
124
-
125
-
126
-
127
-
128
-
129
-
130
-
131
-
132
-
133
-
134
-
135
-
136
-
137
-
138
-
139
-
140
-
141
-
142
-
143
-
144
-
145
-
 146
146 -
 147
147 -
 148
148 -
 149
149 -
 150
150 -
 151
151 -
 152
152 -
 153
153 -
 154
154 -
 155
155 -
 156
156 -
157
-
158
-
159
-
160
-
161
-
162
-
163
-
164
-
165
-
166
-
167
-
168
-
169
-
170
-
171
-
172
-
173
-
174
-
175
-
176
-
177
-
178
-
179
-
180
-
181
-
182
-
183
-
184
 |
 |