Sharp AR-BC260 AR-BC260 Operation Manual Suite - Page 110
Color balance
 |
View all Sharp AR-BC260 manuals
Add to My Manuals
Save this manual to your list of manuals |
Page 110 highlights
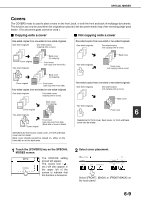
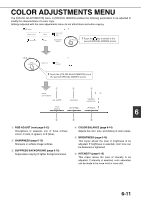
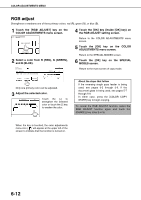
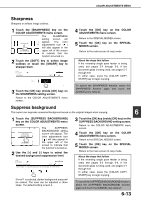
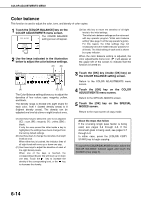
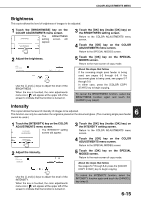
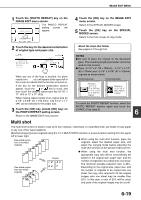
COLOR ADJUSTMENTS MENU Color balance This function is used to adjust the color, tone, and density of color copies. 1 Touch the [COLOR BALANCE] key on the COLOR ADJUSTMENTS menu screen. RGB ADJUST The COLOR BALANCE SH setting screen will appear. COLOR BRI BALANCE 2 Use the keys indicated in the illustration below to adjust the color balance settings. (B) (B) COLOR OK ADJUSTMENTS COLOR BALANCE CANCEL OK 1 2 3 4 5 6 7 8 ALL Y M+ + 0 0 C Bk - - (A) (C) (D) The Color Balance setting allows you to adjust the densities of four colors: cyan, magenta, yellow, and black. The density range is divided into eight levels for each color, from 1 (lowest density areas) to 8 (highest density areas). The density can be adjusted one level at a time or eight levels at once. (D) Use this key to return the densities of all eight levels to the initial settings. The initial color balance settings are the values set with key operator program "Initial color balance setting" (See page 15 of the key operator's guide). For this reason, the initial settings may not necessarily be 0 (the middle indicator position) for all levels. The initial setting of each level is shown by a gray indicator. When the color balance setting is adjusted, the color adjustments menu icon ( ) will appear at the upper left of the screen to indicate that the function is turned on. 3 Touch the [OK] key (inside [OK] key) on the COLOR BALANCE setting screen. Return to the COLOR ADJUSTMENTS menu screen. 4 Touch the [OK] key on the COLOR ADJUSTMENTS menu screen. Return to the SPECIAL MODES screen. 5 Touch the [OK] key on the SPECIAL MODES screen. Return to the main screen of copy mode. (A) Use these keys to select the color to be adjusted ([C] = cyan, [M] = magenta, [Y] = yellow, [Bk] = black). If only the area around the letter inside a key is highlighted, the settings have been changed from the factory default settings. (B) Use these keys to change the densities of all eight levels at once. When either key is touched, the indicator lines of all eight levels will move up or down one step. (C) Use these keys to adjust the densities of each of the eight density levels. When one of the keys is touched, the corresponding indicator line will move up or down one step. Touch the key to increase the density of the corresponding level, or the key to decrease the density. About the steps that follow If the reversing single pass feeder is being used, see pages 5-2 through 5-6. If the document glass is being used, see pages 5-7 through 5-9. In either case, press the [COLOR COPY START] key to begin copying. To cancel the COLOR BALANCE function, select the COLOR BALANCE function again and touch the [CANCEL] key (step 2). 6-14
-
 1
1 -
2
-
3
-
4
-
5
-
6
-
7
-
8
-
9
-
10
-
11
-
12
-
13
-
14
-
15
-
16
-
17
-
18
-
19
-
20
-
21
-
22
-
23
-
24
-
25
-
26
-
27
-
28
-
29
-
30
-
31
-
32
-
33
-
34
-
35
-
36
-
37
-
38
-
39
-
40
-
41
-
42
-
43
-
44
-
45
-
46
-
47
-
48
-
49
-
50
-
51
-
52
-
53
-
54
-
55
-
56
-
57
-
58
-
59
-
60
-
61
-
62
-
63
-
64
-
65
-
66
-
67
-
68
-
69
-
70
-
71
-
72
-
73
-
74
-
75
-
76
-
77
-
78
-
79
-
80
-
81
-
82
-
83
-
84
-
85
-
86
-
87
-
88
-
89
-
90
-
91
-
92
-
93
-
94
-
95
-
96
-
97
-
98
-
99
-
100
-
101
-
102
-
103
-
104
-
 105
105 -
 106
106 -
 107
107 -
 108
108 -
 109
109 -
 110
110 -
 111
111 -
 112
112 -
 113
113 -
 114
114 -
 115
115 -
116
-
117
-
118
-
119
-
120
-
121
-
122
-
123
-
124
-
125
-
126
-
127
-
128
-
129
-
130
-
131
-
132
-
133
-
134
-
135
-
136
-
137
-
138
-
139
-
140
-
141
-
142
-
143
-
144
-
145
-
146
-
147
-
148
-
149
-
150
-
151
-
152
-
153
-
154
-
155
-
156
-
157
-
158
-
159
-
160
-
161
-
162
-
163
-
164
-
165
-
166
-
167
-
168
-
169
-
170
-
171
-
172
-
173
-
174
-
175
-
176
-
177
-
178
-
179
-
180
-
181
-
182
-
183
-
184
 |
 |