Sharp AR-BC260 AR-BC260 Operation Manual Suite - Page 128
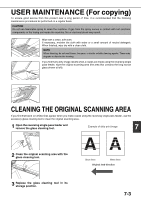
Clean the original scanning area. See
 |
View all Sharp AR-BC260 manuals
Add to My Manuals
Save this manual to your list of manuals |
Page 128 highlights
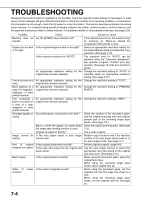
TROUBLESHOOTING Whenever the machine stops or operation is not possible, check the operation panel display for messages. In most cases, these messages will give sufficient information to return the machine to an operating condition. In cases where this information is not enough, check the list below for more information. This section describes problems concerning copier features. For troubleshooting specific problems related to the printer, network scanner, and fax features, see the separate manuals provided for these features. For problems related to other peripheral devices, see page 2-24. Problem Machine does not operate. Copies are too dark or too light. Text is not clear on a copy. Moiré appears on a copy of a magazine, catalogue, or other printed material. Text overlaying a photo is not clear on a copy of a map, magazine or other printed material. Smudges appear on copies. Image cannot be rotated. Part of original image is not copied. Blank copies Order of copies incorrect Check Are the [START] keys indicators off? Is the original image too dark or too light? Is the exposure mode set to "AUTO"? An appropriate resolution setting for the original has not been selected. An appropriate resolution setting for the original has not been selected. An appropriate resolution setting for the original has not been selected. An appropriate resolution setting for the original has not been selected. Document glass or document cover dirty? Black or white line appear on copies when the single pass feeding function is used. Original smudged or blotchy? Is the auto paper select or auto image function set? Is the original positioned correctly? Is the copy ratio proper for the original and paper sizes? Is the original placed correctly? Is the order of originals correct? Solution or cause If the indicators are not on, the machine may be warming up. Warm-up should be completed in 99 seconds or less. Select an appropriate resolution setting for the original being copied and adjust the copy exposure. (See page 5-10) The exposure level for "AUTO" can be adjusted using the "Exposure adjustment" key operator program. Contact your key operator. (See page 15 of the key operator's guide.) Change the resolution setting to "AUTO" or manually select an appropriate resolution setting. (See page 5-10) Change the resolution setting to "TEXT". Change the resolution setting to "PRINTED PHOTO". Change the resolution setting to "MAP". Clean the surface of the document glass, and the original scanning area and original presser part of the reversing single pass feeder. (See page 7-3.) Clean the original scanning area. (See page 7-3.) Use a clean original. Rotation copy functions only if the machine is either in the auto paper select mode or in the auto image mode. (See page 4-7.) Set the original properly. (page 4-6) Use the auto image function to select the appropriate copy ratio based on the original and copy sizes. (See page 5-12.) When using the document glass, place the original face down. When using the reversing single pass feeder, place original face up. When using the document glass, set the originals from the first page one sheet at a time. When using the reversing single pass feeder, set the originals with the first page up. 7-4
-
 1
1 -
2
-
3
-
4
-
5
-
6
-
7
-
8
-
9
-
10
-
11
-
12
-
13
-
14
-
15
-
16
-
17
-
18
-
19
-
20
-
21
-
22
-
23
-
24
-
25
-
26
-
27
-
28
-
29
-
30
-
31
-
32
-
33
-
34
-
35
-
36
-
37
-
38
-
39
-
40
-
41
-
42
-
43
-
44
-
45
-
46
-
47
-
48
-
49
-
50
-
51
-
52
-
53
-
54
-
55
-
56
-
57
-
58
-
59
-
60
-
61
-
62
-
63
-
64
-
65
-
66
-
67
-
68
-
69
-
70
-
71
-
72
-
73
-
74
-
75
-
76
-
77
-
78
-
79
-
80
-
81
-
82
-
83
-
84
-
85
-
86
-
87
-
88
-
89
-
90
-
91
-
92
-
93
-
94
-
95
-
96
-
97
-
98
-
99
-
100
-
101
-
102
-
103
-
104
-
105
-
106
-
107
-
108
-
109
-
110
-
111
-
112
-
113
-
114
-
115
-
116
-
117
-
118
-
119
-
120
-
121
-
122
-
 123
123 -
 124
124 -
 125
125 -
 126
126 -
 127
127 -
 128
128 -
 129
129 -
 130
130 -
 131
131 -
 132
132 -
 133
133 -
134
-
135
-
136
-
137
-
138
-
139
-
140
-
141
-
142
-
143
-
144
-
145
-
146
-
147
-
148
-
149
-
150
-
151
-
152
-
153
-
154
-
155
-
156
-
157
-
158
-
159
-
160
-
161
-
162
-
163
-
164
-
165
-
166
-
167
-
168
-
169
-
170
-
171
-
172
-
173
-
174
-
175
-
176
-
177
-
178
-
179
-
180
-
181
-
182
-
183
-
184
 |
 |
