Sharp AR-BC260 AR-BC260 Operation Manual Suite - Page 36
About the settings
 |
View all Sharp AR-BC260 manuals
Add to My Manuals
Save this manual to your list of manuals |
Page 36 highlights
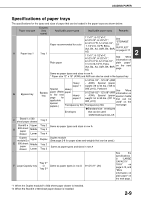
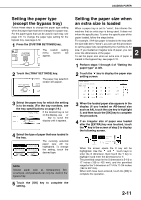
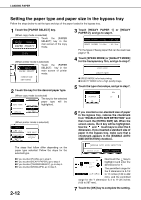
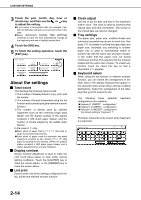
CUSTOM SETTINGS 3 Touch the year, month, day, hour or minute key, and then use the or key to adjust the setting. G If you select a non-existent date (for example, Feb. 30), the [OK] key will gray out to prevent entry of the date. G Select [DAYLIGHT SAVING TIME SETTING] checkbox to have the time automatically change at the beginning and end of daylight saving time. 4 Touch the [OK] key. 5 To finish the setting operation, touch the [EXIT] key. CUSTOM SETTINGS TOTAL COUNT TRAY SETTINGS KEYBOARD SELECT DISPLAY CONTRAST ADDRESS CONTROL LIST PRINT RECEIVE MODE KEY OPERATOR PROGRAMS EXIT CLOCK FAX DATA FORWARD About the settings I Total count This displays the following sheet counts: The number of sheets printed in copy, print, and fax modes. The number of sheets transmitted using the fax function and scanned using the network scanner function. The number of sheets used by optional equipment such as the reversing single pass feeder and the duplex module of the duplex module/2 x 500 sheet paper drawer, and the number of sheets stapled by the saddle stitch finisher. In the case of only, G Each sheet of paper that is 11" x 17" (A3) size or larger is counted as two sheets. G Each sheet of paper used for automatic two-sided copying is counted as two sheets (11" x 17" (A3) paper is counted as four sheets). (When an optional duplex module/2 x 500 sheet paper drawer and a duplex bypass/inverter unit are installed.) I Display contrast Screen contrast adjustment is used to make the LCD touch panel easier to view under various lighting conditions. Touch the [LIGHTER] key to make the screen lighter, or the [DARKER] key to make the screen darker. I List print Used to print a list of the settings configured in the fax, printer and network scanner function. I Clock adjust Use this to set the date and time in the machine's built-in clock. This clock is used by functions that require date and time information. The format of the printed date can also be changed. I Tray settings The paper type, paper size, enabled modes and automatic tray switching can set for each tray. See page 2-11 for details on setting the paper type and paper size. Automatic tray switching to another paper tray is used to automatically switch to another tray with the same size and type of paper in the event that the paper runs out during continuous printing. This requires that the trays be loaded with the same size of paper. To enable any function, touch the check box key so that a checkmark ( ) appears. I Keyboard select When using the fax function or network scanner function, you can switch the arrangement of the letter keys in the display keyboard that appear in the character entry screen when storing or editing destinations. Select the arrangement of the letter keys that you find easiest to use. The following three alphabet configurations are available: G Keyboard 1 (QWERT... configuration)* G Keyboard 2 (AZERTY...configuration) G Keyboard 3 (ABCDEF...configuration) * The default setting is "Keyboard 1". keyboard (Example: Character entry screen when Keyboard 3 is selected) DESTINATION NAME CANCEL OK SPACE 2-14
-
 1
1 -
2
-
3
-
4
-
5
-
6
-
7
-
8
-
9
-
10
-
11
-
12
-
13
-
14
-
15
-
16
-
17
-
18
-
19
-
20
-
21
-
22
-
23
-
24
-
25
-
26
-
27
-
28
-
29
-
30
-
 31
31 -
 32
32 -
 33
33 -
 34
34 -
 35
35 -
 36
36 -
 37
37 -
 38
38 -
 39
39 -
 40
40 -
 41
41 -
42
-
43
-
44
-
45
-
46
-
47
-
48
-
49
-
50
-
51
-
52
-
53
-
54
-
55
-
56
-
57
-
58
-
59
-
60
-
61
-
62
-
63
-
64
-
65
-
66
-
67
-
68
-
69
-
70
-
71
-
72
-
73
-
74
-
75
-
76
-
77
-
78
-
79
-
80
-
81
-
82
-
83
-
84
-
85
-
86
-
87
-
88
-
89
-
90
-
91
-
92
-
93
-
94
-
95
-
96
-
97
-
98
-
99
-
100
-
101
-
102
-
103
-
104
-
105
-
106
-
107
-
108
-
109
-
110
-
111
-
112
-
113
-
114
-
115
-
116
-
117
-
118
-
119
-
120
-
121
-
122
-
123
-
124
-
125
-
126
-
127
-
128
-
129
-
130
-
131
-
132
-
133
-
134
-
135
-
136
-
137
-
138
-
139
-
140
-
141
-
142
-
143
-
144
-
145
-
146
-
147
-
148
-
149
-
150
-
151
-
152
-
153
-
154
-
155
-
156
-
157
-
158
-
159
-
160
-
161
-
162
-
163
-
164
-
165
-
166
-
167
-
168
-
169
-
170
-
171
-
172
-
173
-
174
-
175
-
176
-
177
-
178
-
179
-
180
-
181
-
182
-
183
-
184
 |
 |