Sharp AR-BC260 AR-BC260 Operation Manual Suite - Page 147
Set the IP address of the machine, Installing the printer driver standard installation - pdf
 |
View all Sharp AR-BC260 manuals
Add to My Manuals
Save this manual to your list of manuals |
Page 147 highlights
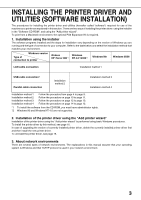
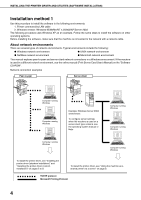
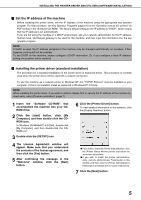
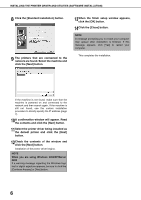
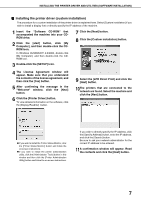
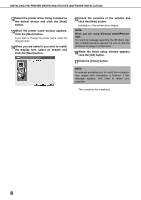
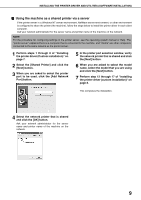
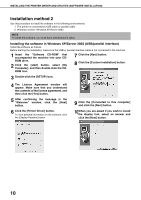
INSTALLING THE PRINTER DRIVER AND UTILITIES (SOFTWARE INSTALLATION) I Set the IP address of the machine Before installing the printer driver, set the IP address of the machine using the appropriate key operator program. For this procedure, see Key Operator Programs (page 6-6) in the "Operation manual (for printer)" (in PDF format) in the "Software CD-ROM". The factory default setting for the IP address is "DHCP", which means that the IP address is set automatically. If you are not using the machine in a DHCP environment, ask your network administrator for the IP address, Subnet mask, and Default gateway to be used for the machine, and then input this information into the key operator program. NOTE If DHCP is used, the IP address assigned to the machine may be changed automatically on occasion. If this happens, printing will not be possible. To use DHCP on this machine, please configure a DHCP reservation. Or, if you configure a fixed IP address setting, the problem will be resolved. I Installing the printer driver (standard installation) The procedure for a standard installation of the printer driver is explained below. This procedure is normally used when the printer driver will be used with a network connection. To use the machine as a network printer in Windows NT 4.0, "TCP/IP Protocol" must be installed on your computer. If this is not installed, install as explained in Windows NT 4.0 Help. NOTE When installing the printer driver, if you wish to install a display font or specify the IP address of the machine by direct entry, select [Custom installation]. (page 7) 1 Insert the "Software CD-ROM" that accompanied the machine into your CDROM drive. 2 Click the [start] button, click [My Computer], and then double-click the CDROM icon. In Windows 95/98/Me/NT 4.0/2000, double-click [My Computer], and then double-click the CDROM icon. 3 Double-click the [SETUP] icon. 4 The License Agreement window will appear. Make sure that you understand the contents of the license agreement, and then click the [Yes] button. 5 After confirming the message in the "Welcome" window, click the [Next] button. 6 Click the [Printer Driver] button. To view detailed information on the software, click the [Display Readme] button. G If you wish to install the Printer Status Monitor, click the [Printer Status Monitor] button and follow the on-screen instructions. G If you wish to install the printer administration utility, click the [Administrator Tools] button in this window and then click the [Printer Administration Utility] button and follow the on-screen instructions. 7 Click the [Next] button. 5
-
 1
1 -
2
-
3
-
4
-
5
-
6
-
7
-
8
-
9
-
10
-
11
-
12
-
13
-
14
-
15
-
16
-
17
-
18
-
19
-
20
-
21
-
22
-
23
-
24
-
25
-
26
-
27
-
28
-
29
-
30
-
31
-
32
-
33
-
34
-
35
-
36
-
37
-
38
-
39
-
40
-
41
-
42
-
43
-
44
-
45
-
46
-
47
-
48
-
49
-
50
-
51
-
52
-
53
-
54
-
55
-
56
-
57
-
58
-
59
-
60
-
61
-
62
-
63
-
64
-
65
-
66
-
67
-
68
-
69
-
70
-
71
-
72
-
73
-
74
-
75
-
76
-
77
-
78
-
79
-
80
-
81
-
82
-
83
-
84
-
85
-
86
-
87
-
88
-
89
-
90
-
91
-
92
-
93
-
94
-
95
-
96
-
97
-
98
-
99
-
100
-
101
-
102
-
103
-
104
-
105
-
106
-
107
-
108
-
109
-
110
-
111
-
112
-
113
-
114
-
115
-
116
-
117
-
118
-
119
-
120
-
121
-
122
-
123
-
124
-
125
-
126
-
127
-
128
-
129
-
130
-
131
-
132
-
133
-
134
-
135
-
136
-
137
-
138
-
139
-
140
-
141
-
 142
142 -
 143
143 -
 144
144 -
 145
145 -
 146
146 -
 147
147 -
 148
148 -
 149
149 -
 150
150 -
 151
151 -
 152
152 -
153
-
154
-
155
-
156
-
157
-
158
-
159
-
160
-
161
-
162
-
163
-
164
-
165
-
166
-
167
-
168
-
169
-
170
-
171
-
172
-
173
-
174
-
175
-
176
-
177
-
178
-
179
-
180
-
181
-
182
-
183
-
184
 |
 |