Sharp AR-BC260 AR-BC260 Operation Manual Suite - Page 57
Disposal of hole punch scrap when the punch unit is installed
 |
View all Sharp AR-BC260 manuals
Add to My Manuals
Save this manual to your list of manuals |
Page 57 highlights
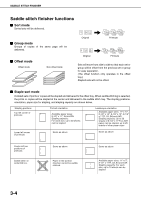
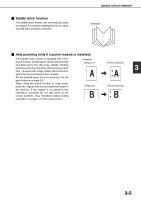
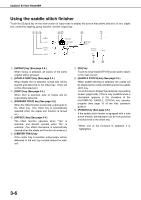
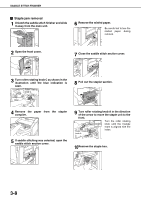
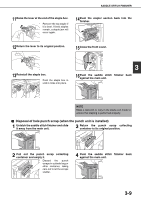
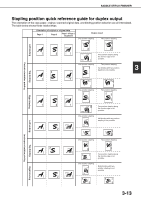
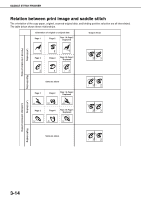
SADDLE STITCH FINISHER 11Raise the lever at the end of the staple box. Remove the top staple if it is bent. If bent staples remain, a staple jam will occur again. 14Push the stapler section back into the finisher. 12Return the lever to its original position. 15Close the front cover. 13Reinstall the staple box. Push the staple box in until it clicks into place. 3 16Push the saddle stitch finisher back against the main unit. NOTE Make a test print or copy in the staple sort mode to ensure that stapling is performed properly. I Disposal of hole punch scrap (when the punch unit is installed) 1 Unlatch the saddle stitch finisher and slide it away from the main unit. 3 Return the punch scrap collecting container to its original position. 2 Pull out the punch scrap collecting container and empty it. Discard the punch scraps in a plastic bag or other container, taking care not to let the scraps scatter. 4 Push the saddle stitch finisher back against the main unit. 3-9
-
 1
1 -
2
-
3
-
4
-
5
-
6
-
7
-
8
-
9
-
10
-
11
-
12
-
13
-
14
-
15
-
16
-
17
-
18
-
19
-
20
-
21
-
22
-
23
-
24
-
25
-
26
-
27
-
28
-
29
-
30
-
31
-
32
-
33
-
34
-
35
-
36
-
37
-
38
-
39
-
40
-
41
-
42
-
43
-
44
-
45
-
46
-
47
-
48
-
49
-
50
-
51
-
 52
52 -
 53
53 -
 54
54 -
 55
55 -
 56
56 -
 57
57 -
 58
58 -
 59
59 -
 60
60 -
 61
61 -
 62
62 -
63
-
64
-
65
-
66
-
67
-
68
-
69
-
70
-
71
-
72
-
73
-
74
-
75
-
76
-
77
-
78
-
79
-
80
-
81
-
82
-
83
-
84
-
85
-
86
-
87
-
88
-
89
-
90
-
91
-
92
-
93
-
94
-
95
-
96
-
97
-
98
-
99
-
100
-
101
-
102
-
103
-
104
-
105
-
106
-
107
-
108
-
109
-
110
-
111
-
112
-
113
-
114
-
115
-
116
-
117
-
118
-
119
-
120
-
121
-
122
-
123
-
124
-
125
-
126
-
127
-
128
-
129
-
130
-
131
-
132
-
133
-
134
-
135
-
136
-
137
-
138
-
139
-
140
-
141
-
142
-
143
-
144
-
145
-
146
-
147
-
148
-
149
-
150
-
151
-
152
-
153
-
154
-
155
-
156
-
157
-
158
-
159
-
160
-
161
-
162
-
163
-
164
-
165
-
166
-
167
-
168
-
169
-
170
-
171
-
172
-
173
-
174
-
175
-
176
-
177
-
178
-
179
-
180
-
181
-
182
-
183
-
184
 |
 |
