Sony Ericsson Xperia X User Guide - Page 8
Assembly, Wi-Fi/Bluetooth/GPS antenna area
 |
View all Sony Ericsson Xperia X manuals
Add to My Manuals
Save this manual to your list of manuals |
Page 8 highlights
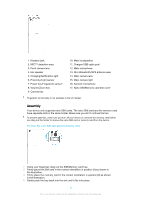
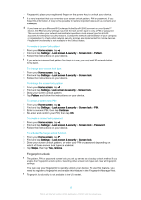
1. Headset jack 2. NFC™ detection area 3. Front camera lens 4. Ear speaker 5. Charging/Notification light 6. Proximity/Light sensor 7. Power key/Fingerprint sensor* 8. Volume/Zoom key 9. Camera key 10. Main loudspeaker 11. Charger/USB cable port 12. Main microphone 13. Wi-Fi/Bluetooth/GPS antenna area 14. Main camera lens 15. Main camera light 16. Second microphone 17. Nano SIM/Memory card slot cover Fingerprint functionality is not available in the US market. Assembly Your device only supports nano SIM cards. The nano SIM card and the memory card have separate slots in the same holder. Make sure you don't confuse the two. To prevent data loss, make sure you turn off your device or unmount the memory card before you drag out the holder to remove the nano SIM card or memory card from the device. To insert the nano SIM card and the memory card 1 Using your fingernail, drag out the SIM/Memory card tray. 2 Firmly place the SIM card in the correct orientation in position (1) as shown in the illustration. 3 Firmly place the memory card in the correct orientation in position (2) as shown in the illustration. 4 Gently push the tray back into the slot until it fits into place. 8 This is an internet version of this publication. © Print only for private use.
-
 1
1 -
2
-
 3
3 -
 4
4 -
 5
5 -
 6
6 -
 7
7 -
 8
8 -
 9
9 -
 10
10 -
 11
11 -
 12
12 -
 13
13 -
14
-
15
-
16
-
17
-
18
-
19
-
20
-
21
-
22
-
23
-
24
-
25
-
26
-
27
-
28
-
29
-
30
-
31
-
32
-
33
-
34
-
35
-
36
-
37
-
38
-
39
-
40
-
41
-
42
-
43
-
44
-
45
-
46
-
47
-
48
-
49
-
50
-
51
-
52
-
53
-
54
-
55
-
56
-
57
-
58
-
59
-
60
-
61
-
62
-
63
-
64
-
65
-
66
-
67
-
68
-
69
-
70
-
71
-
72
-
73
-
74
-
75
-
76
-
77
-
78
-
79
-
80
-
81
-
82
-
83
-
84
-
85
-
86
-
87
-
88
-
89
-
90
-
91
-
92
-
93
-
94
-
95
-
96
-
97
-
98
-
99
-
100
-
101
-
102
-
103
-
104
-
105
-
106
-
107
-
108
-
109
-
110
-
111
-
112
-
113
-
114
-
115
-
116
-
117
-
118
-
119
-
120
-
121
-
122
-
123
-
124
-
125
-
126
-
127
-
128
-
129
-
130
-
131
-
132
-
133
-
134
-
135
 |
 |
