Sony DCR PC101 Operating Instructions - Page 189
Notes on formatting, Note on PRINT SET, Icon/item, MEMORY SET, SLIDE SHOW, PHOTO SAVE, FILE NO.
 |
View all Sony DCR PC101 manuals
Add to My Manuals
Save this manual to your list of manuals |
Page 189 highlights
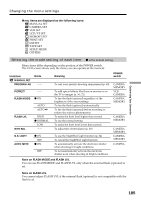
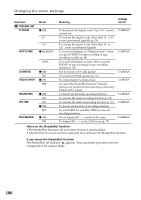
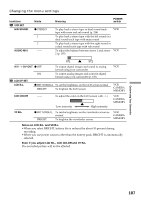
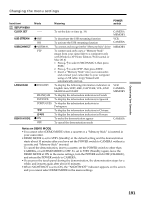
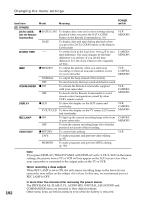
Customizing Your Camcorder Changing the menu settings Icon/item MEMORY SET SLIDE SHOW PHOTO SAVE FILE NO. DELETE ALL FORMAT PRINT SET 9PIC PRINT DATE/TIME Mode Meaning -- -- z SERIES RESET -- z RETURN OK To play back images in a continuous loop (p. 155) To copy still images on a tape onto a "Memory Stick" (p. 146) To assign numbers to file in sequence even if the "Memory Stick" is changed To reset the file numbering each time the "Memory Stick" is changed To delete all the unprotected images (p. 159) To cancel formatting To format an inserted "Memory Stick." Formatting erases all information on the "Memory Stick." Check the contents of the "Memory Stick" before formatting. 1. Select FORMAT with r/R, then press EXEC. 2. Press r/R to select OK, then press EXEC. 3. After EXECUTE appears, press EXEC. FORMATTING flashes during formatting. COMPLETE appears when formatting is finished. z RETURN SAME MULTI MARKED z OFF DATE DAY&TIME To stop 9PICS print To execute SAME PICS print (p. 161) To execute MULTI PICS print To print images with print mark arranging them in order of recording To make prints without the recording date and time To make prints with the recording date (p. 162) To make prints with the recording date and time POWER switch MEMORY VCR VCR MEMORY MEMORY MEMORY MEMORY MEMORY Notes on formatting •Do not do any of the following while FORMATTING is displayed: - Change the POWER switch position to others - Operate buttons - Eject the "Memory Stick" •The "Memory Stick" supplied with your camcorder has been formatted at factory. Formatting with your camcorder is not required. •You cannot format the "Memory Stick" if the write-protect switch on the "Memory Stick" is set to LOCK. •Format the "Memory Stick" if " FORMAT ERROR" appears. •Formatting erases protected image data on the "Memory Stick." Note on PRINT SET 9PIC PRINT and DATE/TIME are displayed only when an external printer (optional) is connected to the intelligent accessory shoe. 189
-
 1
1 -
2
-
3
-
4
-
5
-
6
-
7
-
8
-
9
-
10
-
11
-
12
-
13
-
14
-
15
-
16
-
17
-
18
-
19
-
20
-
21
-
22
-
23
-
24
-
25
-
26
-
27
-
28
-
29
-
30
-
31
-
32
-
33
-
34
-
35
-
36
-
37
-
38
-
39
-
40
-
41
-
42
-
43
-
44
-
45
-
46
-
47
-
48
-
49
-
50
-
51
-
52
-
53
-
54
-
55
-
56
-
57
-
58
-
59
-
60
-
61
-
62
-
63
-
64
-
65
-
66
-
67
-
68
-
69
-
70
-
71
-
72
-
73
-
74
-
75
-
76
-
77
-
78
-
79
-
80
-
81
-
82
-
83
-
84
-
85
-
86
-
87
-
88
-
89
-
90
-
91
-
92
-
93
-
94
-
95
-
96
-
97
-
98
-
99
-
100
-
101
-
102
-
103
-
104
-
105
-
106
-
107
-
108
-
109
-
110
-
111
-
112
-
113
-
114
-
115
-
116
-
117
-
118
-
119
-
120
-
121
-
122
-
123
-
124
-
125
-
126
-
127
-
128
-
129
-
130
-
131
-
132
-
133
-
134
-
135
-
136
-
137
-
138
-
139
-
140
-
141
-
142
-
143
-
144
-
145
-
146
-
147
-
148
-
149
-
150
-
151
-
152
-
153
-
154
-
155
-
156
-
157
-
158
-
159
-
160
-
161
-
162
-
163
-
164
-
165
-
166
-
167
-
168
-
169
-
170
-
171
-
172
-
173
-
174
-
175
-
176
-
177
-
178
-
179
-
180
-
181
-
182
-
183
-
 184
184 -
 185
185 -
 186
186 -
 187
187 -
 188
188 -
 189
189 -
 190
190 -
 191
191 -
 192
192 -
 193
193 -
 194
194 -
195
-
196
-
197
-
198
-
199
-
200
-
201
-
202
-
203
-
204
-
205
-
206
-
207
-
208
-
209
-
210
-
211
-
212
-
213
-
214
-
215
-
216
-
217
-
218
-
219
-
220
-
221
-
222
-
223
-
224
 |
 |