Sony LF-X11 User Manual - Page 41
Connecting to an access point, Then select [Settings] next to Wireless
 |
View all Sony LF-X11 manuals
Add to My Manuals
Save this manual to your list of manuals |
Page 41 highlights
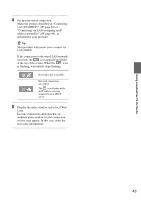
Using LocationFree TV On the Go 4 Select [Back]. If you selected [Public Wireless] in the [Settings] window in step 1, you return to the [Settings] window. If you selected the [Settings] button next to [On the Go-Wireless] in the [Monitor] window in step 1, you return to the [On the Go-Wireless] window. In this case, you return to the [Settings] window if you select [Back] twice. 2 Select the access point from the [Wireless Network List], and then select [Connect]. 5 Set up your wireless connection. Make the settings described in "Connecting via LAN (DHCP)" (1 page 83) or "Connecting via LAN (assigning an IP address manually)" (1 page 84), as specified by your provider. z Tip Most providers will instruct you to connect via LAN (DHCP). 6 Select [Settings], and then select [Exit]. Connecting to an access point 1 Display the [Settings] window, and then select [Public Wireless]. The [Connection Settings] window appears. [Public Wireless] cannot be selected unless the Monitor connection type is Wireless On the Go mode. If the Monitor is in another mode, select [Monitor] and [On the Go]. Then select [Settings] next to Wireless On the Go mode, and select [Public Wireless]. [Connect] Select an access point. The wireless network (SSID) and signal quality appear under [Current Connection] when you connect to an access point. Notes • On some access points, a mark beside the wireless network (SSID) may not appear, even when it is accessible. • If the message "Searching for (wireless network)" displayed below "Current Connection" does not disappear after a while, reselect [Connect]. For a wireless access point that already has authentication information entered, check the [Security Settings]. • On the web page or mail, there is danger of personal information being leaked or stolen, if you connect to an unencrypted access point. For details on wireless security, see "About Wireless Security" (1 page 5). 3 Check your network connection. Wait until an icon appears at the top of the window to indicate that a network connection has been successfully established. 41 Continued
-
 1
1 -
2
-
3
-
4
-
5
-
6
-
7
-
8
-
9
-
10
-
11
-
12
-
13
-
14
-
15
-
16
-
17
-
18
-
19
-
20
-
21
-
22
-
23
-
24
-
25
-
26
-
27
-
28
-
29
-
30
-
31
-
32
-
33
-
34
-
35
-
 36
36 -
 37
37 -
 38
38 -
 39
39 -
 40
40 -
 41
41 -
 42
42 -
 43
43 -
 44
44 -
 45
45 -
 46
46 -
47
-
48
-
49
-
50
-
51
-
52
-
53
-
54
-
55
-
56
-
57
-
58
-
59
-
60
-
61
-
62
-
63
-
64
-
65
-
66
-
67
-
68
-
69
-
70
-
71
-
72
-
73
-
74
-
75
-
76
-
77
-
78
-
79
-
80
-
81
-
82
-
83
-
84
-
85
-
86
-
87
-
88
-
89
-
90
-
91
-
92
-
93
-
94
-
95
-
96
 |
 |
