Sony LF-X11 User Manual - Page 42
Connecting to a On the Go, Wired LAN, The [Wired Monitor Settings] window
 |
View all Sony LF-X11 manuals
Add to My Manuals
Save this manual to your list of manuals |
Page 42 highlights
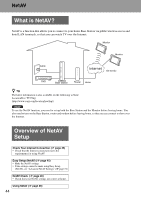
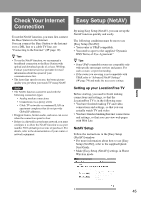
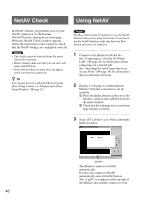
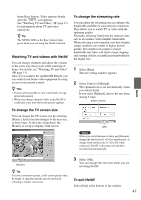
Network is not accessible. Network connection successful. The icon flashes while an IP address is being acquired from a DHCP server. The signal level indicated by the wireless icon may also be level one or level two depending on signal strength. Note If the icon does not appear, or if the icon does not stop blinking, then the security settings may not be correct. Check the access point settings to be sure that they follow the instructions of the provider. 4 Display the index window and select [Web Lite]. If the web page that you chose appears, then the setup is completed. Some providers automatically display an authentication screen when you access their public wireless access services. Follow the instructions on the screen and enter your ID password. For details, refer to the information of the public wireless access service provider. z Tip If you attempt to display a web page before the icon appears (no flash), a message appears warning that no Internet connection is available. If this occurs, wait until the icon stops flashing, and then select [Home]. Note Some providers charge for all time you are online - from authentication to logout. For details, refer to resources on the web site of the network provider. Connecting to a On the GoWired LAN Using a LAN cable (not supplied), you can connect the Monitor to a wired LAN in a hotel or other public facility, so that you can view web pages and check your mail via the Internet. Contact your service provider for details about the information needed to connect to the network. Some providers charge for all time you are online - from authentication to logout. For details, refer to the information of the network provider. 1 Display the [Settings] window, and then select [Monitor]. The [Monitor] window appears. 2 Select [Settings] next to wired LAN On the Go mode. The [Wired Monitor Settings] window appears. 3 Using a LAN cable (not supplied), connect the Monitor to the Internet terminal at the location where you are connecting. 42
-
 1
1 -
2
-
3
-
4
-
5
-
6
-
7
-
8
-
9
-
10
-
11
-
12
-
13
-
14
-
15
-
16
-
17
-
18
-
19
-
20
-
21
-
22
-
23
-
24
-
25
-
26
-
27
-
28
-
29
-
30
-
31
-
32
-
33
-
34
-
35
-
36
-
 37
37 -
 38
38 -
 39
39 -
 40
40 -
 41
41 -
 42
42 -
 43
43 -
 44
44 -
 45
45 -
 46
46 -
 47
47 -
48
-
49
-
50
-
51
-
52
-
53
-
54
-
55
-
56
-
57
-
58
-
59
-
60
-
61
-
62
-
63
-
64
-
65
-
66
-
67
-
68
-
69
-
70
-
71
-
72
-
73
-
74
-
75
-
76
-
77
-
78
-
79
-
80
-
81
-
82
-
83
-
84
-
85
-
86
-
87
-
88
-
89
-
90
-
91
-
92
-
93
-
94
-
95
-
96
 |
 |
