Sony LF-X11 User Manual - Page 75
Setting up NetAV on the Base, Station, The [Port Number for NetAV] window
 |
View all Sony LF-X11 manuals
Add to My Manuals
Save this manual to your list of manuals |
Page 75 highlights
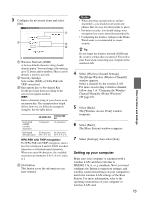
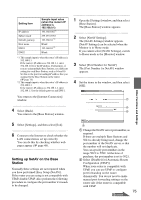
Setting item IP address Subnet mask Default gateway Host name DNS1 DNS2 Sample input value (when the router's IP address is 192.168.0.1) 192.168.0.64*1 255.255.255.0 192.168.0.1*2 Blank 192.168.0.1*2 Blank *1 This sample input is when the router's IP address is 192.168.0.1. If the router's IP address is 192.168.1.1, enter 192.168.1.64 for the IP address. Furthermore, if you are using multiple Base Stations, set a different setting for each Base Station, such as 64 and 65. Set this to the port forwarding IP address that you assigned to the Base Station on the router (1 page 76). *2 This sample input is when the router's IP address is 192.168.0.1. If the router's IP address is 192.168.1.1, enter 192.168.1.1 for the default gateway and DNS 1. You return to the [Internet Connection] window. 1 Open the [Settings] window, and then select [Base Station]. The [Base Station] window appears. 2 Select [NetAV Settings]. The [NetAV Settings] window appears. [NetAV Settings] can be selected when the Monitor is in Home mode. If you cannot select [NetAV Settings], switch to Home mode in the [Monitor] window. 3 Select [Port Number for NetAV]. The [Port Number for NetAV] window appears. 4 Set the items in the window, and then select [OK]. Other Functions and Settings 4 Select [Back]. You return to the [Base Station] window. 5 Select [Settings], and then select [Exit]. 6 Connect to the Internet to check whether the LAN connection is set up correctly. You can do this by checking whether web pages appear (1 page 48). Setting up NetAV on the Base Station Normally these settings are not required when you have performed [Easy Setup (NetAV)]. If the router you are using is not compatible with UPnP, disable UPnP. Also perform the following procedure to configure the port number if it needs to be changed. 1 Change the NetAV server port number, as required. If there are multiple Base Stations and 5021 is already being used, change the port number of the NetAV server so that the number will not duplicate. You can specify port numbers in the range 5021 to 5999. At the time of purchase, the port number is set to 5021. 2 Select [Disable] for [Automatic Router Configuration (UPnP)]. When your router is compatible with UPnP, you can use UPnP to configure port forwarding on the router dynamically. You do not need to make manual port forwarding settings on the router side if the router is compatible with UPnP. 75 Continued
-
 1
1 -
2
-
3
-
4
-
5
-
6
-
7
-
8
-
9
-
10
-
11
-
12
-
13
-
14
-
15
-
16
-
17
-
18
-
19
-
20
-
21
-
22
-
23
-
24
-
25
-
26
-
27
-
28
-
29
-
30
-
31
-
32
-
33
-
34
-
35
-
36
-
37
-
38
-
39
-
40
-
41
-
42
-
43
-
44
-
45
-
46
-
47
-
48
-
49
-
50
-
51
-
52
-
53
-
54
-
55
-
56
-
57
-
58
-
59
-
60
-
61
-
62
-
63
-
64
-
65
-
66
-
67
-
68
-
69
-
 70
70 -
 71
71 -
 72
72 -
 73
73 -
 74
74 -
 75
75 -
 76
76 -
 77
77 -
 78
78 -
 79
79 -
 80
80 -
81
-
82
-
83
-
84
-
85
-
86
-
87
-
88
-
89
-
90
-
91
-
92
-
93
-
94
-
95
-
96
 |
 |
