Sony LF-X11 User Manual - Page 76
Setting up the Monitor, Setting up NetAV on the Base Station
 |
View all Sony LF-X11 manuals
Add to My Manuals
Save this manual to your list of manuals |
Page 76 highlights
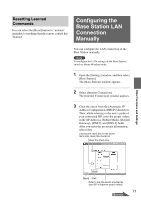
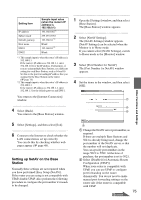
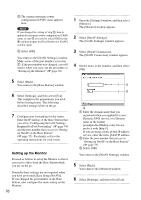
3 The current automatic router configuration (UPnP) status appears here. Note If you changed the setting of step 2, then to update the automatic router configuration (UPnP) status of step 3 you need to select [OK] in step 4 and then display the [Port Number for NetAV] window again. 4 Select [OK]. You return to the [NetAV Settings] window. Make a note of the port number set in step 1. If the port number was changed, you will need it when you carry out the procedure in "Setting up the Monitor" (1 page 76). 1 Open the [Settings] window, and then select [Monitor]. The [Monitor] window appears. 2 Select [NetAV Settings]. The [NetAV Settings] window appears. 3 Select [NetAV Connection]. The [NetAV Connection] window appears. 4 Set the items in the window, and then select [OK]. 5 Select [Back]. You return to the [Base Station] window. 6 Select [Settings], and then select [Exit]. This completes the preparations you need before leaving home. The following describes settings while on the go. 7 Configure port forwarding for the router. Enter the IP address of the Base Station that you set in "Configuring the LAN Settings Required for Port Forwarding" (1 page 74) and the port number that you set in "Setting up NetAV on the Base Station" (1 page 75). For details, refer to the operating instructions for your router. Setting up the Monitor Proceed as follows to set up the Monitor so that it can receive video from the Base Station while you are on the go. Normally these settings are not required when you have performed [Easy Setup (NetAV)]. If you changed the port number of the Base Station, also configure the same setting on the Monitor. 76 1 Enter the domain name that you registered when you applied for your Dynamic DNS service, or a Domain name in the format [example.dns.lflinkup.com]. Do not prefix it with [http://]. If you are using a static global IP address service, enter the static global IP address. 2 Enter the port number that you set in "Setting up NetAV on the Base Station" (1 page 75). 3 Select [OK]. You return to the [NetAV Settings] window. 5 Select [Back]. You return to the [Monitor] window. 6 Select [Settings], and then select [Exit].
-
 1
1 -
2
-
3
-
4
-
5
-
6
-
7
-
8
-
9
-
10
-
11
-
12
-
13
-
14
-
15
-
16
-
17
-
18
-
19
-
20
-
21
-
22
-
23
-
24
-
25
-
26
-
27
-
28
-
29
-
30
-
31
-
32
-
33
-
34
-
35
-
36
-
37
-
38
-
39
-
40
-
41
-
42
-
43
-
44
-
45
-
46
-
47
-
48
-
49
-
50
-
51
-
52
-
53
-
54
-
55
-
56
-
57
-
58
-
59
-
60
-
61
-
62
-
63
-
64
-
65
-
66
-
67
-
68
-
69
-
70
-
 71
71 -
 72
72 -
 73
73 -
 74
74 -
 75
75 -
 76
76 -
 77
77 -
 78
78 -
 79
79 -
 80
80 -
 81
81 -
82
-
83
-
84
-
85
-
86
-
87
-
88
-
89
-
90
-
91
-
92
-
93
-
94
-
95
-
96
 |
 |