Sony PMW320K Product Manual (PMW320 Operating Instruction) - Page 136
Saving and Loading User Setting Data, Saving and Loading Settings, Saving Setting Data
 |
View all Sony PMW320K manuals
Add to My Manuals
Save this manual to your list of manuals |
Page 136 highlights
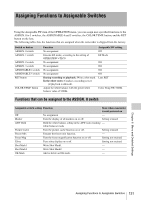
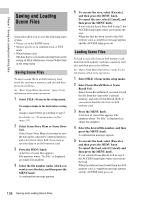
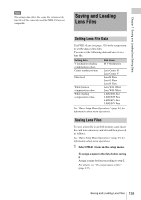
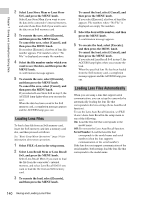
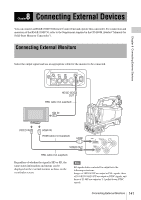
Chapter 7 Saving and Loading User Setting Data 7 Chapter Saving and Loading User Setting Data Saving and Loading Settings You can save setup menu settings in the camcorder's internal memory and on S×S memory cards. This allows you to quickly recall an appropriate set of menu settings for the current situation. Setting data is saved in the following categories. ALL files: ALL files save the setting data of all menus. You can save up to 64 ALL files on an S×S memory card. Note Device specific data (shading, output levels, and other data that requires adjustment for the specific device) is not saved. Scene files: Scene file save adjustments to PAINT menu items for the purpose of shooting a particular scene. You can save up to five scene files in the camcorder's internal memory and up to 64 scene files on an S×S memory card. Reference files: Reference files save the reference values that are set when you execute FILE >Scene > Standard in the setup menu. You can save one reference file in the camcorder's internal memory and one on an S×S memory card. Lens files: Lens files save the setting data used to compensate for lens characteristics, such as flare, white shading, white balance and center markers. You can save up to 32 lens files in the camcorder's internal memory and up to 64 lens files on an S×S memory card. The first settings stored in a file are called "preset" values. Even after loading files to set up the camcorder, and overwriting original files with new settings, you can still recover preset values and reset files to their initial states (see page 137). Saving Setting Data This section explains how to save setting data in an ALL file. Before starting, insert a writable S×S memory card into a memory card slot. See "Basic Setup Menu Operations" (page 93) for information about menu operations. 1 Select FILE >All in the setup menu. To assign a name to the data before saving it Assign a name before proceeding to step 2. For details, see "To assign names to files" (page 137). 2 Select All File Save >Execute. An ALL file list box appears. File numbers where "No File" is displayed are empty file numbers. File numbers with a file name or a date and time are the number of files that already contain data. 3 Turn the MENU knob to select the desired file number. 4 Press the MENU knob. A confirmation message appears. 5 To execute the save, select [Execute], and then press the MENU knob. To cancel the save, select [Cancel], and then press the MENU knob. If you choose to execute the save, the ACCESS lamp lights. A completion message appears and the ACCESS lamp goes out when the data has been saved to the S×S memory card. If an error message appears One of the following error messages may appear during execution of the save, or as soon as you select [Execute]. In this case, the file is not saved to the S×S memory card. 136 Saving and Loading Settings
-
 1
1 -
2
-
3
-
4
-
5
-
6
-
7
-
8
-
9
-
10
-
11
-
12
-
13
-
14
-
15
-
16
-
17
-
18
-
19
-
20
-
21
-
22
-
23
-
24
-
25
-
26
-
27
-
28
-
29
-
30
-
31
-
32
-
33
-
34
-
35
-
36
-
37
-
38
-
39
-
40
-
41
-
42
-
43
-
44
-
45
-
46
-
47
-
48
-
49
-
50
-
51
-
52
-
53
-
54
-
55
-
56
-
57
-
58
-
59
-
60
-
61
-
62
-
63
-
64
-
65
-
66
-
67
-
68
-
69
-
70
-
71
-
72
-
73
-
74
-
75
-
76
-
77
-
78
-
79
-
80
-
81
-
82
-
83
-
84
-
85
-
86
-
87
-
88
-
89
-
90
-
91
-
92
-
93
-
94
-
95
-
96
-
97
-
98
-
99
-
100
-
101
-
102
-
103
-
104
-
105
-
106
-
107
-
108
-
109
-
110
-
111
-
112
-
113
-
114
-
115
-
116
-
117
-
118
-
119
-
120
-
121
-
122
-
123
-
124
-
125
-
126
-
127
-
128
-
129
-
130
-
 131
131 -
 132
132 -
 133
133 -
 134
134 -
 135
135 -
 136
136 -
 137
137 -
 138
138 -
 139
139 -
 140
140 -
 141
141 -
142
-
143
-
144
-
145
-
146
-
147
-
148
-
149
-
150
-
151
-
152
-
153
-
154
-
155
-
156
-
157
-
158
-
159
-
160
-
161
-
162
-
163
-
164
-
165
-
166
-
167
-
168
-
169
-
170
-
171
 |
 |
