Sony PMW320K Product Manual (PMW320 Operating Instruction) - Page 16
Operating and Connectors Front
 |
View all Sony PMW320K manuals
Add to My Manuals
Save this manual to your list of manuals |
Page 16 highlights
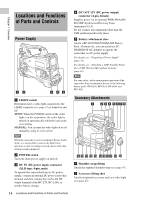
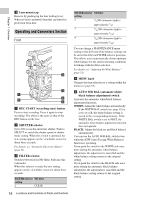
Chapter 1 Overview s Lens mount cap Remove by pushing up the lens locking lever. When no lens is mounted, keep this cap fitted for protection from dust. Operating and Connectors Section Front a REC START (recording start) button Press to start recording. Press it again to stop recording. The effect is the same as that of the REC button on the lens. b SHUTTER selector Set to ON to use the electronic shutter. Push to SELECT to switch the shutter speed or shutter mode setting. When this switch is operated, the new setting appears on the viewfinder screen for about three seconds. For details, see "Setting the Electronic Shutter" (page 54). c FILTER selector Switches between four ND filters built into this camcorder. When this selector is used, the new setting appears on the viewfinder screen for about three seconds. FILTER selector ND filter setting 1 CLEAR FILTER selector ND filter setting 2 1/4 ND (attenuates light to approximately 1/4) 3 1/16 ND (attenuates light to approximately 1/16) 4 1/64 ND (attenuates light to approximately 1/64) You can change a MAINTENANCE menu setting so that different white balance settings can be stored for different FILTER selector positions. This allows you to automatically obtain optimum white balance for the current shooting conditions in linkage with the filter selection. For details, see "Adjusting the White Balance" (page 51). d MENU knob Changes the item selection or a setting within the menu (see page 93). e AUTO W/B BAL (automatic white/ black balance adjustment) switch Activates the automatic white/black balance adjustment functions. WHITE: Adjust the white balance automatically. If the WHITE BAL switch (see page 18) is set to A or B, the white balance setting is stored in the corresponding memory. If the WHITE BAL switch is set to PRST, the automatic white balance adjustment function does not operate. BLACK: Adjust the black set and black balance automatically. You can use the AUTO W/B BAL switch even when the ATW (Auto Tracing White Balance) function is operating. If you push the switch to the WHITE side once more during the automatic white balance adjustment, the adjustment is cancelled and the white balance setting returns to the original setting. If you push the switch to the BLACK side once more during the automatic black balance adjustment, the adjustment is cancelled and the black balance setting returns to the original setting. 16 Locations and Functions of Parts and Controls
-
 1
1 -
2
-
3
-
4
-
5
-
6
-
7
-
8
-
9
-
10
-
 11
11 -
 12
12 -
 13
13 -
 14
14 -
 15
15 -
 16
16 -
 17
17 -
 18
18 -
 19
19 -
 20
20 -
 21
21 -
22
-
23
-
24
-
25
-
26
-
27
-
28
-
29
-
30
-
31
-
32
-
33
-
34
-
35
-
36
-
37
-
38
-
39
-
40
-
41
-
42
-
43
-
44
-
45
-
46
-
47
-
48
-
49
-
50
-
51
-
52
-
53
-
54
-
55
-
56
-
57
-
58
-
59
-
60
-
61
-
62
-
63
-
64
-
65
-
66
-
67
-
68
-
69
-
70
-
71
-
72
-
73
-
74
-
75
-
76
-
77
-
78
-
79
-
80
-
81
-
82
-
83
-
84
-
85
-
86
-
87
-
88
-
89
-
90
-
91
-
92
-
93
-
94
-
95
-
96
-
97
-
98
-
99
-
100
-
101
-
102
-
103
-
104
-
105
-
106
-
107
-
108
-
109
-
110
-
111
-
112
-
113
-
114
-
115
-
116
-
117
-
118
-
119
-
120
-
121
-
122
-
123
-
124
-
125
-
126
-
127
-
128
-
129
-
130
-
131
-
132
-
133
-
134
-
135
-
136
-
137
-
138
-
139
-
140
-
141
-
142
-
143
-
144
-
145
-
146
-
147
-
148
-
149
-
150
-
151
-
152
-
153
-
154
-
155
-
156
-
157
-
158
-
159
-
160
-
161
-
162
-
163
-
164
-
165
-
166
-
167
-
168
-
169
-
170
-
171
 |
 |
