Sony PMW320K Product Manual (PMW320 Operating Instruction) - Page 17
Right side near the front, COLOR TEMP. color temperature
 |
View all Sony PMW320K manuals
Add to My Manuals
Save this manual to your list of manuals |
Page 17 highlights
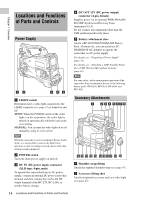
Chapter 1 Overview f MIC (microphone) LEVEL control Adjusts the input level of audio channels 1, 2, 3 and 4 (see page 59). Right side (near the front) c ALARM (alarm tone volume adjustment) knob Controls the volume of the warning tone that is output via the built-in speaker or optional earphones. When the knob is turned to the minimum position, no sound can be heard. However, if MAINTENANCE >Audio >Min Alarm Volume in the setup menu is set to [Set], the alarm tone is audible even when this volume control is at the minimum position. a ASSIGN. (assignable) 1/2/3 switches You can assign the desired functions to these switches on OPERATION >Assignable SW in the setup menu (see page 131). EZ Mode is assigned to the ASSIGN. 1 switch, and Off is assigned to the ASSIGN. 2/3 switches as the factory default setting. The ASSIGN.1/3 switches are provided with an indicator to show whether a function is assigned to the switch (ON) or not (OFF). b COLOR TEMP. (color temperature) button Press to light the button and change the color temperature for shooting (factory default setting). You can use this as an assignable switch (see page 131). ALARM Minimum Maximum d MONITOR (monitor volume adjustment) knob Controls the volume of the sound other than the warning tone that is output via the built-in speaker or earphones. When the knob is turned to the minimum position, no sound can be heard. e MONITOR (audio monitor selection) switches By means of combinations of the two switches, you can select audio that you want to hear through the built-in speaker or earphones. Position of down-side switch: CH-1/2 Position of up-side switch CH-1/CH-3 MIX CH-2/CH-4 Audio output Channel 1 audio Channels 1 and 2 mixed audio (stereo) a) Channel 2 audio Position of down-side switch: CH-3/4 Position of up-side switch CH-1/CH-3 MIX CH-2/CH-4 Audio output Channel 3 audio Channels 3 and 4 mixed audio (stereo) a) Channel 4 audio a) By connecting stereo headphones to the EARPHONE jack, you can hear the audio in stereo. (Under MAINTENANCE >Audio in the setup menu, Headphone Out must be set to STEREO.) Locations and Functions of Parts and Controls 17
-
 1
1 -
2
-
3
-
4
-
5
-
6
-
7
-
8
-
9
-
10
-
11
-
 12
12 -
 13
13 -
 14
14 -
 15
15 -
 16
16 -
 17
17 -
 18
18 -
 19
19 -
 20
20 -
 21
21 -
 22
22 -
23
-
24
-
25
-
26
-
27
-
28
-
29
-
30
-
31
-
32
-
33
-
34
-
35
-
36
-
37
-
38
-
39
-
40
-
41
-
42
-
43
-
44
-
45
-
46
-
47
-
48
-
49
-
50
-
51
-
52
-
53
-
54
-
55
-
56
-
57
-
58
-
59
-
60
-
61
-
62
-
63
-
64
-
65
-
66
-
67
-
68
-
69
-
70
-
71
-
72
-
73
-
74
-
75
-
76
-
77
-
78
-
79
-
80
-
81
-
82
-
83
-
84
-
85
-
86
-
87
-
88
-
89
-
90
-
91
-
92
-
93
-
94
-
95
-
96
-
97
-
98
-
99
-
100
-
101
-
102
-
103
-
104
-
105
-
106
-
107
-
108
-
109
-
110
-
111
-
112
-
113
-
114
-
115
-
116
-
117
-
118
-
119
-
120
-
121
-
122
-
123
-
124
-
125
-
126
-
127
-
128
-
129
-
130
-
131
-
132
-
133
-
134
-
135
-
136
-
137
-
138
-
139
-
140
-
141
-
142
-
143
-
144
-
145
-
146
-
147
-
148
-
149
-
150
-
151
-
152
-
153
-
154
-
155
-
156
-
157
-
158
-
159
-
160
-
161
-
162
-
163
-
164
-
165
-
166
-
167
-
168
-
169
-
170
-
171
 |
 |
