Sony SRR1000 Product Brochure (SRMASTER: SRR1000 Operation Manual) - Page 15
Port control Numeric buttons, Recording/playback control SET button
 |
View all Sony SRR1000 manuals
Add to My Manuals
Save this manual to your list of manuals |
Page 15 highlights
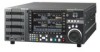
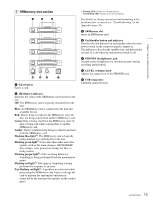
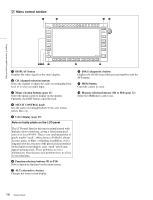
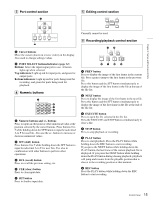
C Port control section E Editing control section Chapter 2 Names and Functions of Parts Currently cannot be used. F Recording/playback control section a Cursor buttons Move the cursor (shown in reverse video) on the display. Also used to change settings values. b PORT SELECT buttons/indicators (page 32) Buttons: Select the input/output port to use. A button lights up when selected. Top indicators: Light up red for input ports, and green for output ports. Bottom indicators: Light up red for ports being used for recording, and green for ports being used for playback. D Numeric buttons a Numeric buttons and +/- buttons Press to input an edit point or other numerical value at the position selected by the cursor buttons. Press buttons 0 to 5 while holding down the SFT button to input hexadecimal A to F for user bits. Also use the +/- buttons to increase or decrease numerical values. b SFT (shift) button Press buttons 0 to 5 while holding down the SFT button to input hexadecimal A to F for user bits. Use also in combination with other buttons to perform other operations. c RCL (recall) button Press to recall the previous setting, etc. d CLR (clear) button Press to clear input data. e SET button Press to finalize input data. a PREV button Press to display the image of the first frame in the current file. Press again to jump to the first frame in the previous file. Press this button and the SFT button simultaneously to display the image of the first frame in the file at the top of the file list. b NEXT button Press to display the image of the first frame in the next file. Press this button and the SFT button simultaneously to display the image of the first frame in the file at the end of the file list. c EXECUTE button Press to open the file selected in the file list. Press the EXECUTE and STOP buttons simultaneously to close a file. d STOP button Press to stop playback or recording. e PLAY button Press to start playback. Press the PLAY button while holding down the REC button to start recording. If you press the NEXT button while holding down the PLAY button, the last frame of the current playback file is displayed. If you press the NEXT button while holding down the PLAY button during chasing playback, playback will jump and resume from the playable position that is closest to the recording position at that moment. f REC button Press the PLAY button while holding down the REC button to start recording. 15 Control Panel
-
 1
1 -
2
-
3
-
4
-
5
-
6
-
7
-
8
-
9
-
 10
10 -
 11
11 -
 12
12 -
 13
13 -
 14
14 -
 15
15 -
 16
16 -
 17
17 -
 18
18 -
 19
19 -
 20
20 -
21
-
22
-
23
-
24
-
25
-
26
-
27
-
28
-
29
-
30
-
31
-
32
-
33
-
34
-
35
-
36
-
37
-
38
-
39
-
40
-
41
-
42
-
43
-
44
-
45
-
46
-
47
-
48
-
49
-
50
-
51
-
52
-
53
-
54
-
55
-
56
-
57
-
58
-
59
-
60
-
61
-
62
-
63
-
64
-
65
-
66
-
67
-
68
-
69
-
70
 |
 |
