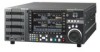
Sony SRR1000 Product Brochure (SRMASTER: SRR1000 Operation Manual) - Page 40
Adjusting the Output Video Signal
 |
View all Sony SRR1000 manuals
Add to My Manuals
Save this manual to your list of manuals |
Page 40 highlights
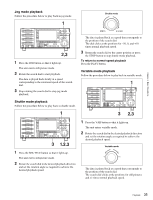
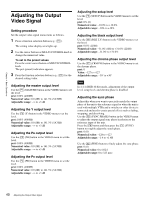
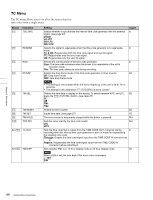
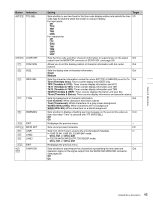
Chapter 4 Basic Operations Adjusting the Output Video Signal Setting procedure Set the output video signal menu items as follows. 1 Press a function selection button (e.g.: [F1]). The setting value display area lights up. 2 Use the cursor buttons or MULTI CONTROL knob to change the numerical value. To set to the preset values Press the center cursor button or MULTI CONTROL knob. The prst (preset) indication appears. 3 Press the function selection button (e.g.: [F1]) for the desired setting value. Adjusting the master output level Use the [F1] (MASTER) button in the VIDEO menu to set the level. prst: 100% (4000H) Numerical value: 0.0 (0H) to 141.3% (5A70H) Adjustable range: -∞ to +3 dB Adjusting the Y output level Use the [F2] (Y) button in the VIDEO menu to set the level. prst: 100% (4000H) Numerical value: 0.0 (0H) to 141.3% (5A70H) Adjustable range: -∞ to +3 dB Adjusting the PB output level Use the [F3] (PB) button in the VIDEO menu to set the level. prst: 100% (4000H) Numerical value: 0.0 (0H) to 141.3% (5A70H) Adjustable range: -∞ to +3 dB Adjusting the PR output level Use the [F4] (PR) button in the VIDEO menu to set the level. prst: 100% (4000H) Numerical value: 0.0 (0H) to 141.3% (5A70H) Adjustable range: -∞ to +3 dB Adjusting the setup level Use the [F5] (SETUP) button in the VIDEO menu to set the level. prst: 0% (0) Numerical value: -10.0% to +10.0% Adjustable range: -10% to +10% Adjusting the black output level Use the [F6] (BLK LV) button in the VIDEO menu to set the level. prst: 0.0% (110H) Numerical value: -31.0% (0H) to +31.0% (220H) Adjustable range: -31.0% to +31.0% Adjusting the chroma phase output level Use the [F7] (CRM PH) button in the VIDEO menu to set the chroma phase. prst: 0 Value: -127 to +127 Adjustable range: -30° to +30° Note In 4:4:4 (RGB 10-bit) mode, adjustment of the output level, setup level, and chroma phase is disabled. Adjusting the sync phase Adjust this when you want to precisely match the output phase of the unit to the reference signal or when the unit is used with multiple VTRs and a switcher or other device is connected and used to create special effects such as fading, wrapping, and dissolving. Use the [F8] (SYNC PHASE) button in the VIDEO menu to adjust the output signal sync phase in relation to the reference input of the unit. Press the [F8] button and then press the [F1] (SYNC) button to roughly adjust the synch phase. prst: 0 (0) Numerical value: -128 to +127 Adjustable range: -1.4 to +1.4H Use the [F2] (FINE) button to finely adjust the sync phase. prst: 0 (0) Numerical value: 0 to 1024 Adjustable range: 0 to 323 nsec 40 Adjusting the Output Video Signal
-
 1
1 -
2
-
3
-
4
-
5
-
6
-
7
-
8
-
9
-
10
-
11
-
12
-
13
-
14
-
15
-
16
-
17
-
18
-
19
-
20
-
21
-
22
-
23
-
24
-
25
-
26
-
27
-
28
-
29
-
30
-
31
-
32
-
33
-
34
-
 35
35 -
 36
36 -
 37
37 -
 38
38 -
 39
39 -
 40
40 -
 41
41 -
 42
42 -
 43
43 -
 44
44 -
 45
45 -
46
-
47
-
48
-
49
-
50
-
51
-
52
-
53
-
54
-
55
-
56
-
57
-
58
-
59
-
60
-
61
-
62
-
63
-
64
-
65
-
66
-
67
-
68
-
69
-
70
 |
 |
