Sony SRR1000 Product Brochure (SRMASTER: SRR1000 Operation Manual) - Page 42
Saving Settings
 |
View all Sony SRR1000 manuals
Add to My Manuals
Save this manual to your list of manuals |
Page 42 highlights
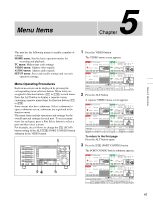
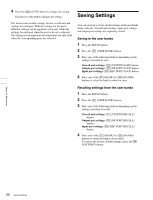
4 Press the [F2] (SCAN) button to change the setting. Each press of the button changes the setting. The menu items include settings for the overall unit and settings for each port. With the settings for the ports, different settings can be applied to each port. Make the settings for each port when the port to be set is selected. The settings for an input port and output port are only valid when the corresponding ports are selected. Saving Settings You can store up to 8 sets of unit settings in the user banks along with title. Overall unit settings, input port settings, and output port settings are separately stored. Saving in the user banks 1 Press the SETUP button. 2 Press the [F1] (USER BANK) button. 3 Press one of the following buttons depending on the settings you want to save. Overall unit settings: [F4] (SYSTEM SAVE) button Output port settings: [F5] (PB PORT SAVE) button Input port settings: [F6] (REC PORT SAVE) button 4 Press one of the [F1] (BANK1) to [F8] (BANK8) buttons to select the bank in which to store. Recalling settings from the user banks 1 Press the SETUP button. 2 Press the [F1] (USER BANK) button. 3 Press one of the following buttons depending on the settings you want to recall. Overall unit settings: [F1] (SYSTEM RECALL) button Output port settings: [F2] (PB PORT RECALL) button Input port settings: [F3] (REC PORT RECALL) button 4 Press one of the [F1] (BANK1) to [F8] (BANK8) buttons to select the bank to be recalled. To restore the factory default settings, press the [F9] (FACTORY) button. Chapter 5 Menu Items 42 Saving Settings
-
 1
1 -
2
-
3
-
4
-
5
-
6
-
7
-
8
-
9
-
10
-
11
-
12
-
13
-
14
-
15
-
16
-
17
-
18
-
19
-
20
-
21
-
22
-
23
-
24
-
25
-
26
-
27
-
28
-
29
-
30
-
31
-
32
-
33
-
34
-
35
-
36
-
 37
37 -
 38
38 -
 39
39 -
 40
40 -
 41
41 -
 42
42 -
 43
43 -
 44
44 -
 45
45 -
 46
46 -
 47
47 -
48
-
49
-
50
-
51
-
52
-
53
-
54
-
55
-
56
-
57
-
58
-
59
-
60
-
61
-
62
-
63
-
64
-
65
-
66
-
67
-
68
-
69
-
70
 |
 |