Symantec 14541094 Administration Guide - Page 31
Adding an option set to a custom installation file, Option, New Item > Advanced, Properties
 |
UPC - 037648640480
View all Symantec 14541094 manuals
Add to My Manuals
Save this manual to your list of manuals |
Page 31 highlights
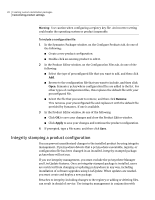
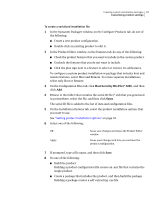
Creating custom installation packages 31 Customizing product settings Table 2-4 Symantec pcAnywhere option set properties (continued) Tab Description Remote Printing Contains settings for configuring remote printing Encryption Specifies certificate information required for public-key encryption To configure an option set in pcAnywhere 1 In the pcAnywhere Manager window, on the left navigation bar, click Option Sets. 2 Do one of the following: ■ To create a new option set, on the File menu, click New Item > Advanced. ■ To modify an existing option set, in the right pane, right-click the option set, and then click Properties. 3 In the Option Set Properties window, click the left and right arrows to scroll through the list of tabs. See Table 2-4 on page 30. 4 Configure the settings that you want to use. 5 When you are finished, click OK. For more information about a feature, see the Symantec pcAnywhere User's Guide . Adding an option set to a custom installation file You can add the option sets that you create in pcAnywhere to a custom installation file. After the package or custom product is installed on the target computer, the option set can be applied on the local computer. To add an option set to a custom installation file 1 In the Symantec Packager window, on the Configure Products tab, do one of the following: ■ Create a new product configuration. ■ Double-click an existing product to edit it. 2 In the Product Editor window, on the Configuration Files tab, click Option Set File (*.OPT), and then click Add.
-
 1
1 -
2
-
3
-
4
-
5
-
6
-
7
-
8
-
9
-
10
-
11
-
12
-
13
-
14
-
15
-
16
-
17
-
18
-
19
-
20
-
21
-
22
-
23
-
24
-
25
-
 26
26 -
 27
27 -
 28
28 -
 29
29 -
 30
30 -
 31
31 -
 32
32 -
 33
33 -
 34
34 -
 35
35 -
 36
36 -
37
-
38
-
39
-
40
-
41
-
42
-
43
-
44
-
45
-
46
-
47
-
48
-
49
-
50
-
51
-
52
-
53
-
54
-
55
-
56
-
57
-
58
-
59
-
60
-
61
-
62
-
63
-
64
-
65
-
66
-
67
-
68
-
69
-
70
-
71
-
72
-
73
-
74
-
75
-
76
-
77
-
78
-
79
-
80
-
81
-
82
-
83
-
84
-
85
-
86
-
87
-
88
-
89
-
90
-
91
-
92
-
93
-
94
-
95
-
96
-
97
-
98
-
99
-
100
-
101
-
102
-
103
-
104
-
105
-
106
-
107
-
108
-
109
 |
 |
