Symantec 14541094 Administration Guide - Page 85
Creating the pcaHostEntry attribute, Console > Add/Remove Snap-in
 |
UPC - 037648640480
View all Symantec 14541094 manuals
Add to My Manuals
Save this manual to your list of manuals |
Page 85 highlights
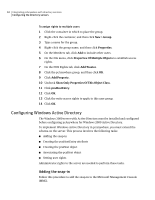
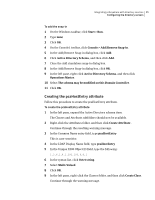
Integrating pcAnywhere with directory services 85 Configuring the directory servers To add the snap-in 1 On the Windows taskbar, click Start > Run. 2 Type mmc 3 Click OK. 4 On the Console1 toolbar, click Console > Add/Remove Snap-in . 5 In the Add/Remove Snap-in dialog box, click Add. 6 Click Active Directory Schema, and then click Add. 7 Close the Add standalone snap-in dialog box. 8 In the Add/Remove Snap-in dialog box, click OK. 9 In the left pane, right-click Active Directory Schema, and then click Operations Master. 10 Select The schema may be modified on this Domain Controller. 11 Click OK. Creating the pcaHostEntry attribute Follow this procedure to create the pcaHostEntry attribute. To create the pcaHostEntry attribute 1 In the left pane, expand the Active Directory schema item. The Classes and Attribute subfolders should now be available. 2 Right-click the Attributes folder, and then click Create Attribute . Continue through the resulting warning message. 3 In the Common Name entry field, type pcaHostEntry This is case-sensitive. 4 In the LDAP Display Name field, type pcaHostEntry 5 In the Unique X500 Object ID field, type the following: 1.3.6.1.4.1.393.100.9.8.1 6 In the syntax list, click Octet string. 7 Select Multi-Valued. 8 Click OK. 9 In the left pane, right-click the Classes folder, and then click Create Class . Continue through the warning message.
-
 1
1 -
2
-
3
-
4
-
5
-
6
-
7
-
8
-
9
-
10
-
11
-
12
-
13
-
14
-
15
-
16
-
17
-
18
-
19
-
20
-
21
-
22
-
23
-
24
-
25
-
26
-
27
-
28
-
29
-
30
-
31
-
32
-
33
-
34
-
35
-
36
-
37
-
38
-
39
-
40
-
41
-
42
-
43
-
44
-
45
-
46
-
47
-
48
-
49
-
50
-
51
-
52
-
53
-
54
-
55
-
56
-
57
-
58
-
59
-
60
-
61
-
62
-
63
-
64
-
65
-
66
-
67
-
68
-
69
-
70
-
71
-
72
-
73
-
74
-
75
-
76
-
77
-
78
-
79
-
 80
80 -
 81
81 -
 82
82 -
 83
83 -
 84
84 -
 85
85 -
 86
86 -
 87
87 -
 88
88 -
 89
89 -
 90
90 -
91
-
92
-
93
-
94
-
95
-
96
-
97
-
98
-
99
-
100
-
101
-
102
-
103
-
104
-
105
-
106
-
107
-
108
-
109
 |
 |
