TP-Link TL-SG2424P TL-SG2424P V1 User Guide 1910010774 - Page 138
Configuration Procedure
 |
View all TP-Link TL-SG2424P manuals
Add to My Manuals
Save this manual to your list of manuals |
Page 138 highlights
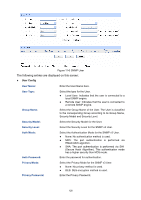
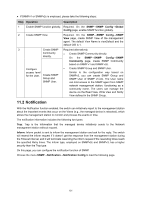
Access: MIB View: Community Table Select: Community Name: Access: MIB View: Operation: Defines the access rights of the community. read-only: Management right of the Community is restricted to read-only, and changes cannot be made to the corresponding View. read-write: Management right of the Community is read-write and changes can be made to the corresponding View. Select the MIB View for the community to access. Select the desired entry to delete the corresponding Community. It is multi-optional. Displays the Community Name here. Displays the right of the Community to access the View. Displays the Views which the Community can access. Click the Edit button to modify the MIB View and the Access right of the Community, and then click the Modify button to apply. Note: The default MIB View of SNMP Community is viewDefault. Configuration Procedure: If SNMPv3 is employed, please take the following steps: Step Operation 1 Enable SNMP function globally. 2 Create SNMP View. 3 Create SNMP Group. 4 Create SNMP User. Description Required. On the SNMP→SNMP Config→Global Config page, enable SNMP function globally. Required. On the SNMP→SNMP Config→SNMP View page, create SNMP View of the management agent. The default View Name is viewDefault and the default OID is 1. Required. On the SNMP→SNMP Config→SNMP Group page, create SNMP Group for SNMPv3 and specify SNMP Views with various access levels for SNMP Group. Required. On the SNMP→SNMP Config→SNMP User page, create SNMP User in the Group and configure the auth/privacy mode and auth/privacy password for the User. 130
-
 1
1 -
2
-
3
-
4
-
5
-
6
-
7
-
8
-
9
-
10
-
11
-
12
-
13
-
14
-
15
-
16
-
17
-
18
-
19
-
20
-
21
-
22
-
23
-
24
-
25
-
26
-
27
-
28
-
29
-
30
-
31
-
32
-
33
-
34
-
35
-
36
-
37
-
38
-
39
-
40
-
41
-
42
-
43
-
44
-
45
-
46
-
47
-
48
-
49
-
50
-
51
-
52
-
53
-
54
-
55
-
56
-
57
-
58
-
59
-
60
-
61
-
62
-
63
-
64
-
65
-
66
-
67
-
68
-
69
-
70
-
71
-
72
-
73
-
74
-
75
-
76
-
77
-
78
-
79
-
80
-
81
-
82
-
83
-
84
-
85
-
86
-
87
-
88
-
89
-
90
-
91
-
92
-
93
-
94
-
95
-
96
-
97
-
98
-
99
-
100
-
101
-
102
-
103
-
104
-
105
-
106
-
107
-
108
-
109
-
110
-
111
-
112
-
113
-
114
-
115
-
116
-
117
-
118
-
119
-
120
-
121
-
122
-
123
-
124
-
125
-
126
-
127
-
128
-
129
-
130
-
131
-
132
-
 133
133 -
 134
134 -
 135
135 -
 136
136 -
 137
137 -
 138
138 -
 139
139 -
 140
140 -
 141
141 -
 142
142 -
 143
143 -
144
-
145
-
146
-
147
-
148
-
149
-
150
-
151
-
152
-
153
-
154
-
155
-
156
-
157
-
158
-
159
-
160
-
161
-
162
-
163
-
164
-
165
-
166
-
167
-
168
-
169
-
170
-
171
-
172
-
173
-
174
-
175
-
176
 |
 |