ZyXEL P-2602HW-D3A User Guide - Page 55
Main Window, Status Bar
 |
View all ZyXEL P-2602HW-D3A manuals
Add to My Manuals
Save this manual to your list of manuals |
Page 55 highlights
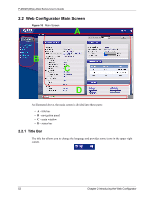
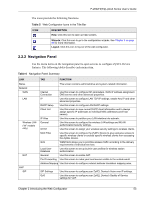
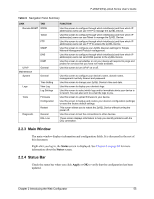
P-2602H(W)(L)-DxA Series User's Guide Table 6 Navigation Panel Summary LINK TAB Remote MGMT WWW Telnet FTP SNMP DNS ICMP UPnP Maintenance System General General Logs Time Setting View Log Log Settings Tools Firmware Configuration Restart Diagnostic General DSL Line FUNCTION Use this screen to configure through which interface(s) and from which IP address(es) users can use HTTP to manage the ZyXEL Device. Use this screen to configure through which interface(s) and from which IP address(es) users can use Telnet to manage the ZyXEL Device. Use this screen to configure through which interface(s) and from which IP address(es) users can use FTP to access the ZyXEL Device. Use this screen to configure your ZyXEL Device's settings for Simple Network Management Protocol management. Use this screen to configure through which interface(s) and from which IP address(es) users can send DNS queries to the ZyXEL Device. Use this screen to set whether or not your device will respond to pings and probes for services that you have not made available. Use this screen to turn UPnP on or off. Use this screen to configure your device's name, domain name, management inactivity timeout and password. Use this screen to change your ZyXEL Device's time and date. Use this screen to display your device's logs. Use this screen to select which logs and/or immediate alerts your device is to record. You can also set it to e-mail the logs to you. Use this screen to upload firmware to your device. Use this screen to backup and restore your device's configuration (settings) or reset the factory default settings. This screen allows you to reboot the ZyXEL Device without turning the power off. Use this screen to test the connections to other devices. These screen displays information to help you identify problems with the DSL connection. 2.2.3 Main Window The main window displays information and configuration fields. It is discussed in the rest of this document. Right after you log in, the Status screen is displayed. See Chapter 6 on page 83 for more information about the Status screen. 2.2.4 Status Bar Check the status bar when you click Apply or OK to verify that the configuration has been updated. Chapter 2 Introducing the Web Configurator 55
-
 1
1 -
2
-
3
-
4
-
5
-
6
-
7
-
8
-
9
-
10
-
11
-
12
-
13
-
14
-
15
-
16
-
17
-
18
-
19
-
20
-
21
-
22
-
23
-
24
-
25
-
26
-
27
-
28
-
29
-
30
-
31
-
32
-
33
-
34
-
35
-
36
-
37
-
38
-
39
-
40
-
41
-
42
-
43
-
44
-
45
-
46
-
47
-
48
-
49
-
 50
50 -
 51
51 -
 52
52 -
 53
53 -
 54
54 -
 55
55 -
 56
56 -
 57
57 -
 58
58 -
 59
59 -
 60
60 -
61
-
62
-
63
-
64
-
65
-
66
-
67
-
68
-
69
-
70
-
71
-
72
-
73
-
74
-
75
-
76
-
77
-
78
-
79
-
80
-
81
-
82
-
83
-
84
-
85
-
86
-
87
-
88
-
89
-
90
-
91
-
92
-
93
-
94
-
95
-
96
-
97
-
98
-
99
-
100
-
101
-
102
-
103
-
104
-
105
-
106
-
107
-
108
-
109
-
110
-
111
-
112
-
113
-
114
-
115
-
116
-
117
-
118
-
119
-
120
-
121
-
122
-
123
-
124
-
125
-
126
-
127
-
128
-
129
-
130
-
131
-
132
-
133
-
134
-
135
-
136
-
137
-
138
-
139
-
140
-
141
-
142
-
143
-
144
-
145
-
146
-
147
-
148
-
149
-
150
-
151
-
152
-
153
-
154
-
155
-
156
-
157
-
158
-
159
-
160
-
161
-
162
-
163
-
164
-
165
-
166
-
167
-
168
-
169
-
170
-
171
-
172
-
173
-
174
-
175
-
176
-
177
-
178
-
179
-
180
-
181
-
182
-
183
-
184
-
185
-
186
-
187
-
188
-
189
-
190
-
191
-
192
-
193
-
194
-
195
-
196
-
197
-
198
-
199
-
200
-
201
-
202
-
203
-
204
-
205
-
206
-
207
-
208
-
209
-
210
-
211
-
212
-
213
-
214
-
215
-
216
-
217
-
218
-
219
-
220
-
221
-
222
-
223
-
224
-
225
-
226
-
227
-
228
-
229
-
230
-
231
-
232
-
233
-
234
-
235
-
236
-
237
-
238
-
239
-
240
-
241
-
242
-
243
-
244
-
245
-
246
-
247
-
248
-
249
-
250
-
251
-
252
-
253
-
254
-
255
-
256
-
257
-
258
-
259
-
260
-
261
-
262
-
263
-
264
-
265
-
266
-
267
-
268
-
269
-
270
-
271
-
272
-
273
-
274
-
275
-
276
-
277
-
278
-
279
-
280
-
281
-
282
-
283
-
284
-
285
-
286
-
287
-
288
-
289
-
290
-
291
-
292
-
293
-
294
-
295
-
296
-
297
-
298
-
299
-
300
-
301
-
302
-
303
-
304
-
305
-
306
-
307
-
308
-
309
-
310
-
311
-
312
-
313
-
314
-
315
-
316
-
317
-
318
-
319
-
320
-
321
-
322
-
323
-
324
-
325
-
326
-
327
-
328
-
329
-
330
-
331
-
332
-
333
-
334
-
335
-
336
-
337
-
338
-
339
-
340
-
341
-
342
-
343
-
344
-
345
-
346
-
347
-
348
-
349
-
350
-
351
-
352
-
353
-
354
-
355
-
356
-
357
-
358
-
359
-
360
-
361
-
362
-
363
-
364
-
365
-
366
-
367
-
368
-
369
-
370
-
371
-
372
-
373
-
374
-
375
-
376
-
377
-
378
-
379
-
380
-
381
-
382
-
383
-
384
-
385
-
386
-
387
-
388
-
389
-
390
-
391
-
392
-
393
-
394
-
395
-
396
-
397
-
398
-
399
-
400
-
401
-
402
-
403
-
404
-
405
-
406
-
407
-
408
-
409
-
410
-
411
-
412
-
413
-
414
-
415
-
416
-
417
-
418
-
419
-
420
-
421
-
422
-
423
-
424
-
425
-
426
-
427
 |
 |