Brother International MFC-7360N Software Users Manual - English - Page 10
Using the control panel, Using printer keys, Job Cancel, Secure Key (For MFC-7460DN and MFC-7860DW)
 |
UPC - 012502627005
View all Brother International MFC-7360N manuals
Add to My Manuals
Save this manual to your list of manuals |
Page 10 highlights
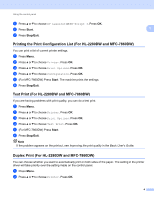
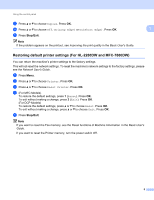
1 Using the control panel 1 Using printer keys You can access the following features from your machine's control panel. 1 1 Job Cancel 1 To cancel the current print job, press Job Cancel. You can clear the data that is left in the printer memory by pressing Job Cancel. To cancel multiple print jobs, hold down this key until the LCD shows Job Cancel (All). Secure Key (For MFC-7460DN and MFC-7860DW) 1 Secured data is password protected. Only those people who know the password will be able to print the secured data. The machine will not print secure data until the password is entered. After the document is printed, the data will be cleared from the memory. To use this function, you need to set your password in the printer driver dialog box. (See Secure Print on page 23, 37, 127, 135 and 141.) If you turn the power switch Off, the secured data saved in memory will be cleared. a Press Secure. Note If the LCD displays No Data Stored, there is no secured data in the memory. b Press a or b to choose the user name. Press OK. The LCD displays the secured jobs list for that name. c Press a or b to choose the job. Press OK. Enter your four-digit password and press OK. d To print the data, press a or b to choose Print, press OK and then enter the number of copies you want. Press OK. The machine prints the data. To delete the secured data, press a or b to choose Delete. Press OK. Note After you print the secured data, it will be cleared from memory. Printer Emulation Support (For HL-2280DW and MFC-7860DW) 1 Your machine will receive print commands in a printer job language or emulation. Different operating systems and applications will send the print commands in different languages. Your machine can receive print commands in a variety of emulations and has an automatic emulation selection feature. When the machine receives data from the computer, it automatically chooses the emulation mode. The default setting is Auto. Your machine has the following emulation modes. You can change the setting by using the control panel or Web Based Management (web browser). To use Web Based Management, type http://xxx.xxx.xxx.xxx (where xxx.xxx.xxx.xxx is the IP address of your machine) into your browser. 2
-
 1
1 -
2
-
3
-
4
-
 5
5 -
 6
6 -
 7
7 -
 8
8 -
 9
9 -
 10
10 -
 11
11 -
 12
12 -
 13
13 -
 14
14 -
 15
15 -
16
-
17
-
18
-
19
-
20
-
21
-
22
-
23
-
24
-
25
-
26
-
27
-
28
-
29
-
30
-
31
-
32
-
33
-
34
-
35
-
36
-
37
-
38
-
39
-
40
-
41
-
42
-
43
-
44
-
45
-
46
-
47
-
48
-
49
-
50
-
51
-
52
-
53
-
54
-
55
-
56
-
57
-
58
-
59
-
60
-
61
-
62
-
63
-
64
-
65
-
66
-
67
-
68
-
69
-
70
-
71
-
72
-
73
-
74
-
75
-
76
-
77
-
78
-
79
-
80
-
81
-
82
-
83
-
84
-
85
-
86
-
87
-
88
-
89
-
90
-
91
-
92
-
93
-
94
-
95
-
96
-
97
-
98
-
99
-
100
-
101
-
102
-
103
-
104
-
105
-
106
-
107
-
108
-
109
-
110
-
111
-
112
-
113
-
114
-
115
-
116
-
117
-
118
-
119
-
120
-
121
-
122
-
123
-
124
-
125
-
126
-
127
-
128
-
129
-
130
-
131
-
132
-
133
-
134
-
135
-
136
-
137
-
138
-
139
-
140
-
141
-
142
-
143
-
144
-
145
-
146
-
147
-
148
-
149
-
150
-
151
-
152
-
153
-
154
-
155
-
156
-
157
-
158
-
159
-
160
-
161
-
162
-
163
-
164
-
165
-
166
-
167
-
168
-
169
-
170
-
171
-
172
-
173
-
174
-
175
-
176
-
177
-
178
-
179
-
180
-
181
-
182
-
183
-
184
-
185
-
186
-
187
-
188
-
189
-
190
-
191
-
192
-
193
-
194
-
195
-
196
-
197
-
198
-
199
-
200
-
201
-
202
-
203
-
204
-
205
-
206
-
207
-
208
-
209
-
210
-
211
-
212
-
213
-
214
-
215
-
216
-
217
-
218
 |
 |