Brother International MFC-7360N Software Users Manual - English - Page 212
Scan to File
 |
UPC - 012502627005
View all Brother International MFC-7360N manuals
Add to My Manuals
Save this manual to your list of manuals |
Page 212 highlights
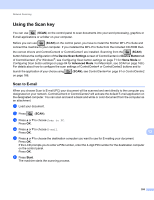
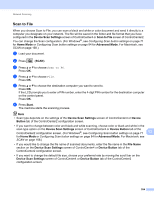
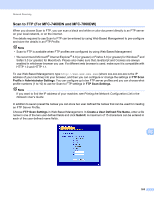
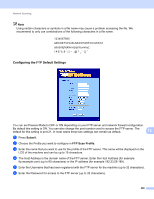
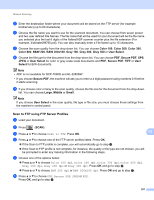
Network Scanning Scan to File 13 When you choose Scan to File, you can scan a black and white or color document and send it directly to a computer you designate on your network. The file will be saved in the folder and file format that you have configured in the Device Scan Settings screen of ControlCenter4 or Scan to File screen of ControlCenter2. You can change the Scan configuration. (For Windows®, see Configuring Scan button settings on page 71 for Home Mode or Configuring Scan button settings on page 84 for Advanced Mode. For Macintosh, see SCAN on page 168.) a Load your document. b Press (SCAN). c Press a or b to choose Scan to PC. Press OK. d Press a or b to choose File. Press OK. e Press a or b to choose the destination computer you want to send to. Press OK. If the LCD prompts you to enter a PIN number, enter the 4-digit PIN number for the destination computer on the control panel. Press OK. f Press Start. The machine starts the scanning process. Note • Scan type depends on the settings of the Device Scan Settings screen of ControlCenter4 or Device Button tab of the ControlCenter2 configuration screen. • If you want to change between color and black and white scanning, choose color or black and white in the scan type option on the Device Scan Settings screen of ControlCenter4 or Device Button tab of the ControlCenter2 configuration screen. (For Windows®, see Configuring Scan button settings on page 71 13 for Home Mode or Configuring Scan button settings on page 84 for Advanced Mode. For Macintosh, see SCAN on page 168.) • If you would like to change the file name of scanned documents, enter the file name in the File Name section on the Device Scan Settings screen of ControlCenter4 or Device Button tab of the ControlCenter2 configuration screen. • If you want to change the default file size, choose your preferred rate by moving the scroll bar on the Device Scan Settings screen of ControlCenter4 or Device Button tab of the ControlCenter2 configuration screen. 204
-
 1
1 -
2
-
3
-
4
-
5
-
6
-
7
-
8
-
9
-
10
-
11
-
12
-
13
-
14
-
15
-
16
-
17
-
18
-
19
-
20
-
21
-
22
-
23
-
24
-
25
-
26
-
27
-
28
-
29
-
30
-
31
-
32
-
33
-
34
-
35
-
36
-
37
-
38
-
39
-
40
-
41
-
42
-
43
-
44
-
45
-
46
-
47
-
48
-
49
-
50
-
51
-
52
-
53
-
54
-
55
-
56
-
57
-
58
-
59
-
60
-
61
-
62
-
63
-
64
-
65
-
66
-
67
-
68
-
69
-
70
-
71
-
72
-
73
-
74
-
75
-
76
-
77
-
78
-
79
-
80
-
81
-
82
-
83
-
84
-
85
-
86
-
87
-
88
-
89
-
90
-
91
-
92
-
93
-
94
-
95
-
96
-
97
-
98
-
99
-
100
-
101
-
102
-
103
-
104
-
105
-
106
-
107
-
108
-
109
-
110
-
111
-
112
-
113
-
114
-
115
-
116
-
117
-
118
-
119
-
120
-
121
-
122
-
123
-
124
-
125
-
126
-
127
-
128
-
129
-
130
-
131
-
132
-
133
-
134
-
135
-
136
-
137
-
138
-
139
-
140
-
141
-
142
-
143
-
144
-
145
-
146
-
147
-
148
-
149
-
150
-
151
-
152
-
153
-
154
-
155
-
156
-
157
-
158
-
159
-
160
-
161
-
162
-
163
-
164
-
165
-
166
-
167
-
168
-
169
-
170
-
171
-
172
-
173
-
174
-
175
-
176
-
177
-
178
-
179
-
180
-
181
-
182
-
183
-
184
-
185
-
186
-
187
-
188
-
189
-
190
-
191
-
192
-
193
-
194
-
195
-
196
-
197
-
198
-
199
-
200
-
201
-
202
-
203
-
204
-
205
-
206
-
 207
207 -
 208
208 -
 209
209 -
 210
210 -
 211
211 -
 212
212 -
 213
213 -
 214
214 -
 215
215 -
 216
216 -
 217
217 -
218
 |
 |