Brother International MFC-7360N Software Users Manual - English - Page 216
Secure PDF, Small, Middle, Large, <Manual>, Connecting, The LCD shows
 |
UPC - 012502627005
View all Brother International MFC-7360N manuals
Add to My Manuals
Save this manual to your list of manuals |
Page 216 highlights
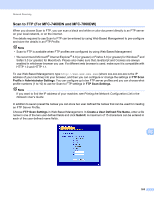
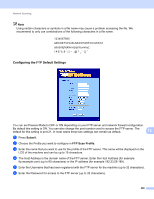
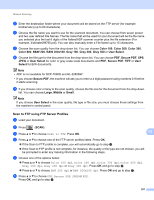
Network Scanning g Press a or b to choose PDF, Secure PDF or TIFF. Press OK, and go to step i. Note If you choose Secure PDF, the machine will ask you to enter a 4 digit password using numbers 0-9 before it starts scanning. h Press a or b to choose Small, Middle or Large. Press OK and go to step i. i Do one of the following: If you want to start scanning, press Start and go to step l. If you want to change the file name, go to step j. j Press a or b to choose a file name you want to use and press OK. Press Start and go to step l. Note If you want to change the file name manually, go to step k. k Press a or b to choose . Press OK. Enter the file name you want to use (up to 15 characters) and press OK. Press Start. l The LCD shows Connecting. When the connection to the FTP server is successful the machine starts the scanning process. Note Scan type depends on the settings in Web Based Management. 13 208
-
 1
1 -
2
-
3
-
4
-
5
-
6
-
7
-
8
-
9
-
10
-
11
-
12
-
13
-
14
-
15
-
16
-
17
-
18
-
19
-
20
-
21
-
22
-
23
-
24
-
25
-
26
-
27
-
28
-
29
-
30
-
31
-
32
-
33
-
34
-
35
-
36
-
37
-
38
-
39
-
40
-
41
-
42
-
43
-
44
-
45
-
46
-
47
-
48
-
49
-
50
-
51
-
52
-
53
-
54
-
55
-
56
-
57
-
58
-
59
-
60
-
61
-
62
-
63
-
64
-
65
-
66
-
67
-
68
-
69
-
70
-
71
-
72
-
73
-
74
-
75
-
76
-
77
-
78
-
79
-
80
-
81
-
82
-
83
-
84
-
85
-
86
-
87
-
88
-
89
-
90
-
91
-
92
-
93
-
94
-
95
-
96
-
97
-
98
-
99
-
100
-
101
-
102
-
103
-
104
-
105
-
106
-
107
-
108
-
109
-
110
-
111
-
112
-
113
-
114
-
115
-
116
-
117
-
118
-
119
-
120
-
121
-
122
-
123
-
124
-
125
-
126
-
127
-
128
-
129
-
130
-
131
-
132
-
133
-
134
-
135
-
136
-
137
-
138
-
139
-
140
-
141
-
142
-
143
-
144
-
145
-
146
-
147
-
148
-
149
-
150
-
151
-
152
-
153
-
154
-
155
-
156
-
157
-
158
-
159
-
160
-
161
-
162
-
163
-
164
-
165
-
166
-
167
-
168
-
169
-
170
-
171
-
172
-
173
-
174
-
175
-
176
-
177
-
178
-
179
-
180
-
181
-
182
-
183
-
184
-
185
-
186
-
187
-
188
-
189
-
190
-
191
-
192
-
193
-
194
-
195
-
196
-
197
-
198
-
199
-
200
-
201
-
202
-
203
-
204
-
205
-
206
-
207
-
208
-
209
-
210
-
 211
211 -
 212
212 -
 213
213 -
 214
214 -
 215
215 -
 216
216 -
 217
217 -
 218
218
 |
 |