Brother International PE-300S Users Manual - English - Page 101
Notch of shuttle
 |
View all Brother International PE-300S manuals
Add to My Manuals
Save this manual to your list of manuals |
Page 101 highlights
Contents Setting Up Basic Sewing Machine Operation Utility Stitches Embroidering 1 2 3. Turn the hand wheel towards you. Line up the shelf of race with the notch of shuttle and remove race. 1 Shuttle 2 Notch of shuttle 3 Race 4 Shelf of race 4 3 4. Remove accumulated lint and thread from the inner shuttle 5 3 and race with a brush or a vacuum cleaner. 3 1 Race 2 Shuttle 1 3 Cleaning brush 2 1 2 5. Remove the race and check that the notch of the shuttle is lined up in its original position by lining up the shuttle projection with the spring and insert the race. 1 Projection 2 Spring 6. Close needle plate and screw it shut. Maintenance Troubleshooting Error Messages Sewing Chart Patterns (Programmed in Machine) Patterns (Memory Card) 98
-
 1
1 -
2
-
3
-
4
-
5
-
6
-
7
-
8
-
9
-
10
-
11
-
12
-
13
-
14
-
15
-
16
-
17
-
18
-
19
-
20
-
21
-
22
-
23
-
24
-
25
-
26
-
27
-
28
-
29
-
30
-
31
-
32
-
33
-
34
-
35
-
36
-
37
-
38
-
39
-
40
-
41
-
42
-
43
-
44
-
45
-
46
-
47
-
48
-
49
-
50
-
51
-
52
-
53
-
54
-
55
-
56
-
57
-
58
-
59
-
60
-
61
-
62
-
63
-
64
-
65
-
66
-
67
-
68
-
69
-
70
-
71
-
72
-
73
-
74
-
75
-
76
-
77
-
78
-
79
-
80
-
81
-
82
-
83
-
84
-
85
-
86
-
87
-
88
-
89
-
90
-
91
-
92
-
93
-
94
-
95
-
 96
96 -
 97
97 -
 98
98 -
 99
99 -
 100
100 -
 101
101 -
 102
102 -
 103
103 -
 104
104 -
 105
105 -
 106
106 -
107
-
108
-
109
-
110
-
111
 |
 |

98
Contents
Setting Up
Basic Sewing
Machine
Operation
Utility Stitches
Embroidering
Maintenance
Troubleshooting
Error
Messages
Sewing Chart
Patterns
(Programmed
in Machine)
Patterns
(Memory Card)
5
3
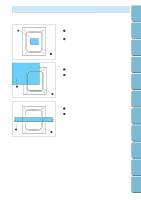
3.
Turn the hand wheel towards you.
Line up the shelf of race
with the notch of shuttle and remove race.
1
Shuttle
2
Notch of shuttle
3
Race
4
Shelf of race
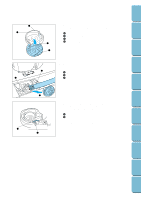
4.
Remove accumulated lint and thread from the inner shuttle
and race with a brush or a vacuum cleaner.
1
Race
2
Shuttle
3
Cleaning brush
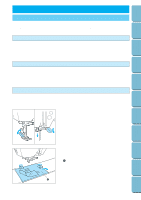
5.
Remove the race and check that the notch of the shuttle is
lined up in its original position by lining up the shuttle projec-
tion with the spring and insert the race.
1
Projection
2
Spring
6.
Close needle plate and screw it shut.
1
2
1
2
3
1
2
3
4