Brother International PE-300S Users Manual - English - Page 57
Scallop
 |
View all Brother International PE-300S manuals
Add to My Manuals
Save this manual to your list of manuals |
Page 57 highlights
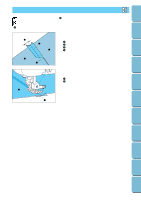
Contents Setting Up Basic Sewing Machine Operation SCALLOP J Use to put a decorative trim on shirt collars and handkerchiefs. 12 1 Scallop 2 Scallop 1. Attach the J foot. While sewing, take care to leave a little space between the stitches and the edge of the fabric. 2. Carefully cut along the outsides of the stitching, taking care not to cut the threads. Utility Stitches Embroidering Maintenance Troubleshooting Error Messages Sewing Chart Patterns (Programmed in Machine) Patterns (Memory Card) 54
-
 1
1 -
2
-
3
-
4
-
5
-
6
-
7
-
8
-
9
-
10
-
11
-
12
-
13
-
14
-
15
-
16
-
17
-
18
-
19
-
20
-
21
-
22
-
23
-
24
-
25
-
26
-
27
-
28
-
29
-
30
-
31
-
32
-
33
-
34
-
35
-
36
-
37
-
38
-
39
-
40
-
41
-
42
-
43
-
44
-
45
-
46
-
47
-
48
-
49
-
50
-
51
-
 52
52 -
 53
53 -
 54
54 -
 55
55 -
 56
56 -
 57
57 -
 58
58 -
 59
59 -
 60
60 -
 61
61 -
 62
62 -
63
-
64
-
65
-
66
-
67
-
68
-
69
-
70
-
71
-
72
-
73
-
74
-
75
-
76
-
77
-
78
-
79
-
80
-
81
-
82
-
83
-
84
-
85
-
86
-
87
-
88
-
89
-
90
-
91
-
92
-
93
-
94
-
95
-
96
-
97
-
98
-
99
-
100
-
101
-
102
-
103
-
104
-
105
-
106
-
107
-
108
-
109
-
110
-
111
 |
 |

54
Contents
Setting Up
Basic Sewing
Machine
Operation
Utility Stitches
Embroidering
Maintenance
Troubleshooting
Error
Messages
Sewing Chart
Patterns
(Programmed
in Machine)
Patterns
(Memory Card)
SCALLOP
J
1.
Attach the J foot.
While sewing, take care to leave a little space
between the stitches and the edge of the fabric.
Use to put a decorative trim on shirt collars and handkerchiefs.
2.
Carefully cut along the outsides of the stitching, taking care
not to cut the threads.
1
2
1
Scallop
2
Scallop