Brother International PE-300S Users Manual - English - Page 33
Thread Tension
 |
View all Brother International PE-300S manuals
Add to My Manuals
Save this manual to your list of manuals |
Page 33 highlights
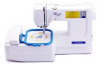
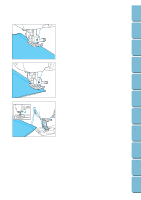
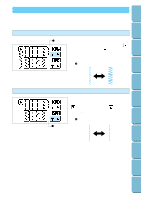
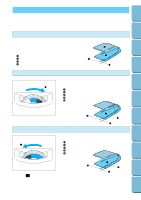
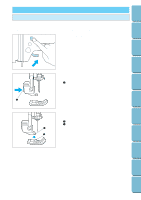
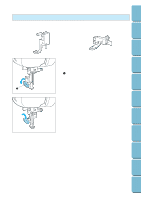
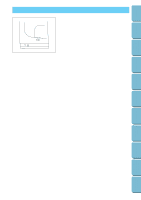
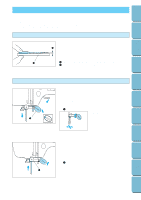
Contents Setting Up Basic Sewing Machine Operation THREAD TENSION Use the tension dial to adjust thread tension in accordance to the fabric and thread you are using. - For stitches with fairly small stitch lengths, such as the satin stitch and buttonhole stitching, you can get a better stitch by slightly reducing tension. - Use the tension dial to adjust thread tension for lightweight or heavyweight fabrics and for gathers. Correct tension * Thread tension is automatically set to the most appropriate point irrespective of the chosen fabric and thread. Correct tension is important because too much or too little tension will weaken your seams or cause your fabric to pucker. 1 Reverse side 2 Surface 3 3 Upper thread 4 Bobbin thread 1 2 4 Tightening the upper thread tension 5 7 @6 @5 Turn the tension dial to the right to tighten the upper thread tension. 1 Locks appears on reverse side of fabric. 2 Surface 3 Upper thread 4 Bobbin thread 5 Tighter Utility Stitches Embroidering @ Maintenance Troubleshooting Error Messages Sewing Chart Loosening the upper thread tension 2 3 1 4 Turn the tension dial to the left to loosen the upper thread tension. 5 5 @4 @3 1 Locks appear on surface of fabric. 2 Surface 3 Upper thread 4 Bobbin thread 5 Looser @ 2 3 1 4 * The 5 setting on the tension dial is a guide for working normal fabrics (medium weight). However, the actual stitch tension you'll want to use will vary according to the fabric and thread you are using, so you should always sew a stitch sample and adjust stitch tension before beginning on the actual piece to be worked. * The machine may stop sewing if tension is set extremely low. This is not a sign that there is anything wrong with your machine. Simply adjust to the correct stitch tension and begin again. 30 Patterns (Programmed in Machine) Patterns (Memory Card)
-
 1
1 -
2
-
3
-
4
-
5
-
6
-
7
-
8
-
9
-
10
-
11
-
12
-
13
-
14
-
15
-
16
-
17
-
18
-
19
-
20
-
21
-
22
-
23
-
24
-
25
-
26
-
27
-
 28
28 -
 29
29 -
 30
30 -
 31
31 -
 32
32 -
 33
33 -
 34
34 -
 35
35 -
 36
36 -
 37
37 -
 38
38 -
39
-
40
-
41
-
42
-
43
-
44
-
45
-
46
-
47
-
48
-
49
-
50
-
51
-
52
-
53
-
54
-
55
-
56
-
57
-
58
-
59
-
60
-
61
-
62
-
63
-
64
-
65
-
66
-
67
-
68
-
69
-
70
-
71
-
72
-
73
-
74
-
75
-
76
-
77
-
78
-
79
-
80
-
81
-
82
-
83
-
84
-
85
-
86
-
87
-
88
-
89
-
90
-
91
-
92
-
93
-
94
-
95
-
96
-
97
-
98
-
99
-
100
-
101
-
102
-
103
-
104
-
105
-
106
-
107
-
108
-
109
-
110
-
111
 |
 |