Brother International PE-300S Users Manual - English - Page 25
How To Use The Automatic Needle Threader
 |
View all Brother International PE-300S manuals
Add to My Manuals
Save this manual to your list of manuals |
Page 25 highlights
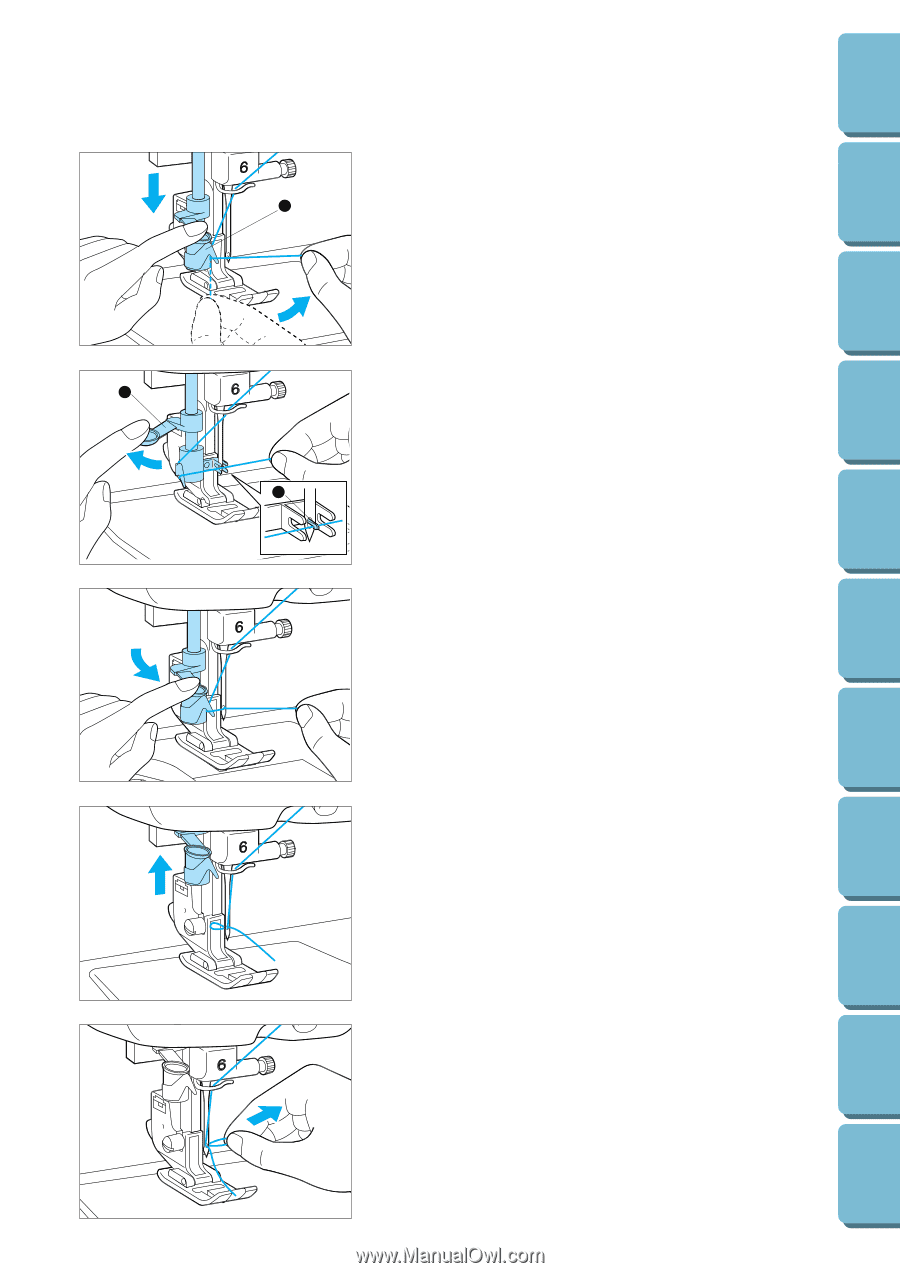
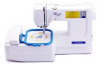
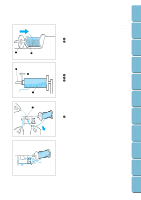
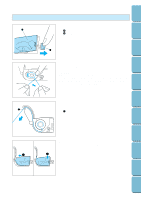
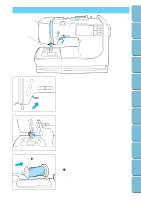
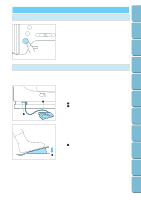
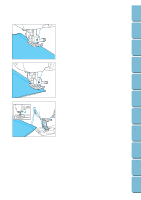
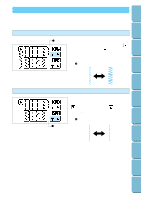
Contents Setting Up Basic Sewing Machine Operation Utility Stitches Embroidering 6. Run thread through the guide above the needle. 1 HOW TO USE THE AUTOMATIC NEEDLE THREADER CAUTION - Be careful not to turn the machine on while using the automatic needle threader. - Use the automatic needle threader with size #11-16 sewing machine needles. Use the quick reference chart (p. 35) to make sure you're using the right needle. 1 Lower the needle threader lever all the way down using 2 your left index finger. (Pass thread to the right. ) 1 Guide (Large hook) 2 Push the automatic needle threader lever to the back, pass the third hook through the eye of the needle, then scoop 3 the thread up from below and through the third hook. 2 Needle threader lever 3 Thread hook 3 While gently holding the thread, pull the needle threader lever toward you. 4 Simultaneously release both thread and automatic needle threader lever. The threading hook will pass the thread through the eye of the needle. Maintenance Troubleshooting Error Messages Sewing Chart Patterns (Programmed in Machine) Patterns (Memory Card) 5 Pull the thread towards the rear to finish the upper threading. CAUTION Be careful not to force the thread and bend or damage the needle. 7. Pass the thread underneath the presser foot and pull it out from the rear of the machine by about 5 cm (13/64"). 22
-
 1
1 -
2
-
3
-
4
-
5
-
6
-
7
-
8
-
9
-
10
-
11
-
12
-
13
-
14
-
15
-
16
-
17
-
18
-
19
-
 20
20 -
 21
21 -
 22
22 -
 23
23 -
 24
24 -
 25
25 -
 26
26 -
 27
27 -
 28
28 -
 29
29 -
 30
30 -
31
-
32
-
33
-
34
-
35
-
36
-
37
-
38
-
39
-
40
-
41
-
42
-
43
-
44
-
45
-
46
-
47
-
48
-
49
-
50
-
51
-
52
-
53
-
54
-
55
-
56
-
57
-
58
-
59
-
60
-
61
-
62
-
63
-
64
-
65
-
66
-
67
-
68
-
69
-
70
-
71
-
72
-
73
-
74
-
75
-
76
-
77
-
78
-
79
-
80
-
81
-
82
-
83
-
84
-
85
-
86
-
87
-
88
-
89
-
90
-
91
-
92
-
93
-
94
-
95
-
96
-
97
-
98
-
99
-
100
-
101
-
102
-
103
-
104
-
105
-
106
-
107
-
108
-
109
-
110
-
111
 |
 |