Brother International PE-300S Users Manual - English - Page 80
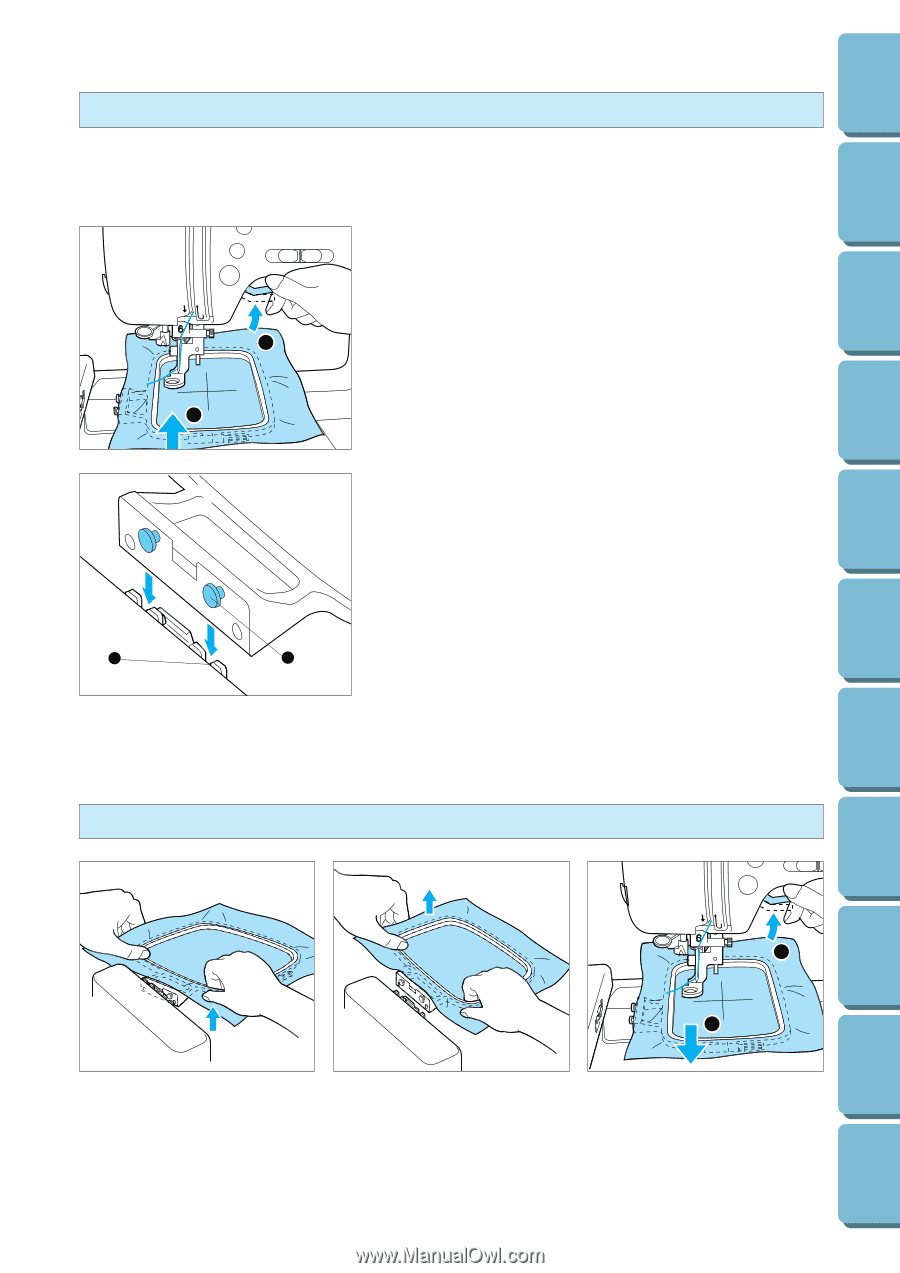
Fitting the embroidery frame to the embroidery unit, Removing the embroidery frame
 |
View all Brother International PE-300S manuals
Add to My Manuals
Save this manual to your list of manuals |
Page 80 highlights
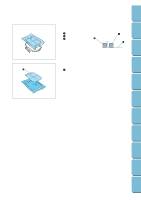
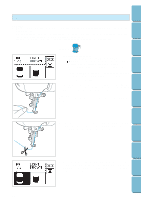
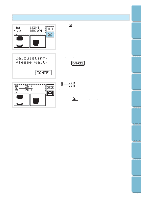
Contents Setting Up Basic Sewing Machine Operation Utility Stitches Fitting the embroidery frame to the embroidery unit CAUTION Be sure to wait until the embroidery unit has finished initializing before fitting the embroidery frame. (Refer to page 65.) 1. Raise the presser foot to its highest position. Then pass the embroidery frame under the presser foot with the mounting bracket on the left side and the fabric right side up. 5 3 1 2 2. Align the two pins on the embroidery unit frame holder with the mounting bracket on the frame, and then press the frame into the embroidery unit frame holder until a click is heard. CAUTION Always make sure to attach the hoop by both pins. If the hoop is not firmly attached, it could mess up your stitching. 1 2 1 Embroidery arm frame holder 2 Pins Embroidering Maintenance Troubleshooting Error Messages Sewing Chart Patterns (Programmed in Machine) Removing the embroidery frame 5 3 1 2 1. While holding the frame with both hands, pull the front of the hoop up to lift it out of the front pin. 2. Then pull the back of the hoop up to lift it out of the back pin. 3. Raise the presser foot lever, then pull frame out from under foot. 77 Patterns (Memory Card)
-
 1
1 -
2
-
3
-
4
-
5
-
6
-
7
-
8
-
9
-
10
-
11
-
12
-
13
-
14
-
15
-
16
-
17
-
18
-
19
-
20
-
21
-
22
-
23
-
24
-
25
-
26
-
27
-
28
-
29
-
30
-
31
-
32
-
33
-
34
-
35
-
36
-
37
-
38
-
39
-
40
-
41
-
42
-
43
-
44
-
45
-
46
-
47
-
48
-
49
-
50
-
51
-
52
-
53
-
54
-
55
-
56
-
57
-
58
-
59
-
60
-
61
-
62
-
63
-
64
-
65
-
66
-
67
-
68
-
69
-
70
-
71
-
72
-
73
-
74
-
 75
75 -
 76
76 -
 77
77 -
 78
78 -
 79
79 -
 80
80 -
 81
81 -
 82
82 -
 83
83 -
 84
84 -
 85
85 -
86
-
87
-
88
-
89
-
90
-
91
-
92
-
93
-
94
-
95
-
96
-
97
-
98
-
99
-
100
-
101
-
102
-
103
-
104
-
105
-
106
-
107
-
108
-
109
-
110
-
111
 |
 |