Brother International PE-300S Users Manual - English - Page 60
Side application
 |
View all Brother International PE-300S manuals
Add to My Manuals
Save this manual to your list of manuals |
Page 60 highlights
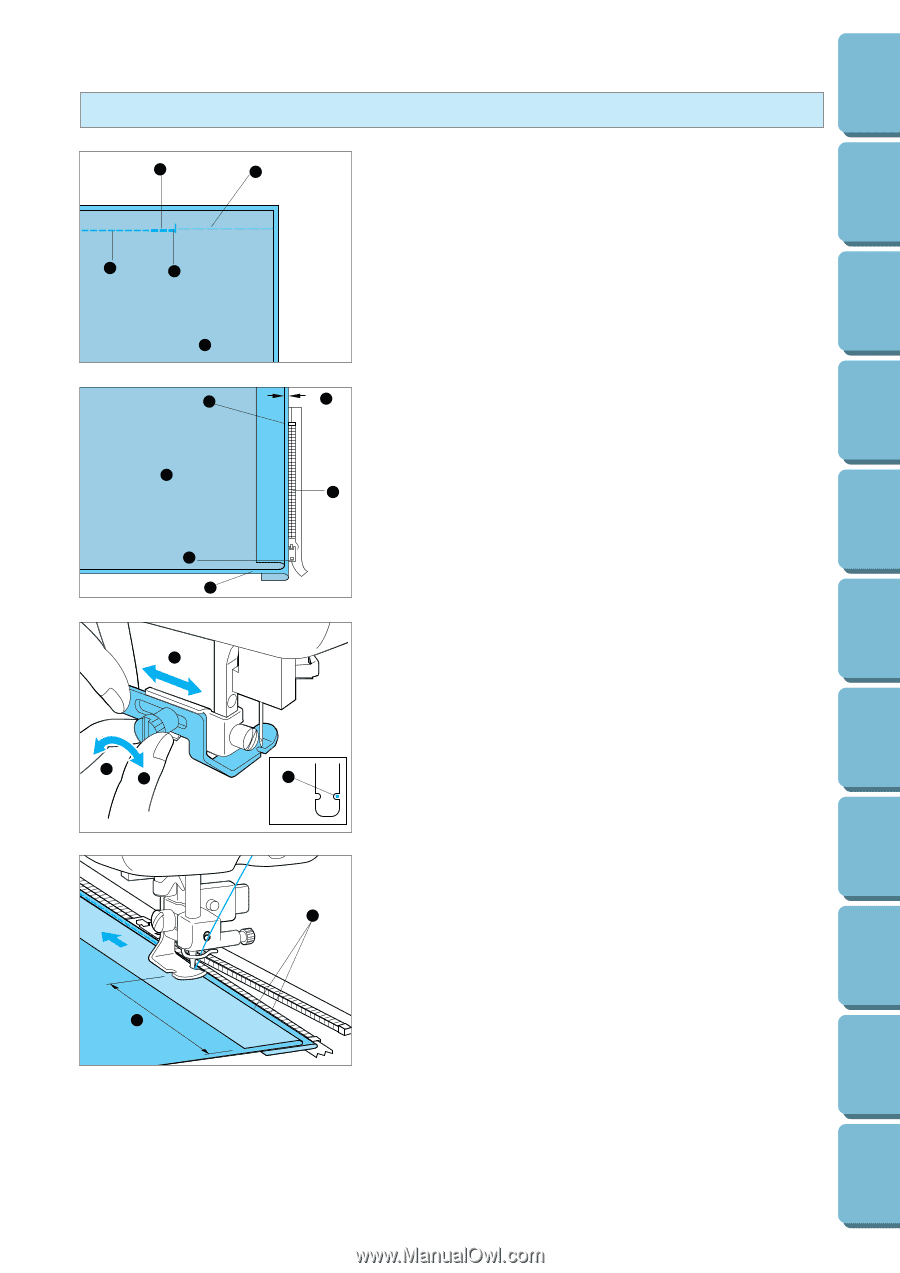
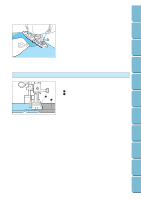
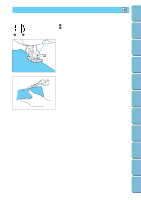
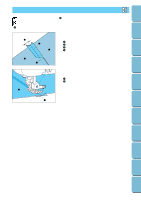
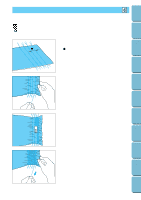
Contents Setting Up Basic Sewing Machine Operation Utility Stitches Embroidering Side application 1 2 5 3 4 1 5 2 6 3 4 1 2 3 4 1 2 Preparations: Attach presser foot "J" and sew straight stitches up to the crotch end. Change to a basting stitch and sew to the top of the fabric. 1 Reverse stitch 2 Basting stitch 3 Crotch end 4 Reverse side 5 Straight stitch 1. Press the seam allowance open and align the folded hem along the teeth of the zipper, while keeping 3 mm (1/8") for the sewing space. 1 Crotch end (Base of zipper) 2 Reverse side 3 Slider on head of zipper 4 Waist 5 Keep 3 mm (1/8") for sewing 6 Teeth of zipper 2. Attach I foot (see p. 32). Use the needle position adjustment knob on back of the foot to position the foot so the needle is positioned over the right groove of the foot as illustrated in diagram. (Adjust foot position so that needle is positioned over the left side of the foot when sewing to the right of the zipper, and to the right side of the foot when sewing to the left of the zipper.) 1 Left-Right 2 Loosen 3 Tighten 4 Needle drop point 3. Sew up from the base of the opening along the center of the 0.3cm space. Stop machine when you come to about 5cm from the top of the zipper, move the zipper slide out of your way, and continue sewing to the end of the zipper. 1 0.3 cm 2 5 cm Maintenance Troubleshooting Error Messages Sewing Chart Patterns (Programmed in Machine) Patterns (Memory Card) 57
-
 1
1 -
2
-
3
-
4
-
5
-
6
-
7
-
8
-
9
-
10
-
11
-
12
-
13
-
14
-
15
-
16
-
17
-
18
-
19
-
20
-
21
-
22
-
23
-
24
-
25
-
26
-
27
-
28
-
29
-
30
-
31
-
32
-
33
-
34
-
35
-
36
-
37
-
38
-
39
-
40
-
41
-
42
-
43
-
44
-
45
-
46
-
47
-
48
-
49
-
50
-
51
-
52
-
53
-
54
-
 55
55 -
 56
56 -
 57
57 -
 58
58 -
 59
59 -
 60
60 -
 61
61 -
 62
62 -
 63
63 -
 64
64 -
 65
65 -
66
-
67
-
68
-
69
-
70
-
71
-
72
-
73
-
74
-
75
-
76
-
77
-
78
-
79
-
80
-
81
-
82
-
83
-
84
-
85
-
86
-
87
-
88
-
89
-
90
-
91
-
92
-
93
-
94
-
95
-
96
-
97
-
98
-
99
-
100
-
101
-
102
-
103
-
104
-
105
-
106
-
107
-
108
-
109
-
110
-
111
 |
 |