Brother International PE-300S Users Manual - English - Page 23
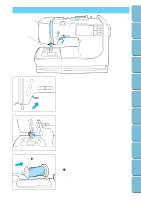
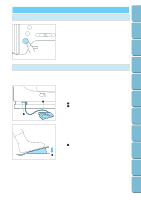
Upper Threading
 |
View all Brother International PE-300S manuals
Add to My Manuals
Save this manual to your list of manuals |
Page 23 highlights
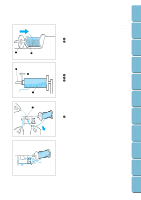
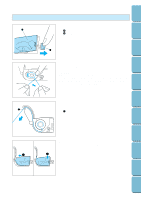
Contents Setting Up Basic Sewing Machine Operation Utility Stitches UPPER THREADING 4 3 6 1 5 h ª⁄ O y[W Ł y[W Lfl Ø 2 CAUTION Always make sure to thread the machine properly as shown in the directions. If the machine is not threaded properly, the thread could get stuck, needles could break and bodily injury could result. 1. Raise the presser foot using the presser foot lever. 2. Press the "NEEDLE POSITION" button to raise the needle to the up position. Embroidering Maintenance Troubleshooting Error Messages Sewing Chart Patterns (Programmed in Machine) 1 20 3. Set the thread spool. The thread end should come from the bottom front of the spool. The spool cap closest to the thread spool size should be used to hold the spool securely on the spool post. 1 Spool cap CAUTION While sewing and embroidering, be sure that the spool pin is pulled out and pushed toward the back of the sewing machine. Patterns (Memory Card)
-
 1
1 -
2
-
3
-
4
-
5
-
6
-
7
-
8
-
9
-
10
-
11
-
12
-
13
-
14
-
15
-
16
-
17
-
 18
18 -
 19
19 -
 20
20 -
 21
21 -
 22
22 -
 23
23 -
 24
24 -
 25
25 -
 26
26 -
 27
27 -
 28
28 -
29
-
30
-
31
-
32
-
33
-
34
-
35
-
36
-
37
-
38
-
39
-
40
-
41
-
42
-
43
-
44
-
45
-
46
-
47
-
48
-
49
-
50
-
51
-
52
-
53
-
54
-
55
-
56
-
57
-
58
-
59
-
60
-
61
-
62
-
63
-
64
-
65
-
66
-
67
-
68
-
69
-
70
-
71
-
72
-
73
-
74
-
75
-
76
-
77
-
78
-
79
-
80
-
81
-
82
-
83
-
84
-
85
-
86
-
87
-
88
-
89
-
90
-
91
-
92
-
93
-
94
-
95
-
96
-
97
-
98
-
99
-
100
-
101
-
102
-
103
-
104
-
105
-
106
-
107
-
108
-
109
-
110
-
111
 |
 |
