Brother International PE-300S Users Manual - English - Page 22
Setting the bobbin
 |
View all Brother International PE-300S manuals
Add to My Manuals
Save this manual to your list of manuals |
Page 22 highlights
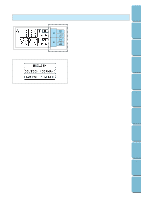
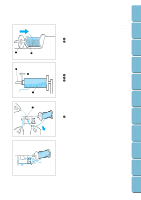
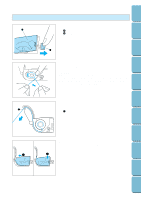
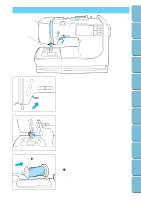
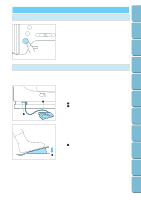
Contents Setting Up Basic Sewing Machine Operation Utility Stitches Embroidering Setting the bobbin 1 1. Slide open the bobbin cover. 1 Bobbin cover 2 Bobbin cover release button 2 2. Insert the bobbin into the shuttle with the thread direction as noted in the diagram. CAUTION Always make sure the bobbin is inserted so the thread feeds out of the bobbin in the correct direction. Setting the bobbin in backwards could result in poor bobbin tension, broken needles and possibly injury. 3. Guide the thread end through the slit, then pull the thread toward you to cut off any excess thread. 1 1 Built-in thread cutter 4. Close the bobbin cover by placing the left end in place and pressing down lightly on the right end so that it snaps into place. 1 2 * Sewing can begin without pulling out the bobbin thread. Maintenance Troubleshooting Error Messages Sewing Chart Patterns (Programmed in Machine) Patterns (Memory Card) 19
-
 1
1 -
2
-
3
-
4
-
5
-
6
-
7
-
8
-
9
-
10
-
11
-
12
-
13
-
14
-
15
-
16
-
 17
17 -
 18
18 -
 19
19 -
 20
20 -
 21
21 -
 22
22 -
 23
23 -
 24
24 -
 25
25 -
 26
26 -
 27
27 -
28
-
29
-
30
-
31
-
32
-
33
-
34
-
35
-
36
-
37
-
38
-
39
-
40
-
41
-
42
-
43
-
44
-
45
-
46
-
47
-
48
-
49
-
50
-
51
-
52
-
53
-
54
-
55
-
56
-
57
-
58
-
59
-
60
-
61
-
62
-
63
-
64
-
65
-
66
-
67
-
68
-
69
-
70
-
71
-
72
-
73
-
74
-
75
-
76
-
77
-
78
-
79
-
80
-
81
-
82
-
83
-
84
-
85
-
86
-
87
-
88
-
89
-
90
-
91
-
92
-
93
-
94
-
95
-
96
-
97
-
98
-
99
-
100
-
101
-
102
-
103
-
104
-
105
-
106
-
107
-
108
-
109
-
110
-
111
 |
 |
