Brother International PE-300S Users Manual - English - Page 54
Bar Tacking
 |
View all Brother International PE-300S manuals
Add to My Manuals
Save this manual to your list of manuals |
Page 54 highlights
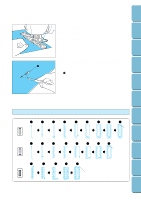
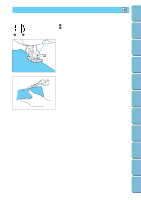
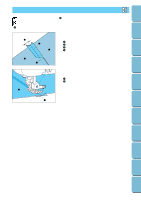
Contents Setting Up Basic Sewing Machine Operation Utility Stitches Embroidering BAR TACKING A Use for reinforcing the openings of pockets, etc. 1 Bar tack 1 3 1 1. Attach presser foot "A" and set the size by measuring the area to be bar tacked. 1 Scale 2 0.5 cm (13/64") 3 Length of bar tack 2 * 0.5 to 3 cm (13/64" to 1-3/16") is suitable for bar tacking. 0.5 to 1 cm (13/64" to 3/8") is the normal size. 2. Position the pocket as illustrated with the top of the pocket facing you. 5 3 CAUTION - After the presser foot lever has been lowered, set the presser foot so that there is no gap be- hind the section marked with an "A", otherwise the size of the stitch will not be correct. To do A this, push the presser foot towards the back of the machine as shown in the figure. - Pass the thread underneath the presser foot. 3. Check the first needle drop point and lower the presser foot. 1 2 mm (5/64") 1 5 4. Lower the buttonhole lever and position it behind the metal 3 bracket on the buttonhole foot. 1 Metal bracket on buttonhole foot Maintenance Troubleshooting Error Messages Sewing Chart Patterns (Programmed in Machine) Patterns (Memory Card) 1 51
-
 1
1 -
2
-
3
-
4
-
5
-
6
-
7
-
8
-
9
-
10
-
11
-
12
-
13
-
14
-
15
-
16
-
17
-
18
-
19
-
20
-
21
-
22
-
23
-
24
-
25
-
26
-
27
-
28
-
29
-
30
-
31
-
32
-
33
-
34
-
35
-
36
-
37
-
38
-
39
-
40
-
41
-
42
-
43
-
44
-
45
-
46
-
47
-
48
-
 49
49 -
 50
50 -
 51
51 -
 52
52 -
 53
53 -
 54
54 -
 55
55 -
 56
56 -
 57
57 -
 58
58 -
 59
59 -
60
-
61
-
62
-
63
-
64
-
65
-
66
-
67
-
68
-
69
-
70
-
71
-
72
-
73
-
74
-
75
-
76
-
77
-
78
-
79
-
80
-
81
-
82
-
83
-
84
-
85
-
86
-
87
-
88
-
89
-
90
-
91
-
92
-
93
-
94
-
95
-
96
-
97
-
98
-
99
-
100
-
101
-
102
-
103
-
104
-
105
-
106
-
107
-
108
-
109
-
110
-
111
 |
 |