Brother International PE-300S Users Manual - English - Page 63
Button Sewing
 |
View all Brother International PE-300S manuals
Add to My Manuals
Save this manual to your list of manuals |
Page 63 highlights
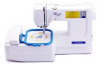
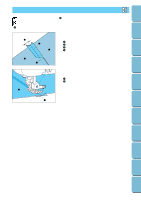
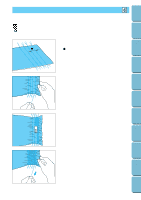
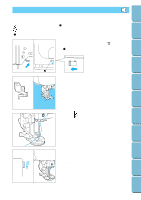
Contents Setting Up Basic Sewing Machine Operation BUTTON SEWING (Option) M Caution Before starting always turn the hand wheel to check to make sure the needle isn't hitting the button. If the needle hits the button while sewing, it could break and cause injury. 1 Zig zag 1 1. Raise the presser foot lever and slide the feed dog adjustment lever to the right to lower the feed dog. ( ) 1 Feed dog adjustment lever 1 2. Attach button sew-on foot (sold separately). Utility Stitches Embroidering Maintenance Troubleshooting Error Messages Sewing Chart 3. Select the . Place the button under the presser foot. Match up needle position with button holes. Lower the foot. 4. Turn the hand wheel slowly to make sure the needle enters the button holes without hitting the button. Sew about ten stitches and you're ready for the next button. CAUTION Adjust stitch width if needle doesn't pass through both button holes. 60 Patterns (Programmed in Machine) Patterns (Memory Card)
-
 1
1 -
2
-
3
-
4
-
5
-
6
-
7
-
8
-
9
-
10
-
11
-
12
-
13
-
14
-
15
-
16
-
17
-
18
-
19
-
20
-
21
-
22
-
23
-
24
-
25
-
26
-
27
-
28
-
29
-
30
-
31
-
32
-
33
-
34
-
35
-
36
-
37
-
38
-
39
-
40
-
41
-
42
-
43
-
44
-
45
-
46
-
47
-
48
-
49
-
50
-
51
-
52
-
53
-
54
-
55
-
56
-
57
-
 58
58 -
 59
59 -
 60
60 -
 61
61 -
 62
62 -
 63
63 -
 64
64 -
 65
65 -
 66
66 -
 67
67 -
 68
68 -
69
-
70
-
71
-
72
-
73
-
74
-
75
-
76
-
77
-
78
-
79
-
80
-
81
-
82
-
83
-
84
-
85
-
86
-
87
-
88
-
89
-
90
-
91
-
92
-
93
-
94
-
95
-
96
-
97
-
98
-
99
-
100
-
101
-
102
-
103
-
104
-
105
-
106
-
107
-
108
-
109
-
110
-
111
 |
 |