Brother International SE-270D Users Manual - English - Page 112
Shell tuck stitching
 |
View all Brother International SE-270D manuals
Add to My Manuals
Save this manual to your list of manuals |
Page 112 highlights
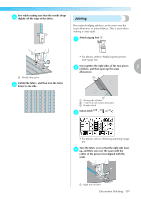
UTILITY STITCHES Select stitch 25 , 26 or 27 . e Shell tuck stitching • For details, refer to "Selecting stitching" (page 45). Stitch between the straight stitches. f The gathers that look like shells are called "shell tucks". They are used to decorate trims, the front of blouses or cuffs made of thin fabrics. Fold the fabric along the bias. a Attach zigzag foot "J". b J Pull out the threads for the straight stitches. g • For details, refer to "Replacing the presser foot" (page 38). Select stitch 20 , and then increase the thread c tension. • For details, refer to "Selecting stitching" (page 45) and "Changing the upper thread tension" (page 53). 106
-
 1
1 -
2
-
3
-
4
-
5
-
6
-
7
-
8
-
9
-
10
-
11
-
12
-
13
-
14
-
15
-
16
-
17
-
18
-
19
-
20
-
21
-
22
-
23
-
24
-
25
-
26
-
27
-
28
-
29
-
30
-
31
-
32
-
33
-
34
-
35
-
36
-
37
-
38
-
39
-
40
-
41
-
42
-
43
-
44
-
45
-
46
-
47
-
48
-
49
-
50
-
51
-
52
-
53
-
54
-
55
-
56
-
57
-
58
-
59
-
60
-
61
-
62
-
63
-
64
-
65
-
66
-
67
-
68
-
69
-
70
-
71
-
72
-
73
-
74
-
75
-
76
-
77
-
78
-
79
-
80
-
81
-
82
-
83
-
84
-
85
-
86
-
87
-
88
-
89
-
90
-
91
-
92
-
93
-
94
-
95
-
96
-
97
-
98
-
99
-
100
-
101
-
102
-
103
-
104
-
105
-
106
-
 107
107 -
 108
108 -
 109
109 -
 110
110 -
 111
111 -
 112
112 -
 113
113 -
 114
114 -
 115
115 -
 116
116 -
 117
117 -
118
-
119
-
120
-
121
-
122
-
123
-
124
-
125
-
126
-
127
-
128
-
129
-
130
-
131
-
132
-
133
-
134
-
135
-
136
-
137
-
138
-
139
-
140
-
141
-
142
-
143
-
144
-
145
-
146
-
147
-
148
-
149
-
150
-
151
-
152
-
153
-
154
-
155
-
156
-
157
-
158
-
159
-
160
-
161
-
162
-
163
-
164
-
165
-
166
 |
 |
106
UTILITY STITCHES
— — — — — — — — — — — — — — — — — — — — — — — — — — — — — — — — — — — — — — — — — — —
e
Select stitch
25
,
26
or
27
.
• For details, refer to "Selecting stitching" (page
45).
f
Stitch between the straight stitches.
g
Pull out the threads for the straight stitches.
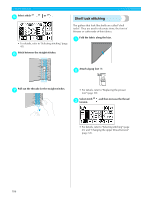
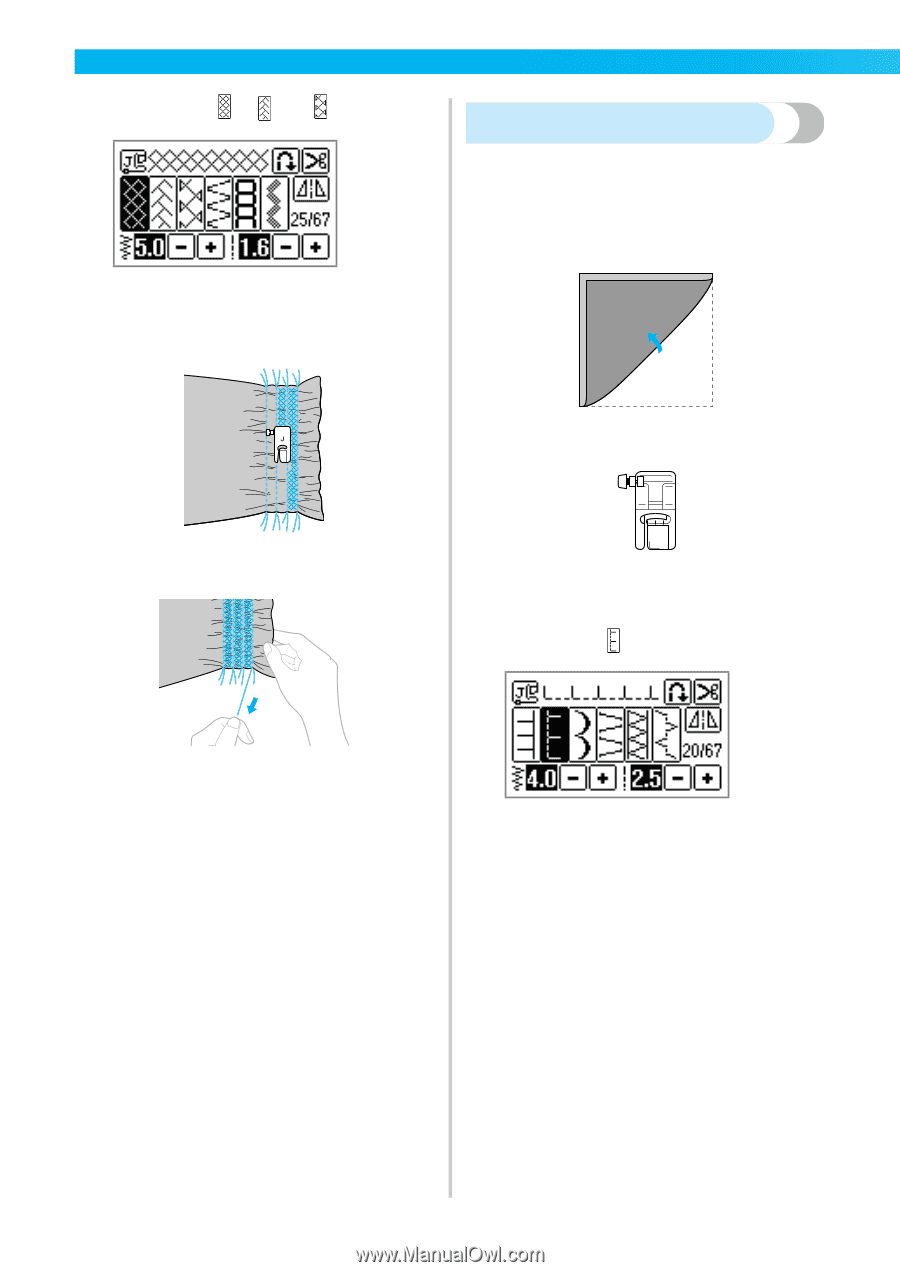
Shell tuck stitching
The gathers that look like shells are called "shell
tucks". They are used to decorate trims, the front of
blouses or cuffs made of thin fabrics.
a
Fold the fabric along the bias.
b
Attach zigzag foot "J".
• For details, refer to "Replacing the presser
foot" (page 38).
c
Select stitch
20
, and then increase the thread
tension.
• For details, refer to "Selecting stitching" (page
45) and "Changing the upper thread tension"
(page 53).
J