Brother International SE-270D Users Manual - English - Page 18
LCD liquid crystal display operation
 |
View all Brother International SE-270D manuals
Add to My Manuals
Save this manual to your list of manuals |
Page 18 highlights
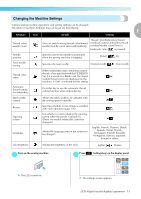
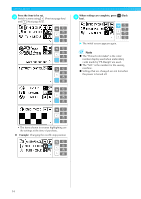
GETTING READY LCD (liquid crystal display) operation Selected stitch, pattern settings and messages are displayed on the LCD (liquid crystal display) on the front of the sewing machine. Viewing the LCD When the power is turned on, the LCD comes on, and the following screen is displayed. The LCD display is changed using the keys on the right, and operations performed by directly touching the LCD. If it is difficult to press the buttons on the LCD by hand, you can use the touch pen to operate the LCD display. ■ Utility stitch selection screen 1 6 2 7 3 4 5 a Selected stitch b Presser foot to be used c Stitches d Stitch width (mm) e Stitch length (mm) f Automatic reverse/reinforcement g Automatic thread cutting h Horizontal mirror image key i Number of stitches in group j Number of the selected stitch k Increase value l Decrease value 8 9 0 A B Memo z A different screen is displayed when the embroidery unit is attached. z Refer to "Error messages" (page 153) for messages displayed on the LCD. z Depending on the model of sewing machine, an animation may be displayed when the power is turned on. When an animation is displayed, the screen above will be displayed if you touch the LCD with your finger. 12
-
 1
1 -
2
-
3
-
4
-
5
-
6
-
7
-
8
-
9
-
10
-
11
-
12
-
 13
13 -
 14
14 -
 15
15 -
 16
16 -
 17
17 -
 18
18 -
 19
19 -
 20
20 -
 21
21 -
 22
22 -
 23
23 -
24
-
25
-
26
-
27
-
28
-
29
-
30
-
31
-
32
-
33
-
34
-
35
-
36
-
37
-
38
-
39
-
40
-
41
-
42
-
43
-
44
-
45
-
46
-
47
-
48
-
49
-
50
-
51
-
52
-
53
-
54
-
55
-
56
-
57
-
58
-
59
-
60
-
61
-
62
-
63
-
64
-
65
-
66
-
67
-
68
-
69
-
70
-
71
-
72
-
73
-
74
-
75
-
76
-
77
-
78
-
79
-
80
-
81
-
82
-
83
-
84
-
85
-
86
-
87
-
88
-
89
-
90
-
91
-
92
-
93
-
94
-
95
-
96
-
97
-
98
-
99
-
100
-
101
-
102
-
103
-
104
-
105
-
106
-
107
-
108
-
109
-
110
-
111
-
112
-
113
-
114
-
115
-
116
-
117
-
118
-
119
-
120
-
121
-
122
-
123
-
124
-
125
-
126
-
127
-
128
-
129
-
130
-
131
-
132
-
133
-
134
-
135
-
136
-
137
-
138
-
139
-
140
-
141
-
142
-
143
-
144
-
145
-
146
-
147
-
148
-
149
-
150
-
151
-
152
-
153
-
154
-
155
-
156
-
157
-
158
-
159
-
160
-
161
-
162
-
163
-
164
-
165
-
166
 |
 |