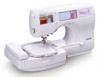
Brother International SE-270D Users Manual - English - Page 51
Selecting stitching
 |
View all Brother International SE-270D manuals
Add to My Manuals
Save this manual to your list of manuals |
Page 51 highlights
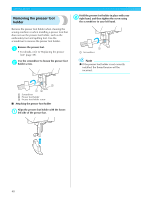
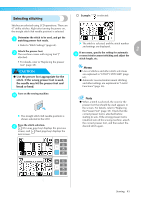
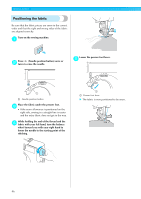
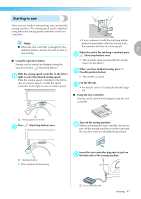
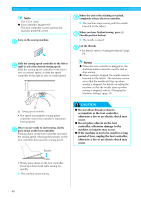
Selecting stitching † Example: 11 is selected: Stitches are selected using LCD operations. There are 67 utility stitches. Right after turning the power on, the straight stitch (left needle position) is selected. Determine the stitch to be used, and get the a matching presser foot ready. • Refer to "Stitch Settings" (page 64). Attach the presser foot. b The machine comes with zigzag foot "J" attached. • For details, refer to "Replacing the presser foot" (page 38). CAUTION ● Use the presser foot appropriate for the stitch. If the wrong presser foot is used, the needle may hit the presser foot and break or bend. X The stitch is selected, and the stitch number and settings are displayed. 2 If necessary, specify the setting for automatic e reverse/reinforcement stitching and adjust the stitch length, etc. Memo z Uses of stitches and other stitch selections are explained in "UTILITY STITCHES" (page 63). z Automatic reverse/reinforcement stitching and other settings are explained in "Useful Functions" (page 56). Turn on the sewing machine. c X The straight stitch (left needle position) is shown selected in the LCD. Press the stitch selection. d (Previous page key) displays the previous screen, and (Next page key) displays the next screen. Note z When a stitch is selected, the icon for the presser foot that should be used appears in the screen. For details, refer to "Replacing the Presser Foot" (page 38). Check that the correct presser foot is attached before starting to sew. If the wrong presser foot is installed, turn off the sewing machine, attach the correct presser foot, and then select the desired stitch again. Sewing 45
-
 1
1 -
2
-
3
-
4
-
5
-
6
-
7
-
8
-
9
-
10
-
11
-
12
-
13
-
14
-
15
-
16
-
17
-
18
-
19
-
20
-
21
-
22
-
23
-
24
-
25
-
26
-
27
-
28
-
29
-
30
-
31
-
32
-
33
-
34
-
35
-
36
-
37
-
38
-
39
-
40
-
41
-
42
-
43
-
44
-
45
-
 46
46 -
 47
47 -
 48
48 -
 49
49 -
 50
50 -
 51
51 -
 52
52 -
 53
53 -
 54
54 -
 55
55 -
 56
56 -
57
-
58
-
59
-
60
-
61
-
62
-
63
-
64
-
65
-
66
-
67
-
68
-
69
-
70
-
71
-
72
-
73
-
74
-
75
-
76
-
77
-
78
-
79
-
80
-
81
-
82
-
83
-
84
-
85
-
86
-
87
-
88
-
89
-
90
-
91
-
92
-
93
-
94
-
95
-
96
-
97
-
98
-
99
-
100
-
101
-
102
-
103
-
104
-
105
-
106
-
107
-
108
-
109
-
110
-
111
-
112
-
113
-
114
-
115
-
116
-
117
-
118
-
119
-
120
-
121
-
122
-
123
-
124
-
125
-
126
-
127
-
128
-
129
-
130
-
131
-
132
-
133
-
134
-
135
-
136
-
137
-
138
-
139
-
140
-
141
-
142
-
143
-
144
-
145
-
146
-
147
-
148
-
149
-
150
-
151
-
152
-
153
-
154
-
155
-
156
-
157
-
158
-
159
-
160
-
161
-
162
-
163
-
164
-
165
-
166
 |
 |
