Brother International SE-270D Users Manual - English - Page 30
If the spool or the spool cap is not, positioned correctly, the thread may, become tangled around - thread cassette
 |
View all Brother International SE-270D manuals
Add to My Manuals
Save this manual to your list of manuals |
Page 30 highlights
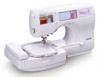
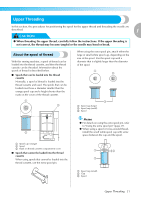
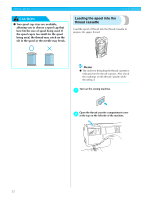
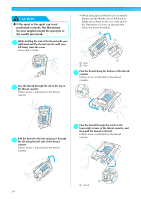
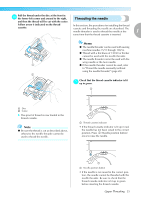
GETTING READY CAUTION ● If the spool or the spool cap is not positioned correctly, the thread may become tangled around the spool pin or the needle may break. While holding the end of the thread with your h right hand and the thread cassette with your left hand, close the cover. Close until it clicks. • When using special thread such as metallic thread, use the thumb of your left hand to lightly press down on the area indicated in the illustration to create an opening that allows for easier threading. 1 Pass the thread through the slit in the top of i the thread cassette. Follow arrow 2 indicated on the thread cassette. 2 a Push b Gap Pass the thread along the bottom of the thread k cassette. Follow arrow 4 indicated on the thread cassette. Pull the thread to the left and pass it through j the slit along the left side of the thread cassette. Follow arrow 3 indicated on the thread cassette. Pass the thread through the notch in the l lower-right corner of the thread cassette, and then pull the thread to the left. Follow arrow 5 indicated on the thread cassette. 1 a Notch 24
-
 1
1 -
2
-
3
-
4
-
5
-
6
-
7
-
8
-
9
-
10
-
11
-
12
-
13
-
14
-
15
-
16
-
17
-
18
-
19
-
20
-
21
-
22
-
23
-
24
-
 25
25 -
 26
26 -
 27
27 -
 28
28 -
 29
29 -
 30
30 -
 31
31 -
 32
32 -
 33
33 -
 34
34 -
 35
35 -
36
-
37
-
38
-
39
-
40
-
41
-
42
-
43
-
44
-
45
-
46
-
47
-
48
-
49
-
50
-
51
-
52
-
53
-
54
-
55
-
56
-
57
-
58
-
59
-
60
-
61
-
62
-
63
-
64
-
65
-
66
-
67
-
68
-
69
-
70
-
71
-
72
-
73
-
74
-
75
-
76
-
77
-
78
-
79
-
80
-
81
-
82
-
83
-
84
-
85
-
86
-
87
-
88
-
89
-
90
-
91
-
92
-
93
-
94
-
95
-
96
-
97
-
98
-
99
-
100
-
101
-
102
-
103
-
104
-
105
-
106
-
107
-
108
-
109
-
110
-
111
-
112
-
113
-
114
-
115
-
116
-
117
-
118
-
119
-
120
-
121
-
122
-
123
-
124
-
125
-
126
-
127
-
128
-
129
-
130
-
131
-
132
-
133
-
134
-
135
-
136
-
137
-
138
-
139
-
140
-
141
-
142
-
143
-
144
-
145
-
146
-
147
-
148
-
149
-
150
-
151
-
152
-
153
-
154
-
155
-
156
-
157
-
158
-
159
-
160
-
161
-
162
-
163
-
164
-
165
-
166
 |
 |