Brother International SE-270D Users Manual - English - Page 132
Attaching the embroidery frame
 |
View all Brother International SE-270D manuals
Add to My Manuals
Save this manual to your list of manuals |
Page 132 highlights
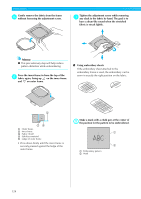
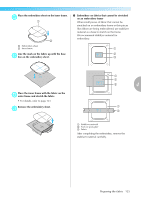
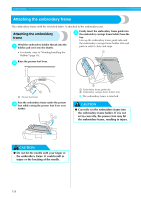
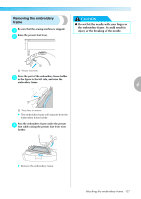
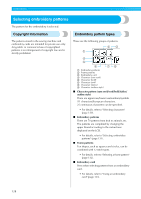
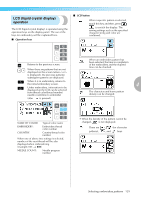
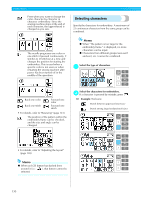
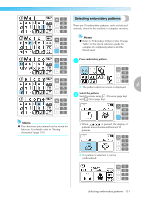
EMBROIDERY Attaching the embroidery frame The embroidery frame with the stretched fabric is attached to the embroidery unit. Attaching the embroidery frame Wind the embroidery bobbin thread onto the a bobbin and set it into the shuttle. • For details, refer to "Winding/Installing the Bobbin" (page 16). Firmly insert the embroidery frame guide into d the embroidery carriage frame holder from the top. Line up the embroidery frame guide tabs and the embroidery carriage frame holder slots and push in until it clicks and stops. 1 Raise the presser foot lever. b 1 a Presser foot lever Pass the embroidery frame under the presser c foot while raising the presser foot lever even further. 2 a Embroidery frame guide tabs b Embroidery carriage frame holder slots X The embroidery frame is attached. CAUTION ● Correctly set the embroidery frame into the embroidery frame holder. If it is not set in correctly, the presser foot may hit the embroidery frame, resulting in injury. CAUTION ● Do not hit the needle with your finger or the embroidery frame. It could result in injury or the breaking of the needle. 126
-
 1
1 -
2
-
3
-
4
-
5
-
6
-
7
-
8
-
9
-
10
-
11
-
12
-
13
-
14
-
15
-
16
-
17
-
18
-
19
-
20
-
21
-
22
-
23
-
24
-
25
-
26
-
27
-
28
-
29
-
30
-
31
-
32
-
33
-
34
-
35
-
36
-
37
-
38
-
39
-
40
-
41
-
42
-
43
-
44
-
45
-
46
-
47
-
48
-
49
-
50
-
51
-
52
-
53
-
54
-
55
-
56
-
57
-
58
-
59
-
60
-
61
-
62
-
63
-
64
-
65
-
66
-
67
-
68
-
69
-
70
-
71
-
72
-
73
-
74
-
75
-
76
-
77
-
78
-
79
-
80
-
81
-
82
-
83
-
84
-
85
-
86
-
87
-
88
-
89
-
90
-
91
-
92
-
93
-
94
-
95
-
96
-
97
-
98
-
99
-
100
-
101
-
102
-
103
-
104
-
105
-
106
-
107
-
108
-
109
-
110
-
111
-
112
-
113
-
114
-
115
-
116
-
117
-
118
-
119
-
120
-
121
-
122
-
123
-
124
-
125
-
126
-
 127
127 -
 128
128 -
 129
129 -
 130
130 -
 131
131 -
 132
132 -
 133
133 -
 134
134 -
 135
135 -
 136
136 -
 137
137 -
138
-
139
-
140
-
141
-
142
-
143
-
144
-
145
-
146
-
147
-
148
-
149
-
150
-
151
-
152
-
153
-
154
-
155
-
156
-
157
-
158
-
159
-
160
-
161
-
162
-
163
-
164
-
165
-
166
 |
 |
