Brother International SE-270D Users Manual - English - Page 124
Attaching the embroidery unit - embroidery machines flap
 |
View all Brother International SE-270D manuals
Add to My Manuals
Save this manual to your list of manuals |
Page 124 highlights
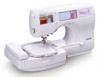
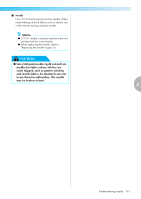
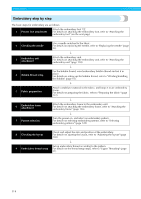
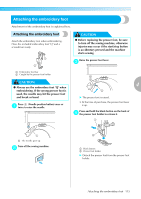
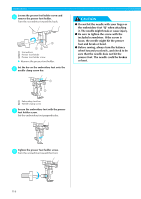
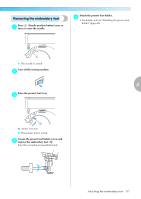
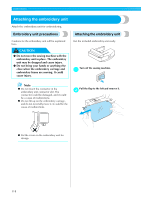
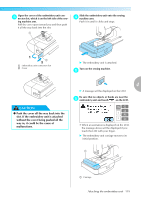
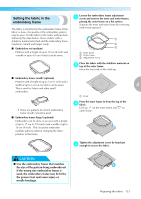
EMBROIDERY Attaching the embroidery unit Attach the embroidery unit for embroidering. Embroidery unit precautions Attaching the embroidery unit Cautions for the embroidery unit will be explained here. CAUTION ● Do not move the sewing machine with the embroidery unit in place. The embroidery unit may be dropped and cause injury. ● Do not bring your hands or anything else close when the embroidery carriage and embroidery frame are moving. It could cause injury. Get the included embroidery unit ready. Turn off the sewing machine. a Note z Do not touch the connector in the embroidery unit connector slot. The connector could be damaged, and it could be a cause of malfunctions. z Do not lift up on the embroidery carriage, and do not forcefully move it. It could be the cause of malfunctions. Pull the flap to the left and remove it. b z Put the cover on the embroidery unit for storage. 118
-
 1
1 -
2
-
3
-
4
-
5
-
6
-
7
-
8
-
9
-
10
-
11
-
12
-
13
-
14
-
15
-
16
-
17
-
18
-
19
-
20
-
21
-
22
-
23
-
24
-
25
-
26
-
27
-
28
-
29
-
30
-
31
-
32
-
33
-
34
-
35
-
36
-
37
-
38
-
39
-
40
-
41
-
42
-
43
-
44
-
45
-
46
-
47
-
48
-
49
-
50
-
51
-
52
-
53
-
54
-
55
-
56
-
57
-
58
-
59
-
60
-
61
-
62
-
63
-
64
-
65
-
66
-
67
-
68
-
69
-
70
-
71
-
72
-
73
-
74
-
75
-
76
-
77
-
78
-
79
-
80
-
81
-
82
-
83
-
84
-
85
-
86
-
87
-
88
-
89
-
90
-
91
-
92
-
93
-
94
-
95
-
96
-
97
-
98
-
99
-
100
-
101
-
102
-
103
-
104
-
105
-
106
-
107
-
108
-
109
-
110
-
111
-
112
-
113
-
114
-
115
-
116
-
117
-
118
-
 119
119 -
 120
120 -
 121
121 -
 122
122 -
 123
123 -
 124
124 -
 125
125 -
 126
126 -
 127
127 -
 128
128 -
 129
129 -
130
-
131
-
132
-
133
-
134
-
135
-
136
-
137
-
138
-
139
-
140
-
141
-
142
-
143
-
144
-
145
-
146
-
147
-
148
-
149
-
150
-
151
-
152
-
153
-
154
-
155
-
156
-
157
-
158
-
159
-
160
-
161
-
162
-
163
-
164
-
165
-
166
 |
 |