Canon EOS Digital Rebel XTi EF-S 18-55 Kit User Manual - Page 79
Parameters Settings and Effects
 |
View all Canon EOS Digital Rebel XTi EF-S 18-55 Kit manuals
Add to My Manuals
Save this manual to your list of manuals |
Page 79 highlights
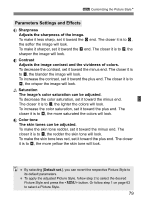
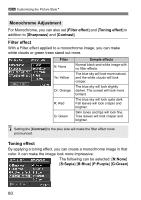
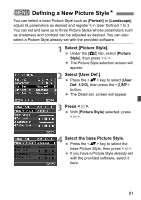
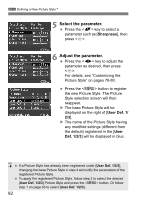
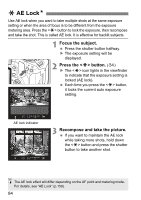
3 Customizing the Picture StyleN Parameters Settings and Effects Sharpness Adjusts the sharpness of the image. To make it less sharp, set it toward the E end. The closer it is to E, the softer the image will look. To make it sharper, set it toward the F end. The closer it is to F, the sharper the image will look. Contrast Adjusts the image contrast and the vividness of colors. To decrease the contrast, set it toward the minus end. The closer it is to G, the blander the image will look. To increase the contrast, set it toward the plus end. The closer it is to H, the crisper the image will look. Saturation The image's color saturation can be adjusted. To decrease the color saturation, set it toward the minus end. The closer it is to G, the lighter the colors will look. To increase the color saturation, set it toward the plus end. The closer it is to H, the more saturated the colors will look. Color tone The skin tones can be adjusted. To make the skin tone redder, set it toward the minus end. The closer it is to G, the redder the skin tone will look. To make the skin tone less red, set it toward the plus end. The closer it is to H, the more yellow the skin tone will look. By selecting [Default set.], you can revert the respective Picture Style to its default parameters. To apply the adjusted Picture Style, follow step 2 to select the desired Picture Style and press the button. Or follow step 1 on page 63 to select a Picture Style. 79
-
 1
1 -
2
-
3
-
4
-
5
-
6
-
7
-
8
-
9
-
10
-
11
-
12
-
13
-
14
-
15
-
16
-
17
-
18
-
19
-
20
-
21
-
22
-
23
-
24
-
25
-
26
-
27
-
28
-
29
-
30
-
31
-
32
-
33
-
34
-
35
-
36
-
37
-
38
-
39
-
40
-
41
-
42
-
43
-
44
-
45
-
46
-
47
-
48
-
49
-
50
-
51
-
52
-
53
-
54
-
55
-
56
-
57
-
58
-
59
-
60
-
61
-
62
-
63
-
64
-
65
-
66
-
67
-
68
-
69
-
70
-
71
-
72
-
73
-
 74
74 -
 75
75 -
 76
76 -
 77
77 -
 78
78 -
 79
79 -
 80
80 -
 81
81 -
 82
82 -
 83
83 -
 84
84 -
85
-
86
-
87
-
88
-
89
-
90
-
91
-
92
-
93
-
94
-
95
-
96
-
97
-
98
-
99
-
100
-
101
-
102
-
103
-
104
-
105
-
106
-
107
-
108
-
109
-
110
-
111
-
112
-
113
-
114
-
115
-
116
-
117
-
118
-
119
-
120
-
121
-
122
-
123
-
124
-
125
-
126
-
127
-
128
-
129
-
130
-
131
-
132
-
133
-
134
-
135
-
136
-
137
-
138
-
139
-
140
-
141
-
142
-
143
-
144
-
145
-
146
-
147
-
148
-
149
-
150
-
151
-
152
-
153
-
154
-
155
-
156
-
157
-
158
-
159
-
160
-
161
-
162
-
163
-
164
-
165
-
166
-
167
-
168
-
169
-
170
-
171
-
172
-
173
-
174
-
175
-
176
-
177
-
178
-
179
-
180
 |
 |