Dell Inspiron 1545 Dell™ Technology Guide - Page 89
Define a New Array, RAID Mode, Striping, Mirroring, Free Disks, Array Disks, Clear disk data - bios
 |
View all Dell Inspiron 1545 manuals
Add to My Manuals
Save this manual to your list of manuals |
Page 89 highlights
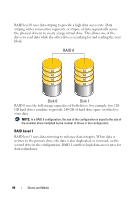
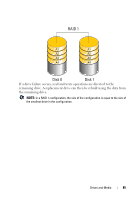
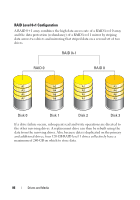
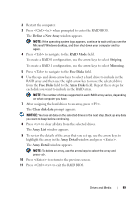
2 Restart the computer. 3 Press when prompted to enter the RAID BIOS. The Define a New Array window appears. NOTE: If the operating system logo appears, continue to wait until you see the Microsoft Windows desktop, and then shut down your computer and try again. 4 Press to navigate to the RAID Mode field. To create a RAID 0 configuration, use the arrow keys to select Striping. To create a RAID 1 configuration, use the arrow keys to select Mirroring. 5 Press to navigate to the Free Disks field. 6 Use the up- and down-arrow keys to select a hard drive to include in the RAID array and then use the right-arrow key to move the selected drive from the Free Disks field to the Array Disks field. Repeat these steps for each disk you want to include in the RAID array. NOTE: The number of drives supported in each RAID array varies, depending on what computer you have. 7 After assigning the hard drives to an array, press . The Clear disk data prompt appears. NOTICE: You lose all data on the selected drives in the next step. Back up any data you want to keep before continuing. 8 Press to clear all data from the selected drives. The Array List window appears. 9 To review the details of the array that you set up, use the arrow keys to highlight the array in the Array Detail window and press . The Array Detail window appears. NOTE: To delete an array, use the arrow keys to select the array and press . 10 Press to return to the previous screen. 11 Press to exit the RAID BIOS. Drives and Media 89
-
 1
1 -
2
-
3
-
4
-
5
-
6
-
7
-
8
-
9
-
10
-
11
-
12
-
13
-
14
-
15
-
16
-
17
-
18
-
19
-
20
-
21
-
22
-
23
-
24
-
25
-
26
-
27
-
28
-
29
-
30
-
31
-
32
-
33
-
34
-
35
-
36
-
37
-
38
-
39
-
40
-
41
-
42
-
43
-
44
-
45
-
46
-
47
-
48
-
49
-
50
-
51
-
52
-
53
-
54
-
55
-
56
-
57
-
58
-
59
-
60
-
61
-
62
-
63
-
64
-
65
-
66
-
67
-
68
-
69
-
70
-
71
-
72
-
73
-
74
-
75
-
76
-
77
-
78
-
79
-
80
-
81
-
82
-
83
-
 84
84 -
 85
85 -
 86
86 -
 87
87 -
 88
88 -
 89
89 -
 90
90 -
 91
91 -
 92
92 -
 93
93 -
 94
94 -
95
-
96
-
97
-
98
-
99
-
100
-
101
-
102
-
103
-
104
-
105
-
106
-
107
-
108
-
109
-
110
-
111
-
112
-
113
-
114
-
115
-
116
-
117
-
118
-
119
-
120
-
121
-
122
-
123
-
124
-
125
-
126
-
127
-
128
-
129
-
130
-
131
-
132
-
133
-
134
-
135
-
136
-
137
-
138
-
139
-
140
-
141
-
142
-
143
-
144
-
145
-
146
-
147
-
148
-
149
-
150
-
151
-
152
-
153
-
154
-
155
-
156
-
157
-
158
-
159
-
160
-
161
-
162
-
163
-
164
-
165
-
166
-
167
-
168
-
169
-
170
-
171
-
172
-
173
-
174
-
175
-
176
-
177
-
178
-
179
-
180
-
181
-
182
-
183
-
184
-
185
-
186
-
187
-
188
-
189
-
190
-
191
-
192
-
193
-
194
-
195
-
196
-
197
-
198
-
199
-
200
-
201
-
202
-
203
-
204
-
205
-
206
-
207
-
208
-
209
-
210
-
211
-
212
-
213
-
214
-
215
-
216
-
217
-
218
-
219
-
220
-
221
-
222
-
223
-
224
-
225
-
226
-
227
-
228
-
229
-
230
-
231
-
232
-
233
-
234
-
235
-
236
-
237
-
238
-
239
-
240
-
241
-
242
-
243
-
244
-
245
-
246
-
247
-
248
-
249
-
250
-
251
-
252
-
253
-
254
-
255
-
256
-
257
-
258
-
259
-
260
-
261
-
262
-
263
-
264
-
265
-
266
-
267
-
268
-
269
-
270
-
271
-
272
-
273
-
274
-
275
-
276
-
277
-
278
-
279
-
280
-
281
-
282
-
283
-
284
-
285
-
286
-
287
-
288
-
289
-
290
-
291
-
292
-
293
-
294
-
295
-
296
-
297
-
298
-
299
-
300
-
301
-
302
-
303
-
304
-
305
-
306
-
307
-
308
-
309
-
310
-
311
-
312
-
313
-
314
-
315
-
316
-
317
-
318
-
319
-
320
-
321
-
322
-
323
-
324
-
325
-
326
-
327
-
328
-
329
-
330
-
331
-
332
-
333
-
334
-
335
-
336
-
337
-
338
-
339
-
340
-
341
-
342
-
343
-
344
-
345
-
346
-
347
-
348
-
349
-
350
-
351
-
352
-
353
-
354
 |
 |